Hubbry Logo
Operation TungstenOperation TungstenMain
Open search
Operation Tungsten
Community hub
Operation Tungsten
logo
8 pages, 0 posts
0 subscribers
Be the first to start a discussion here.
Operation Tungsten
Operation Tungsten
from Wikipedia

Operation Tungsten
Part of the Second World War
Black and white photograph of a man wearing military uniform crouching under an aircraft. He is holding a piece of chalk in his hand, and is posing next to a bomb which is fixed to the bottom of the aircraft on which "Tirpitz it's yours" has been written.
A Fleet Air Arm crewman chalks a message on the 1,600-pound bomb carried by a Fairey Barracuda of HMS Furious
Date3 April 1944
Location
Kaafjord, Norway
Result British victory
Belligerents
 Germany
Commanders and leaders
United Kingdom Henry Moore Nazi Germany Hans Meyer
Strength
  • 40 dive bombers
  • 80 fighters
  • Battleship Tirpitz
  • Anti-aircraft batteries
  • Ships
Casualties and losses
  • 9 killed
  • 4 aircraft lost
  • 123 killed
  • 329 wounded
  • Tirpitz and 5 other vessels damaged

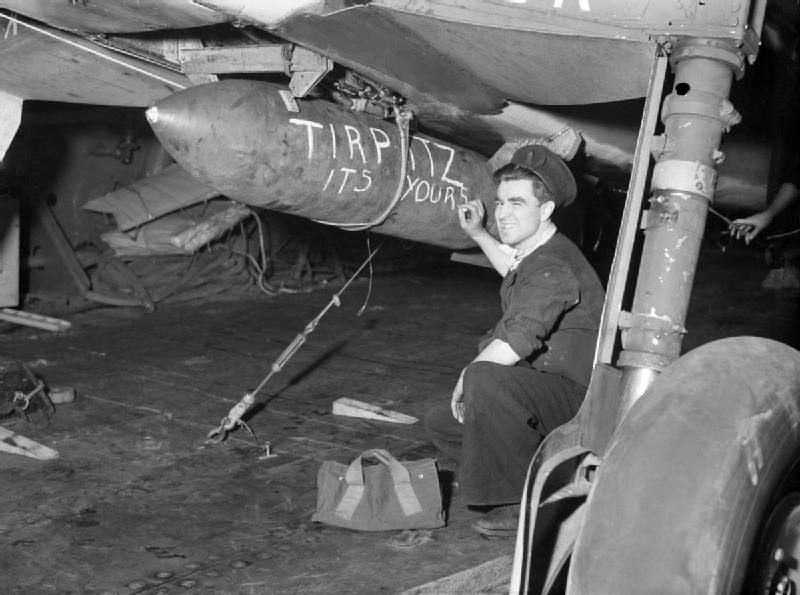
Operation Tungsten was a Second World War air raid by the Fleet Air Arm of the Royal Navy against the German battleship Tirpitz. The operation sought to damage or destroy Tirpitz at her base in Kaafjord in the far north of Norway before she could become fully operational again following a period of repairs.

The British decision to strike Kaafjord was motivated by fears that the battleship, upon re-entering service, would attack strategically important convoys carrying supplies to the Soviet Union. Removing the threat posed by Tirpitz would also allow the Allies to redeploy the capital ships which had to be held in the North Sea to counter her. After four months of training and preparations, the British Home Fleet sailed on 30 March 1944 and aircraft launched from five aircraft carriers struck Kaafjord on 3 April. The raid achieved surprise, and the British aircraft met little opposition. Fifteen bombs hit the battleship, and strafing by fighter aircraft inflicted heavy casualties on her gun crews. Four British aircraft and nine airmen were lost during the operation.

The damage inflicted during the attack was not sufficient to sink or disable Tirpitz but she suffered considerable damage to her superstructure and unarmored areas, with 122 members of her crew killed and 316 wounded. The German Kriegsmarine decided to repair the battleship, and works were completed by mid-July. The British conducted further carrier raids against Tirpitz between April and August 1944 to prolong the period she was out of service but all failed. Tirpitz was eventually disabled and then sunk by Royal Air Force heavy bombers in late 1944.

Background

[edit]

The threat posed by Tirpitz had an important influence on British naval strategy. She was commissioned in February 1941 and completed her crew training late that year. At about the same time the German high command decided to station the battleship in Norway; this deployment was intended to deter a feared Allied invasion of Norway and threaten the Arctic convoys which regularly sailed through the Arctic Sea to the Soviet Union.[1] The convoys carried large quantities of war material from ports in Britain and Iceland, and were frequently attacked by the German air and naval units stationed in Norway.[2] Tirpitz arrived in Norway in January 1942 and operated from anchorages in fjords.[3] While she was operational the Allies had to keep a powerful force of warships with the British Home Fleet to guard against the possibility of a sortie against the Arctic convoys and capital ships accompanied most convoys part of the way to the Soviet Union.[4][5]

Kaafjord is located in Finnmark
Kaafjord
Kaafjord
The location of Kaafjord in northern Norway

The British attacked Tirpitz several times during 1942 and 1943. When the battleship sortied to intercept Convoy PQ 12 on 6 March 1942 HMS Victorious, that formed part of the convoy's escort, attempted to attack her using torpedo bombers. These aircraft launched twenty torpedoes at the battleship but all missed.[6][7] On several occasions during 1942 and 1943 bombers from the Royal Air Force and Soviet Air Forces attempted to strike Tirpitz in her anchorages but without success.[6] On 23 September 1943 two British X-class midget submarines penetrated the defences around the battleship at her main anchorage at Kaafjord in northern Norway during Operation Source and placed explosive charges in the water beneath her. This attack caused extensive damage to Tirpitz, putting her out of service for six months.[8]

Repairs to Tirpitz were carried out using improvised facilities at Kaafjord as it was considered too risky to attempt to move the warship to Germany, equipment and work crews were shipped to the fjord from German ports.[9] On the night of 10/11 February 1944, 15 Soviet aircraft attacked the battleship but did not cause any damage.[10] By 17 March, the repairs to Tirpitz's armament, machinery and hull were complete, but several minor repair tasks were outstanding.[11] During the period the ship was under repair, Scharnhorst, the only remaining operational German battleship, was sunk on 26 December during the Battle of the North Cape.[12] Following this engagement the Royal Navy stopped deploying battleships to cover convoys travelling to and from the Soviet Union.[13] By this stage of the war the Allies also had large numbers of anti-submarine and anti-aircraft escort ships available, and were able to assign strong forces to protect the Arctic convoys. German submarines operating in the Norwegian Sea were rarely able to evade the convoy escorts, and few merchant vessels suffered damage from German attack.[14]

The British Government and Royal Navy were concerned about the threat Tirpitz posed once she re-entered service. Allied intelligence tracked the progress of work on the battleship using decrypted German radio signals, photo reconnaissance flights and witness reports from agents in Norway.[15] It was feared the battleship could sortie and attack convoys in the Norwegian Sea or Atlantic Ocean after the repairs were completed. The need to guard against this possibility would also occupy warships needed to support the planned Operation Overlord the invasion of France.[16] It was decided in late 1943 to make further attempts to sink the battleship.[17] Despite Allied concerns, Tirpitz posed only a limited danger to Allied shipping. From late 1943 the battleship was unable to put to sea for crew training due to the threat of Allied attack and fuel shortages. These shortages also meant the Germans were unable to move the battleship between anchorages to make her more difficult to locate and attack.[18]

Preparations

[edit]
Black and white photograph of a Second World War-era warship in a small bay with a steep and snow-covered shoreline. Clouds of smoke are being blown from the shoreline towards the ship.
A British aerial reconnaissance photograph of Tirpitz moored at Kaafjord. The artificial smoke generators on the shores of the fjord have not yet obscured her.

The options for attacking Tirpitz at Kaafjord were limited. Another submarine-borne raid was considered impractical as intelligence gathered from intercepted radio transmissions and field agents indicated that the battleship's underwater defences had been improved and more aerial reconnaissance patrols of the region were being flown.[11] The commander of the Royal Air Force's Bomber Command, Air Chief Marshal Sir Arthur Harris, also refused to attempt a heavy bomber raid on Tirpitz on the grounds that the Kaafjord area was beyond the effective range of these aircraft and the battleship's guns would cause heavy casualties.[16] After these two options were ruled out, the task was assigned to the Home Fleet's aircraft carriers.[11] At this time the large fleet carriers HMS Furious and Victorious and four smaller escort carriers were ready.[19][20]

Planning for the raid on Kaafjord began in December 1943. Vice Admiral Bruce Fraser, the commander of the Home Fleet, was not optimistic about the prospects for success, and had to be persuaded to undertake the operation by First Sea Lord Sir Andrew Cunningham.[21] Fraser gave his second in command, Vice Admiral Sir Henry Moore, responsibility for planning and leading the raid.[19][21] The operation was initially designated "Operational Thrustful", but was later renamed "Operation Tungsten". The attack was originally scheduled for mid-March 1944, shortly before the time Allied intelligence believed Tirpitz would become operational.[19] However, it was delayed by two weeks while Victorious was fitted with new radars.[22] The British considered cancelling Operation Tungsten in February as Victorious was also needed in the Indian Ocean to counter a build-up of Japanese warships at Singapore. To enable the attack to proceed, the United States Navy agreed to temporarily transfer USS Saratoga to the Eastern Fleet so that Victorious could be retained in the North Sea.[23]

The plans for the raid were centred on two dive-bombing attacks by Fleet Air Arm Fairey Barracuda aircraft. Led by Strike Leader Roy Sydney Baker-Falkner, each of the attacks was to involve 21 Barracudas escorted by 40 fighters; Vought F4U Corsairs flying from Victorious would provide protection against German aircraft while Wildcats and Hellcats operating from Furious and the escort carriers HMS Emperor, Pursuer and Searcher were to strafe anti-aircraft guns near Tirpitz and on the battleship. Aircraft flying from Furious and the escort carrier HMS Fencer would protect the fleet against attack by German aircraft or submarines.[24] Carrier aircraft had lacked a bomb capable of penetrating a battleship's thick deck armour, it was hoped that the new 1,600-pound (730 kg) armour-piercing bomb would be able to pierce at least the first layer of Tirpitz's armour if they were dropped from an altitude of 3,500 feet (1,100 m) or higher. The damage caused by such hits was expected to put the battleship out of service. Nine of the Barracudas were to be armed with 1,600-pounders and a further 22 would each carry three 500 lb (230 kg) semi-armour-piercing bombs that were capable of penetrating the lightly protected upper decks of the ship if dropped from above 2,000 feet (610 m). The remaining ten aircraft would be armed with 500 lb (230 kg) and 600 lb (270 kg) general-purpose bombs and with anti-submarine bombs intended to inflict casualties among the battleship's crew and cause underwater damage if they exploded in the water near her hull.[22] The aircraft carrying high-explosive bombs were to o first as it was hoped that these weapons would knock out at least some of the battleship's anti-aircraft guns before the main attack commenced.[19]

Colour photograph of a body of water surrounded by hills viewed from a hill
Loch Eriboll in Scotland was used to simulate Kaafjord during training exercises

The Fleet Air Arm units selected for Operation Tungsten conducted intensive training from February 1944 under Roy Sydney Baker-Falkner with his very experienced 827 Naval Air Squadron and 830 Naval Air Squadron. A high proportion of the airmen of the 2nd Wing 829 NAS and 831 NAS were inexperienced and the captain of Victorious estimated that 85 per cent of the aircrew embarked on his ship had not operated at sea.[25] The training programme was centred on Loch Eriboll in northern Scotland which, like Kaafjord, was surrounded by steep hills. Flying from RNAS Hatston in the Orkney Islands, aircrew practiced manoeuvring around this terrain to familiarise themselves with the tactics needed to avoid German anti-aircraft guns and attack Tirpitz.[21] The Royal Navy drew on intelligence on the defences of Kaafjord to make the exercise range as similar to the conditions around Tirpitz as was possible, and the aircrew were extensively briefed on the locations of German positions.[26] An area the size of the battleship was also marked out on an island in the centre of the loch and repeatedly bombed.[27]

While these preparations were under way, the Allies continued to monitor Tirpitz. In late February the escort carrier HMS Chaser transported photo analysts and the ground crews for a Royal Air Force photo reconnaissance detachment to Vaenga airfield in northern Russia. These personnel were joined by three Supermarine Spitfires fitted for photo reconnaissance work and a Consolidated PBY Catalina in March. The Spitfires flew regular sorties over Kaafjord and took detailed photographs of Tirpitz and the nearby anti-aircraft batteries on 12 and 13 March; after being developed the Catalina flew these images to Britain. Although the German forces in northern Norway detected the Spitfire flights, the Kaafjord area's defences were not increased or placed on alert.[28] On 16 March eight British, Dutch and Norwegian submarines were directed to take up positions off the Norwegian coast after decrypted German radio messages indicated that Tirpitz may have been preparing to depart Kaafjord for Germany to complete her repairs. A further eight British and Dutch submarines were dispatched on 18 March, but two days later it was concluded that Tirpitz was not about to put to sea and the submarines were diverted to other tasks or ordered back to port.[29] On 21 March, British intelligence warned the Admiralty that due to recent Soviet advances on the Eastern Front, the Germans were placing a strong emphasis on disrupting the flow of supplies to the Soviet Union and could dispatch Tirpitz to attack any convoys not escorted by capital ships. Fraser was directed to provide battleship protection for the next Arctic convoy.[30][31]

The final decision to undertake Operation Tungsten was made in mid-March on the basis of a decrypted radio message that indicated that Tirpitz was almost ready for combat and would conduct high-speed trials on 1 April.[19] As a result of the delays to the operation, the sailing of the attack force coincided with the departure of Convoy JW 58 for the Soviet Union.[22] It was hoped that if German forces spotted the British fleet it would be assumed that the warships were supporting the convoy.[32] As part of the final preparations for the attack, a full-scale rehearsal was conducted using the training range at Loch Eriboll on 28 March.[33] From 1 April, the Admiralty received hourly weather reports from a group of Norwegian Secret Intelligence Service agents in Alta, near Kåfjord.[34]

Opposing forces

[edit]
Black and white photograph of single propeller fighter aircraft on the deck of an aircraft carrier at sea. Several other ships are visible in the background.
Hellcats on the escort carrier HMS Emperor, with other ships of the British force in the background

The Royal Navy assembled a powerful force for Operation Tungsten. The main striking force was made up of two wings of Barracudas. 8 Wing comprising 827 Naval Air Squadron and 830 Naval Air Squadron and 52 Wing with 829 and 831 Naval Air Squadrons. While 8 Wing was normally based on board Furious and 52 Wing on Victorious, Moore chose to station a squadron from each of the wings on each carrier so they could launch simultaneously and go into battle as formed units.[27] The 163 Fleet Air Arm airmen in the attacking units included 28 New Zealanders, three Canadians, two Australians, and one South African; the remainder were British.[35][36][37]

The large number of warships assigned to the operation were initially split into two groups. Force One was commanded by Fraser on board the battleship HMS Duke of York, and also included Victorious, the battleship HMS Anson (with Moore and his staff embarked), a light cruiser and five destroyers. Force Two was commanded by Rear Admiral Arthur La Touche Bisset and comprised Furious, the four escort carriers, five destroyers and two tankers. It was planned that Force One would initially provide support for Convoy JW 58 and Force Two would sail separately and proceed directly to a point off Norway where it would be joined by Anson and Victorious on 3 April and conduct the raid the next day.[32][38]

Tirpitz's anchorage at Kaafjord was protected by anti-aircraft batteries and fighter aircraft. At the time of Operation Tungsten, four batteries of heavy anti-aircraft guns and seven batteries of light guns were located on the shore near the battleship. Several anti-aircraft vessels and destroyers were also usually moored near Tirpitz.[39] The battleship herself was fitted with 68 anti-aircraft guns.[40] Equipment capable of generating an artificial smokescreen to hide Tirpitz from aircraft had also been installed around Kaafjord.[41] The German Air Force (Luftwaffe) had only a small number of fighters stationed at bases near Kaafjord, and their operations were constrained by a lack of fuel. British intelligence believed that the German fighter force in the area could be rapidly expanded in the event of an emergency.[18][41] The Luftwaffe typically conducted three reconnaissance flights into the Arctic Sea each day.[41]

Attack

[edit]

Force One departed the Home Fleet's base at Scapa Flow in the Orkney Islands on 30 March, three days after Convoy JW 58 had sailed from Loch Ewe in Scotland.[25] Force Two departed separately later that day.[32] The convoy comprised 49 merchant ships escorted by a powerful force of 33 warships, including two escort carriers.[42] German reconnaissance aircraft located JW 58 on 30 March, and all of the U-boats in the Norwegian Sea were directed to intercept it. The German aircraft did not conduct wider-ranging sorties in search of the convoy's battleship covering force or other Allied ships. A total of 17 U-boats attacked JW 58 between 1 and 3 April without success; none of the Allied ships suffered any damage, and the escorts sank four U-boats and shot down six German aircraft during the convoy's voyage from Scotland to the Soviet Union. JW 58 reached its destination at Kola Bay on 6 April.[25][43] While several Allied aircraft were lost during the voyage, mostly to flying accidents, all of the ships arrived unscathed.[44]

Colour photograph of men wearing military uniform crouching over bombs on the flight deck of an aircraft carrier
Fleet Air Arm personnel arming bombs on HMS Victorious' flight deck prior to the attack

Owing to a combination of favourable factors, Fraser decided on 1 April to bring the raid on Kaafjord forward by 24 hours. Decrypted German signals indicated that Tirpitz's trials had been delayed until 3 April, and Fraser hoped that an attack on this date would catch the battleship away from her usual well-protected mooring. Moreover, as JW 58's escorts were performing well and there was no indication that Tirpitz would sortie into the open sea, Fraser judged that Force One no longer needed to provide support for the transports. Weather conditions were also unusually good for the Norwegian Sea in early Spring and were well suited to flying operations.[32][45][46] After the decision to attack was made both tankers and two escorting destroyers detached from Force Two and proceeded to a point 300 miles (480 km) north-west of Kaafjord where they remained to supply any destroyers that ran low on fuel. The rest of Force Two altered course to rendezvous with Force One, and this was achieved at 4:20 pm on 2 April.[47] After the two forces met, Duke of York with Fraser on board, and two destroyers sailed to the north-west and took up a position where they would be able to intercept Tirpitz in the event that she had sailed from Kaafjord without being detected.[48] The remainder of the Home Fleet proceeded to the strike's launching point.[49]

The attack was launched during the early hours of 3 April. All the airmen were woken shortly after midnight, and attended a final briefing by Strike Leader Baker-Falkner from 1:15 am. The aircraft to be used in the strike were armed at this time, with all of the bombs being marked with messages for Tirpitz in chalk. The aircrew began boarding their aircraft at 4:00 am and flying-off operations started 15 minutes later; at this time the warships were 120 miles (190 km) from Kaafjord. Ten Corsairs drawn from 1834 and 1836 Naval Air Squadrons were the first aircraft to be launched and were followed by the 21 Barracudas of 8 Wing; 827 Squadron was launched from Victorious and 830 Squadron departed from Furious. Seven of the Barracudas were armed with a 1,600-pound bomb, and the remainder carried multiple 500 or 600-pound weapons. Once the Barracudas were airborne the remaining escort fighters – 30 Wildcats and Hellcats from 800, 881 and 882 Naval Air Squadrons  – were launched. All the aircraft of the first wave were dispatched successfully, and the force completed forming up at 4:37 am.[45][50][51][52] Flying conditions remained perfect, and German forces had not detected the British fleet during its approach.[47]

Black and white photograph of a group of aircraft flying in formation above a fjord surrounded by snow-covered mountains
Barracudas flying over a fjord shortly before attacking Tirpitz

The first wave headed for Norway at low altitude, flying just 50 feet (15 m) above the sea to avoid detection by German radar. The aircraft began to climb to a higher altitude when they reached a point 20 miles (32 km) from the coast, and had reached 7,000 feet (2,100 m) by the time they made landfall at 5:08 am. The force approached the Altenfjord from the west, passing over the western end of the Langfjord before turning south, then looping to the north and attacking the battleship over the hills on the southern shore of Kaafjord shortly before 5:30 am.[53]

The arrival of the British force caught Tirpitz by surprise. While the aircraft had first been picked up by a German radar station shortly after they crossed the Norwegian coastline, the battleship was not immediately warned.[54] At the time of the attack Tirpitz was preparing to sail for her high-speed trials, and her crew were busy unmooring the vessel. Her five protective destroyers had already departed for the trials area in Stjern Sound.[55] The warning from the radar station arrived shortly before the British aircraft appeared over Kaafjord, and the battleship's crew were still in the process of moving to their battle stations when the attack commenced; at this time not all of the watertight doors were closed and some damage-control stations were not fully manned.[53][56]

As planned, the British raid began with Hellcat and Wildcat fighters strafing Tirpitz's anti-aircraft guns and batteries located on the shore; this attack inflicted heavy casualties on the battleship's gunners, disabled her main anti-aircraft control centre and damaged several guns.[57][58] The fighters also strafed several anti-aircraft ships in Kaafjord.[58] The 21 Barracudas began their attack shortly afterwards, and hit Tirpitz with a general-purpose bomb, three 500-pound semi-armour-piercing bombs and three 1,600-pound bombs within 60 seconds.[59] Overall, ten bombs struck the battleship during the first attack.[60] Most of these bombs did not penetrate the ship's armoured deck as they had been dropped from too low an altitude.[59] Hundreds of members of the ship's crew died or were wounded; her commanding officer, Captain Hans Meyer, was among the wounded and intelligence officer Hugo Heydal assumed command.[61] The battleship also drifted into the western shore of Kaafjord and ran aground, but was quickly refloated.[62] One of 830 Squadron's Barracudas crashed following the attack with the loss of all three members of its crew. The surviving aircraft of the first wave began landing on the carriers at 6:19 am, and all were recovered by 6:42.[58][63]

Black and white photograph of a warship moored near a snowy shore viewed from the air. Smoke is issuing from the warship.
Bombs exploding around Tirpitz during the first attack on the battleship

The first aircraft of the second wave took to the air at 5:25 am. One of 829 Squadron's Barracudas crashed shortly after take-off, resulting in the deaths of its crew of three, and another aircraft from this squadron was not launched due to engine problems. Only two of the Barracudas in this wave were armed with 1,600-pound bombs.[64] As with the first strike, 40 fighters accompanied the torpedo bombers; these comprised 10 Corsairs from 1834 and 1836 Naval Air Squadrons, all of the 20 Wildcats assigned to 896 and 898 Naval Air Squadrons and 10 Hellcats from 804 Naval Air Squadron.[64][65][66] All aircraft were launched by 5:37 am, and the force had an uneventful flight to the Kaafjord area.[67] While the German defences were now alert, the artificial smoke screen being generated around Kaafjord was not yet sufficient to hide Tirpitz from view.[68]

The second attack on Tirpitz was similar to the first. It began with Hellcat fighters strafing the anti-aircraft batteries while Wildcats attacked the battleship. The fighters also attacked German ships in Kaafjord and a radio or radio direction finding station. The Barracudas executed their dive bombing attack at 6:36 am and struck Tirpitz with a 1,600-pound bomb and four 500-pound bombs within a minute.[64][67][69] The German defences at Kaafjord received little warning of the incoming raid, and the smokescreen hid the British aircraft from sight. As a result, the gunners had to fire blindly and only shot down one of the Barracudas; all three airmen died.[64] The second wave landed on the carriers between 7:20 and 7:58 am. A damaged Hellcat had to ditch near the Canadian destroyer HMCS Algonquin and one of the Corsairs suffered heavy damage as a result of a landing accident; both pilots survived.[70][71][72]

During the period in which the air strikes were conducted, a force of 25 Wildcat and Supermarine Seafire fighters from 801, 842 and 880 Naval Air Squadrons provided air defence for the Home Fleet. Nine Fairey Swordfish torpedo bombers, which were also operated by 842 Naval Air Squadron, conducted anti-submarine patrols. No threat to the fleet developed, and Corsairs took over air defence duties at the conclusion of the two attacks.[72][73]

During the early afternoon of 3 April, Moore considered conducting a further raid on Kaafjord the next day. He decided against doing so as the preliminary assessment of photos taken during the attack had concluded that Tirpitz was badly damaged. Moore was also aware that his aircrew were fatigued, and was reluctant to expose them to what would now be alert defences.[70][74][75] Accordingly, he ordered that the fleet return to base, and it arrived at Scapa Flow in the afternoon of 6 April.[69] King George VI and Prime Minister Winston Churchill sent congratulatory messages to the fleet, but both Churchill and Cunningham were concerned that Tirpitz could be returned to service. Cunningham also regretted Moore's decision not to launch a further strike on 4 April.[76]

Aftermath

[edit]

Analysis

[edit]
Black and white photograph of a single engined monoplane flying just above the deck of an aircraft carrier with its wheels extended. Two other aircraft are visible flying in the background of the photo.
A Barracuda landing on HMS Victorious during Operation Tungsten

The two attacks on Tirpitz largely went to plan. The airmen found the defences and geography at Kaafjord to be very similar to the Loch Eriboll training range, and one of the post-attack reports stated that the operation had been "almost an exercise which they [the aircrew] had frequently carried out before".[26] The official historian of the Royal Navy's role in the Second World War, Stephen Roskill, also judged that the strikes were "beautifully co-ordinated and fearlessly executed".[77] The most important discrepancy between the plans for the operation and its execution was that many pilots dropped their bombs below the specified minimum altitude of 3,000 feet (910 m) in an attempt to improve their chances of hitting Tirpitz. The shorter than optimum flight times may have meant that some of the bombs which struck the battleship lacked the necessary velocity to penetrate her deck armour.[78] Nine Royal Navy airmen died during the raid.[70]

While two bombs that exploded in the water near Tirpitz opened holes in her hull and caused flooding, none of the 15 bombs that struck the battleship penetrated her main deck armour belt. As a result, her guns, magazines, and machinery did not suffer serious damage.[79][80] Most of the damage to the battleship was inflicted on her superstructure and between her armoured decks. The starboard aircraft catapult and crane were destroyed, as were both Tirpitz's Arado floatplanes. The number two starboard 150-millimetre (5.9 in) gun turret was knocked out, and the number three port 150 mm turret incurred significant damage. The officers' mess and several galleys were wrecked, and the ship was filled with smoke. Tirpitz's funnel was also struck by bomb fragments that badly damaged all of the boiler intakes. While the starboard turbine was knocked out by shock damage and two of the boilers were disabled after being contaminated by salt water used for firefighting, the battleship was still capable of steaming within Kaafjord.[81][82]

Casualties

[edit]

Tirpitz's crew suffered severe casualties in the attack, 122 sailors died and 316 were wounded; these casualties represented 15 per cent of the crew. Many of the casualties were anti-aircraft gunners hit by machine-gun fire from the British fighters.[81][83] The fighters also damaged four patrol craft and a large repair ship; the captain of an armed trawler was killed and 13 other sailors on board these vessels were wounded.[83] Torstein Raaby of the Allied Secret Intelligence Service group in Alta reported a few hours after the raid, that there had been no civilian casualties and that the local population was "... extremely impressed by the bombing". A report six days after the operation relayed that the Germans thought that it would take months to repair the damage inflicted on Tirpitz.[84]

Subsequent operations

[edit]

Grand Admiral Karl Dönitz, the commander of the Kriegsmarine, directed that the damage caused to Tirpitz during Tungsten be repaired. Although the battleship was no longer capable of operating against Allied convoys for lack of air support, it was considered desirable to retain her in service to tie down Allied naval resources.[85] Repair work began in early May after a destroyer transported equipment and workmen to Kaafjord from Germany; Tirpitz was able to steam under her own power by 2 June. She was capable of undertaking gunnery practice by the end of June, and all repairs were completed in mid-July. During this period the battleship's anti-aircraft armament was increased with more 20-millimetre (0.79 in) cannon, modifying the 150 mm guns so they could be used against aircraft and supplying anti-aircraft ammunition for her 380-millimetre (15 in) main guns.[85] The defences of Kaafjord were improved with more radar stations and observation posts; the number of smoke generators around Tirpitz was increased.[86]

Colour photo of a small graveyard with about 40 dark grey gravestones
Five of the British airmen who died during Operation Tungsten are interred at the Commonwealth War Graves section of Tromsø's main cemetery[87]

British intelligence assessed that Tirpitz would be repaired within six months and Cunningham directed Fraser on 13 April to launch another attack on the battleship.[76] While Cunningham did not believe that Barracudas could carry weapons capable of sinking Tirpitz, he hoped that further air strikes would increase the period the battleship was out of service and harm her crew's morale.[88] Fraser initially resisted Cunningham's order, arguing that the prospects for a successful raid were poor as the Germans would have reinforced the defences around Tirpitz and weather conditions were likely to be worse than those of Tungsten. He relented, and Moore sailed from Scapa Flow on 21 April to attack Kaafjord again.[89] Operation Planet, was called off on 24 April due to bad weather over the target.[90]

Operation Brawn and Operation Tiger Claw, were cancelled on 15 and 28 May respectively because of adverse weather. Further carrier raids were attempted in July and August after Allied intelligence determined that the repairs to Tirpitz were near complete. During Operation Mascot a force of 42 Barracudas and 40 fighters attacked Tirpitz on 17 July, but did not score any hits as the battleship was hidden by a smokescreen. A further four carrier raids were conducted against Kaafjord between 22 and 29 August during Operation Goodwood, but these caused only minor damage to the battleship.[91]

In late August it was decided that Fleet Air Arm attacks should not continue as the Germans were able to cover Tirpitz in smoke before Barracudas could reach the battleship, and these aircraft could not carry bombs large enough to inflict severe damage. As it was still seen as desirable to destroy Tirpitz, the task was assigned to Bomber Command.[92] On 15 September a force of heavy bombers in Operation Paravane attacked Kaafjord after refuelling at bases in northern Russia and inflicted irreparable damage on the battleship. Following this, Tirpitz sailed to an anchorage near Tromsø to be used as an immobile coastal defence battery. Operation Obviate, another heavy bomber attack on 29 October caused only minor damage and a third raid, Operation Catechism, was mounted on 12 November in which Tirpitz was struck by several Tallboy bombs and capsized with mass loss of life among her crew.[93]

Citations

[edit]
  1. ^ Bennett (2012), p. 10
  2. ^ Dear and Foot (2005), p. 35
  3. ^ Bennett (2012), pp. 10–11
  4. ^ Bennett (2012), p. 9
  5. ^ Faulkner and Wilkinson (2012), p. 109
  6. ^ a b Bennett (2012), p. 11
  7. ^ Bishop (2012), pp. 78–83
  8. ^ Woodman (2004), p. 340
  9. ^ Zetterling and Tamelander (2009), p. 251
  10. ^ Bishop (2012), p. 295
  11. ^ a b c Zetterling and Tamelander (2009), p. 265
  12. ^ Zetterling and Tamelander (2009), p. 264
  13. ^ Hinsley et al. (1984), p. 269
  14. ^ Dear and Foot (2005), p. 38
  15. ^ Bishop (2012), pp. 291–293
  16. ^ a b Bishop (2012), p. 294
  17. ^ Zetterling and Tamelander (2009), pp. 266–267
  18. ^ a b Bennett (2012), p. 14
  19. ^ a b c d e Zetterling and Tamelander (2009), p. 267
  20. ^ Bishop (2012), pp. 296–297
  21. ^ a b c Bishop (2012), p. 297
  22. ^ a b c Bishop (2012), p. 299
  23. ^ Hinsley et al. (1984), p. 271
  24. ^ Bishop (2012), pp. 295–296, 298
  25. ^ a b c Bishop (2012), p. 300
  26. ^ a b Hinsley et al. (1984), pp. 273–274
  27. ^ a b Bishop (2012), p. 298
  28. ^ Roskill (1960), p. 274
  29. ^ Rohwer (2005), p. 311
  30. ^ Hinsley et al. (1984), p. 273
  31. ^ Barnett (2000), p. 744
  32. ^ a b c d Zetterling and Tamelander (2009), p. 268
  33. ^ Brown (1977), p. 33
  34. ^ Rørholt and Thorsen (1990), p. 254
  35. ^ Army News (Darwin, NT), Wednesday 7 June 1944
  36. ^ "Operation Tungsten — Attacking the Tirpitz, 1944". Navy Today (160). Royal New Zealand Navy. April 2011. Archived from the original on 10 February 2013. Retrieved 28 January 2013.
  37. ^ "Fights Germans From Sea, Air". The Daily News (City Final ed.). Perth, Western Australia: National Library of Australia. 21 June 1944. p. 5. Retrieved 6 July 2015.
  38. ^ Bishop (2012), pp. 299–300
  39. ^ Tactical, Torpedo and Staff Duties Division (Historical Section) (2012), p. 151
  40. ^ Barnett (2000), p. 275
  41. ^ a b c Tactical, Torpedo and Staff Duties Division (Historical Section) (2012), p. 135
  42. ^ Blair (2000), p. 516
  43. ^ Blair (2000), pp. 516–517
  44. ^ Woodman (2004), pp. 390–394
  45. ^ a b Roskill (1960), p. 275
  46. ^ Bishop (2012), pp. 300–301
  47. ^ a b Tactical, Torpedo and Staff Duties Division (Historical Section) (2012), p. 140
  48. ^ Levy (2003), p. 144
  49. ^ Bishop (2012), p. 301
  50. ^ Bishop (2012), pp. 301–302
  51. ^ Zetterling and Tamelander (2009), pp. 268–269
  52. ^ Brown (1977), p. 34
  53. ^ a b Bishop (2012), p. 302
  54. ^ Zetterling and Tamelander (2009), p. 270
  55. ^ Bishop (2012), p. 303
  56. ^ Zetterling and Tamelander (2009), pp. 271–272
  57. ^ Zetterling and Tamelander (2009), p. 272
  58. ^ a b c Tactical, Torpedo and Staff Duties Division (Historical Section) (2012), p. 144
  59. ^ a b Zetterling and Tamelander (2009), p. 275
  60. ^ Garzke and Dulin (1985), pp. 266–267
  61. ^ Brennecke (1981), pp. 60
  62. ^ Zetterling and Tamelander (2009), pp. 275–277
  63. ^ Bishop (2012), p. 305
  64. ^ a b c d Brown (1977), p. 35
  65. ^ Tactical, Torpedo and Staff Duties Division (Historical Section) (2012), p. 158
  66. ^ Tillman (1996), p. 74
  67. ^ a b Tactical, Torpedo and Staff Duties Division (Historical Section) (2012), p. 145
  68. ^ Zetterling and Tamelander (2009), p. 277
  69. ^ a b Bishop (2012), p. 306
  70. ^ a b c Zetterling and Tamelander (2009), p. 279
  71. ^ Tactical, Torpedo and Staff Duties Division (Historical Section) (2012), p. 147
  72. ^ a b Levy (2003), p. 145
  73. ^ Tactical, Torpedo and Staff Duties Division (Historical Section) (2012), pp. 148, 176
  74. ^ Bishop (2012), p. 308
  75. ^ Hinsley et al. (1984), p. 275
  76. ^ a b Bishop (2012), p. 309
  77. ^ Roskill (1960), p. 276
  78. ^ Bennett (2012), p. 17
  79. ^ Zetterling and Tamelander (2009), p. 281
  80. ^ Garzke and Dulin (1985), p. 265
  81. ^ a b Bishop (2012), p. 307
  82. ^ Garzke and Dulin (1985), pp. 265–267
  83. ^ a b Brown (1977), p. 36
  84. ^ Rørholt and Thorsen (1990), pp. 255, 257
  85. ^ a b Garzke and Dulin (1985), p. 267
  86. ^ Brown (1977), p. 37
  87. ^ "Tromso Cemetery". Commonwealth War Graves Commission. Retrieved 20 September 2013.
  88. ^ Roskill (1960), p. 278
  89. ^ Zetterling and Tamelander (2009), p. 280
  90. ^ Zetterling and Tamelander (2009), pp. 282–284
  91. ^ Zetterling and Tamelander (2009), pp. 282–284
  92. ^ Zetterling and Tamelander (2009), pp. 285–286
  93. ^ Bennett (2012), pp. 19–21

Bibliography

[edit]
Revisions and contributorsEdit on WikipediaRead on Wikipedia
from Grokipedia
Operation Tungsten was a Second World War Royal Navy Fleet Air Arm air raid conducted on 3 April 1944 against the German battleship Tirpitz, targeting the vessel while it was anchored in Kaafjord, northern Norway, to neutralize its threat to Allied Arctic convoys. The operation involved a task force from the British Home Fleet, including the fleet carriers HMS Victorious and HMS Furious, four escort carriers (HMS Emperor, HMS Searcher, HMS Pursuer, and HMS Fencer), battleships HMS Duke of York and HMS Anson, and supporting cruisers and destroyers. Aircraft from squadrons aboard these carriers—primarily 40 Fairey Barracuda torpedo/dive bombers escorted by around 40 fighters including Grumman F6F Hellcats, Vought F4U Corsairs, and Supermarine Seafires—launched in two waves to achieve surprise at low altitude despite the fjord's challenging terrain and German defenses. The strike caught Tirpitz unprepared, as its crew was conducting damage-control exercises, and resulted in 14 to 16 direct bomb hits or near-misses that severely damaged the battleship's superstructure, radar systems, anti-aircraft batteries, and fire-control mechanisms, though its armored deck remained intact. The raid inflicted 122 fatalities and 316 wounded on the German crew, sidelining Tirpitz for repairs that lasted until late July 1944 and temporarily alleviating pressure on Allied shipping routes in the . Allied losses included four aircraft and nine airmen killed, demonstrating the effectiveness of carrier-based aviation in long-range strikes. Operation Tungsten marked the first successful aerial attack on Tirpitz following earlier failed efforts, such as RAF bomber raids and the midget submarine in September 1943, and it boosted British morale while paving the way for subsequent strikes like Operations , Goodwood, and , culminating in the battleship's final sinking by RAF Lancaster bombers on 12 November 1944.

Historical Context

The Threat of Tirpitz

The German battleship Tirpitz, commissioned on 25 February 1941 as the second and final vessel of the Bismarck class, served as the sister ship to the ill-fated Bismarck. With a standard displacement of 42,900 tons and armed with eight 38 cm (15-inch) guns in four twin turrets, Tirpitz represented one of the largest and most heavily armed warships built by , designed for surface actions in the open ocean. Although intended to challenge British naval supremacy alongside Bismarck, Tirpitz spent much of her career in northern European waters rather than conducting transatlantic raids, her mere existence exerting a profound psychological and strategic influence on Allied operations. From January 1942, when Tirpitz was transferred to Norwegian waters, she posed a constant threat to Allied convoys ferrying vital supplies from Britain to the via the treacherous northern routes. This positioning forced the to divert substantial resources—including battleships, aircraft carriers, and cruisers—from critical theaters such as the Pacific and Mediterranean to provide heavy escorts and cover for the convoys, thereby diluting Britain's overall naval strength and complicating global strategy. The ship's potential to and annihilate unescorted vessels acted as a "," compelling the Allies to maintain a state of perpetual vigilance and readiness, which tied down far more resources than Tirpitz herself could deploy. Tirpitz's sorties in 1942 and 1943 exemplified this disruptive potential, most notably during the crisis surrounding Convoy PQ-17 in July 1942. Although Tirpitz did not directly engage the convoy—remaining moored in Altenfjord—the intelligence reports of her possible departure prompted British First Sea Lord Admiral Sir to order the convoy's close escort to withdraw and the merchant ships to scatter on 4 July. This decision exposed the 34 vessels to relentless attacks by aircraft and U-boats, resulting in the loss of 23 ships and over 150 lives, with only 11 reaching port and delivering a fraction of the intended 70,000 tons of cargo. Earlier, in March 1942, Tirpitz had sortied as part of Operation Sportpalast to intercept Convoy PQ-12, forcing its diversion but ultimately achieving little direct damage due to adverse weather; such actions heightened Allied fears and further strained convoy protections throughout 1942-1943. By late 1943, Tirpitz became increasingly immobilized in Norwegian fjords, particularly Kaafjord, due to a combination of severe damage from Allied attacks and chronic fuel shortages within the Kriegsmarine. The September 1943 midget submarine raid (Operation Source) crippled her propulsion and flooded compartments, sidelining the ship for six months of repairs until April 1944, while escalating Allied air and submarine pressure prevented further operational freedom. Fuel constraints, exacerbated by Germany's broader logistical strains, limited training and potential sorties, confining Tirpitz to a static role that nonetheless continued to demand Allied countermeasures until her eventual destruction.

Prior Allied Efforts Against Tirpitz

The Allied efforts to neutralize the German battleship Tirpitz prior to Operation Tungsten involved a series of unsuccessful air and submarine attacks, primarily by British forces, that underscored the formidable challenges of targeting the vessel in its Norwegian strongholds. Between January and April 1942, while Tirpitz was anchored at Fættenfjord near , the Royal Air Force (RAF) Bomber Command launched four major bombing raids using heavy bombers such as Halifaxes and Stirlings, but all failed to inflict any damage due to conditions, inaccurate targeting, and effective German measures that concealed the ship under netting and smoke screens. These operations resulted in the loss of 13 aircraft and their crews without a single hit on the target, highlighting the limitations of long-range bombing in environments. The most notable attempt in 1943 was Operation Source, a daring Royal Navy mission employing X-class midget submarines to deliver limpet mines directly to Tirpitz. On 11 September 1943, six X-craft—X-5 through X-10—were towed by conventional submarines from Loch Cairnbawn, Scotland, toward northern Norway, with X-5, X-6, and X-7 assigned to Tirpitz at Kaafjord, while the others targeted the heavy cruiser Lützow and battleship Scharnhorst. En route, X-9 was lost with its passage crew, X-8 was scuttled due to mechanical failure, and X-10 aborted its mission; however, on 22 September, X-6 and X-7 penetrated the harbor defenses, navigating through anti-submarine nets and depth charges to place their 2-ton explosive charges beneath the battleship. The charges from X-6 and X-7 detonated at approximately 08:12, causing significant structural damage including hull breaches, flooding in engine rooms, and contamination of fuel tanks; X-5 was detected and destroyed by German forces before completing its attack. The operation resulted in heavy British casualties, with nine personnel killed—including four from X-5's operational , two from X-7, and three from X-9—and six crew members captured after their submarines were scuttled or sunk. For the Germans, Tirpitz sustained moderate damage that rendered it inoperable for six months, requiring extensive repairs in Kaafjord until April 1944, during which time over 600 workmen were employed to restore its functionality. Despite this setback for the , the battleship was not sunk, and the raid earned two Victoria Crosses for the commanders of X-6 and X-7. In addition, on the night of 10/11 February 1944, the launched an air raid with 15 aircraft against Tirpitz in Kaafjord, but inflicted no damage due to effective defenses. These efforts were repeatedly thwarted by Tirpitz's strategic positioning in narrow, heavily defended Norwegian fjords, which provided natural protection and allowed for rapid concealment under and smoke. Intense anti-aircraft defenses, including guns from escorting vessels and shore batteries, combined with the harsh weather—frequent storms, low visibility, and long winter nights—severely hampered navigation, bombing accuracy, and submarine stealth. The cumulative losses, including , submarines, and personnel, demonstrated the high risks and limited effectiveness of conventional approaches, informing subsequent strategies that emphasized surprise carrier-based strikes.

Planning and Execution

British Preparations and Training

The preparations for Operation Tungsten began in December 1943, with the Royal Navy's undertaking an intensive four-month training regimen to ready for the strike against the German battleship Tirpitz. This period focused on building proficiency in coordinated attacks under challenging conditions, drawing on intelligence that confirmed Tirpitz's position in Kaafjord, . Training was centered at Loch Eriboll in north-western , selected for its geographical similarity to Kaafjord with surrounding steep hills that mimicked potential flak and defensive obstacles. Pilots and aircrews from the naval air station at Hatston in the Islands conducted repeated simulated attacks on mock targets, including a marked area on an island representing Tirpitz's dimensions and a buoyed section simulating the anchorage complete with smoke screens and dummy anti-aircraft positions. These exercises emphasized wave-based coordination, , and operations in poor weather typical of northern waters, honing skills for low-visibility strikes. The primary strike aircraft were 42 torpedo/dive bombers from Nos. 827, 830, and 831 Naval Air Squadrons, modified to carry 1,600 lb armor-piercing bombs sourced from U.S. supplies, along with secondary loads of 500 lb semi-armor-piercing or general-purpose bombs for flexibility. These modifications enhanced the Barracudas' ability to penetrate Tirpitz's deck armor, with pilots practicing releases during dives from altitudes of around 3,500 feet for the heavier bombs to balance accuracy and flak evasion. Escorting the bombers were approximately 10 Grumman Hellcat fighters from No. 804 Naval Air Squadron, 10 Vought Corsair fighters from Nos. 1834 and 1836 Naval Air Squadrons on HMS Victorious, and 20 Grumman Wildcat fighters from Nos. 896 and 898 Naval Air Squadrons on escort carriers, providing around 40 escorts per wave tasked with achieving air superiority and suppressing ground defenses through runs ahead of the bombing waves. The carrier , under Vice-Admiral Sir Henry Moore, was built around the fleet carriers HMS Victorious as and HMS Furious, supported by escort carriers HMS Emperor, HMS Pursuer, HMS Searcher, and HMS Fencer, along with cruisers such as HMS Sheffield and , and a screen of 14 destroyers for anti-submarine protection. Training stressed synchronized launches and recoveries to enable multiple waves—21 per initial strike supported by fighters—ensuring the force could sustain pressure on the target despite the carriers' operational limits in conditions. A key tactical innovation developed during preparations was refined dive-bombing techniques to minimize exposure to anti-aircraft fire, with pilots drilling steep dives from higher initial altitudes—approaching 10,000 feet in simulations—to accelerate through flak envelopes before releasing ordnance at lower levels for precision. This approach, combined with fighter suppression of gun positions, was practiced extensively to achieve hits on a maneuvering in confined waters, even amid smokescreens or adverse weather that reduced visibility to gun flashes alone.

Intelligence Gathering and Strike Planning

The intelligence operations preceding Operation Tungsten relied heavily on photo-reconnaissance flights conducted by RAF Spitfires based at Vaenga airfield in northern Russia in March 1944, which confirmed the German battleship Tirpitz was moored in Kaafjord, a branch of Altafjord in northern Norway, after completing repairs from earlier damage. These missions, enabled by an RAF photo-reconnaissance detachment hosted by Soviet forces, provided detailed imagery of the ship's position and surrounding defenses, while also revealing a diminished German air presence in the region, as Luftwaffe fighter units had been redeployed to support operations on the Eastern Front against advancing Soviet forces. Planning for the strike originated in late 1943 under Sir Bruce Fraser, of the , who recognized the need to neutralize Tirpitz before it could threaten Allied Arctic convoys to the . Initial preparations accelerated after intelligence indicated the battleship's repairs would be complete by early , prompting Fraser to favor a carrier-based air attack over RAF heavy bomber raids, as the steep-sided fjords restricted access for land-based aircraft and their bomb loads would be less effective against the protected anchorage. The operation was tentatively scheduled for mid-March but postponed to early April to align with favorable weather forecasts, convoy schedules, and completion of radar upgrades on HMS Victorious, allowing four months of coordination between the Admiralty and units. Tactical planning emphasized surprise and precision, structuring the assault as a two-wave bombing run: the first wave of 21 torpedo bombers, escorted by fighters, would launch around 0410 hours and strike around 0630 hours local time to catch German defenses off guard, followed 30 minutes later by a second wave to exploit any disruption. The Home Fleet's approach route skirted the Islands northward through the , minimizing radar detection by maintaining and using low-altitude cruising to evade patrols. Weather played a pivotal role in finalizing the timing, with meteorological reports predicting clear skies and good visibility over Kaafjord on 3 April 1944—conditions vital for the dive-bombers' accuracy in the confined environment.

Forces and Defenses

Allied Naval and Air Forces

The Allied naval and air forces for Operation Tungsten were drawn primarily from the British , with overall command exercised by Sir aboard the battleship HMS Anson, under the strategic direction of Admiral Sir Bruce Fraser. The 10th Cruiser Squadron, providing close escort and anti-aircraft support, was led by Robert Burnett flying his flag in the cruiser . Air operations were coordinated by the from the carrier force, marking the service's first major carrier-based strike of the war against a target. The task force comprised 11 warships in total, organized into striking and support elements to deliver and protect the air attack. The core striking carriers included the fleet carriers HMS Victorious and HMS Furious, supplemented by the escort carriers HMS Searcher, HMS Emperor, HMS Pursuer, and HMS Fencer for fighter cover. HMS Victorious embarked 21 torpedo/dive bombers from Nos. 827 and 829 Naval Air Squadrons, along with F4U Corsairs from Nos. 1834 and 1836 Naval Air Squadrons. HMS Furious carried 21 Barracudas from Nos. 830 and 831 Naval Air Squadrons. The escort carriers provided additional fighters, including F6F Hellcats from No. 880 Naval Air Squadron on HMS Emperor and Seafires from Nos. 881 and 896 Naval Air Squadrons on HMS Searcher and HMS Pursuer, for sweeps and protection. Supporting the carriers were the cruisers and HMS Sheffield, plus eight destroyers including HMS Milne, HMS Matchless, HMS Musketeer, HMS Mahratta, HMS Onslaught, HMS Obedient, and the Canadian HMCS Algonquin, ensuring anti-submarine screening and duties. The were equipped with ASV (Air-to-Surface Vessel) radar to aid in under potential low visibility, enabling precise dive-bombing runs with 1,600 lb armor-piercing bombs despite the aircraft's relatively modest speed and range. and Corsairs, serving as fighter escorts, conducted operational sorties in the initial waves to suppress anti-aircraft fire and engage any interceptors, leveraging their superior climb rate and armament of six .50-caliber machine guns. These aircraft types represented the Fleet Air Arm's shift toward American-sourced fighters, enhancing performance over earlier British designs. Over 2,000 sailors and airmen participated across the force, with the carrier air wings alone involving around 163 personnel in the striking squadrons, many of whom were relatively inexperienced in large-scale operations but had undergone intensive training in dive-bombing and at Hatston in . This commitment underscored the Royal Navy's emphasis on expanding carrier capabilities to neutralize surface threats like the Tirpitz without risking capital ships in direct engagement.

German Defenses at Kaafjord

The German battleship Tirpitz, anchored in Kaafjord, served as the centerpiece of the defensive network protecting this strategic Norwegian fjord in April 1944. Her own anti-aircraft armament included 16 × 10.5 cm SK C/33 guns in eight twin mounts, 16 × 3.7 cm SK C/30 guns in eight twin mounts, and 78 × 2 cm guns in various single and quadruple configurations, supported by a wartime crew of 2,608 personnel comprising 108 officers and 2,500 enlisted men. These weapons were integrated with fire-control systems, including a Würzburg-D radar antenna installed earlier in 1944 for directing heavy AA fire, though the overall setup emphasized close-range protection amid ongoing modifications to enhance her defensive capabilities. Complementing the ship's guns were additional shore batteries positioned around the anchorage, consisting of four batteries of heavy anti-aircraft guns equipped with searchlights for night operations, along with smoke-screen generators designed to obscure visibility and deny attackers a clear targeting opportunity. These local defenses formed a layered barrier, with the smoke system relying on chemical dispersal to create dense fog, though activation times varied under operational conditions. Air cover for Kaafjord relied on the limited resources of the in , where priorities on the Eastern Front and chronic fuel shortages constrained deployments. Only 25–30 fighters, primarily Bf 109s and Fw 190s from , were available in the region, insufficient to provide robust interception against potential raids. Early warning capabilities were hampered by incomplete radar coverage; while some Freya and stations existed along the coast, none were fully operational for real-time detection over Kaafjord on 3 April 1944, contributing to delayed responses. On 3 April 1944, Tirpitz was at a low state of readiness, having completed repairs from the midget submarine attack only by early March but remaining in post-refit trials just two weeks prior to the raid. This left her crew and defenses in a transitional phase, with incomplete integration of new systems and reduced alert posture, allowing the British strike to achieve initial surprise despite the presence of supporting flak ships and netting.

The Raid

Approach and Initial Engagement

The British task force, comprising two forces under , departed on 30 , embarking on a 1,000-mile voyage northward through the treacherous Arctic waters toward the Norwegian coast. The operation's secrecy was maintained through strict , zigzag formations to evade potential attacks, and diversionary tactics that successfully avoided German reconnaissance patrols, ensuring the fleet remained undetected during the transit. The two forces rendezvoused at 16:20 on 2 April before advancing to a launch position approximately 120 miles from Kaafjord, the anchorage of the . Early on 3 April, under the cover of pre-dawn twilight, the first wave of aircraft was launched at 04:15 from the carriers HMS Victorious and HMS Furious. This wave included 21 Fairey Barracuda torpedo/dive-bombers escorted by 40 fighters—comprising 10 Vought Corsairs and 30 Grumman Wildcats or F6F Hellcats—flying at low altitude to minimize radar detection. A second wave followed at 05:25, consisting of 19 Barracudas similarly escorted by 40 fighters, with additional Hellcats and Wildcats providing a fighter sweep ahead to suppress shore-based defenses. The low-level approach, maintained at around 50 feet over the sea, further aided in evading early warning systems during the 170-mile flight to the target area. The initial fighter sweep encountered virtually no aerial opposition, as the element of surprise held firm. German radar stations detected the incoming raid at 05:30 shortly after the aircraft crossed the Norwegian coastline, but the alert to Tirpitz was delayed, allowing the British formations to reach the fjord with minimal interference. In response, the scrambled only eight fighters from nearby bases, which arrived too late to engage the attackers effectively. Weather conditions were favorable, with clear skies, light winds, and excellent visibility that supported precise navigation and formation integrity during the approach. However, these same conditions exposed the low-flying aircraft to observation once over land, heightening their vulnerability to ground-based anti-aircraft fire as they neared Kaafjord.

Bombing Runs and Damage Assessment

The bombing runs on the German battleship Tirpitz were conducted in two waves by Fleet Air Arm aircraft from British carriers during the early morning of 3 April 1944. The first wave, comprising 21 Fairey Barracuda dive bombers escorted by 40 fighters, approached Kaafjord and dived from 10,000 feet at 0540 hours, releasing a mix of 1,600 lb armor-piercing and 500 lb semi-armor-piercing bombs. This attack scored 10 hits. The second wave, consisting of 19 Barracudas with another 40 fighters, struck at approximately 0630 hours, navigating through heavy flak fire from Tirpitz and supporting defenses as well as thick smoke screens deployed by the Germans. The bombers achieved 5 additional hits, bringing the total to 15 confirmed strikes, though the smoke and intense anti-aircraft barrage limited further accuracy. The bomb hits caused extensive damage to the ship's superstructure, igniting major fires that damaged the starboard , installations, and anti-aircraft batteries, though the main armored deck remained largely intact with only one penetration. There was no flooding of the engine rooms, and any list was minor from near-misses. The attack resulted in 122 German crew killed and 316 wounded, rendering the temporarily inoperable and requiring extensive repairs. British losses during the raid included 3-4 shot down by flak, resulting in 9 airmen killed.

Outcomes and Legacy

Immediate Damage and Casualties

The raid inflicted significant damage on the , with 15 direct hits from 1,000- and 1,600-pound armor-piercing bombs dropped by . These strikes primarily affected the ship's and unarmored areas, destroying much of the fire-control systems and anti-aircraft batteries while causing extensive fires across the deck. Near misses also opened holes in the hull, leading to flooding of approximately 1,400 tons of water in multiple compartments, though the main armored deck remained intact and vital machinery was unaffected. The German crew suffered heavy losses, with 122 killed and 316 wounded—representing about 15% of the battleship's complement—largely due to the bomb impacts and strafing runs by escorting fighters on gun crews. The Tirpitz was rendered inoperable for several months, remaining out of action until temporary repairs allowed limited mobility by mid-July 1944; she was then towed within the Altafjord area for further drydock work using improvised facilities, with full operational readiness delayed until October due to ongoing assessments and additional minor damage from subsequent threats. British losses were comparatively light, with 9 airmen killed from the operation; four aircraft were lost, including two Barracudas shot down, one Hellcat ditched after damage, and one Barracuda lost in a takeoff accident, but no ships were hit or sunk. The raiding force successfully withdrew from the Kaafjord without pursuit by German naval or air units, navigating adverse weather and completing the return voyage to Scapa Flow by 6 April 1944.

Strategic Implications and Follow-up Operations

Operation Tungsten achieved significant strategic success by severely damaging the , rendering it inoperable for three to five months and thereby neutralizing its immediate threat to Allied shipping. This outcome boosted morale within the British and the broader Allied naval forces, while demoralizing the German , as the raid demonstrated the vulnerability of even heavily defended capital ships to carrier-based air power. By sidelining Tirpitz, the operation allowed for safer passage of convoys, such as Convoy JW 58, which departed on 27 March 1944 and reached the without interference from the battleship, facilitating the delivery of critical supplies to support the Eastern Front. From the German perspective, the raid exposed the Luftwaffe's weakness in , where minimal air opposition was mounted due to limited resources and poor coordination, as evidenced by post-war Admiralty assessments of enemy reports. , already cautious about deploying Tirpitz at sea following the loss of its Bismarck, responded to the damage by further restricting the battleship's operational role, effectively condemning it to serve as a static to deter potential Allied invasions of rather than allowing offensive sorties. This decision, rooted in Hitler's fear of losing another prestige asset, tied down substantial German resources, including repair crews, anti-aircraft defenses, and logistical support in the fjords, diverting assets from other fronts and prolonging the strain on the Kriegsmarine's northern command. The raid paved the way for a series of follow-up operations aimed at permanently eliminating Tirpitz. Operation Mascot on 17 July 1944 involved 42 Barracuda dive-bombers and 40 fighters from British carriers but failed to score hits due to an effective German smokescreen that obscured the target. Operation Goodwood, conducted between 22 and 29 August 1944, consisted of multiple strikes from carriers Formidable and Victorious using Firefly and Corsair aircraft, inflicting only minor splinter damage as the battleship again employed smoke defenses. These efforts culminated in Operation Catechism on 12 November 1944, when RAF Lancaster bombers from Nos. 9 and 617 Squadrons dropped Tallboy "earthquake" bombs on Tirpitz in Tromsø, scoring multiple direct hits that capsized and sank the ship with the loss of nearly 1,000 crew. In its legacy, Operation Tungsten underscored the effectiveness of carrier aviation in modern , validating the Royal Navy's investment in fleet carriers and integrated air groups for precision strikes against fortified targets. The operation influenced post-war naval doctrine by emphasizing the primacy of air power over surface gunnery in fleet engagements and the importance of surprise, fighter escorts, and specialized ordnance like the 1,600-pound armor-piercing bombs used in the raid. Recent historical analyses, drawing on declassified Admiralty records, confirm that Tungsten played a crucial role in preventing Tirpitz from breaking out into the Atlantic, thereby sustaining Allied convoy security through the war's final phases.
Add your contribution
Related Hubs
User Avatar
No comments yet.