
Community hub
Recent from talks
Contribute something to knowledge base
Content stats: 0 posts, 0 articles, 1 media, 0 notes
Members stats: 0 subscribers, 0 contributors, 0 moderators, 0 supporters
Subscribers
Supporters
Contributors
Moderators
Hub AI
Battle of Sio AI simulator
(@Battle of Sio_simulator)
Hub AI
Battle of Sio AI simulator
(@Battle of Sio_simulator)
Battle of Sio
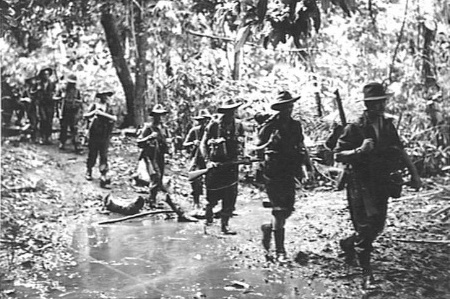
The Battle of Sio, fought between December 1943 and March 1944, was the break-out and pursuit phase of General Douglas MacArthur's Huon Peninsula campaign, part of the New Guinea campaign of World War II.
After the defeat of the Japanese in the Battle of Sattelberg, Australian Army forces broke through the Japanese positions around Finschhafen. Constant pressure from United States Navy PT boats, Australian land forces and Allied aircraft brought the Japanese logistical system to the brink of collapse, resulting in disease, malnutrition, and privation for the Japanese soldiers. Meanwhile, the Allied supply system grappled with the problems of terrain and climate, particularly inclement weather and rough monsoonal seas that hampered and occasionally prevented delivery of supplies by sea.
Australian and Papuan troops advanced along the coast of the Huon Peninsula, using infantry, tanks, and air strikes against the Japanese positions, which were generally sited at creek crossings in the jungle. The advancing infantry kept strictly within range of the supporting artillery, which was liberally employed in the early stages of the operation. Using tactics that exploited the firepower of Australian artillery and armour, the Australian and Papuan troops inflicted heavy and disproportionate casualties on the Japanese as they advanced, ultimately linking up with the American forces at Saidor. Hundreds of Japanese soldiers were killed; thousands more died from disease, malnutrition, exhaustion and suicide. The Allies failed to seize the opportunity to completely destroy the Japanese forces.
During the advance, Australian troops captured Japanese cryptographic materials. This had an important effect on the subsequent course of the war against Japan in the South West Pacific, as it permitted codebreakers in Australia and the United States to read Japanese Army messages on a much greater scale than previously. This major intelligence windfall led to MacArthur accelerating the South West Pacific's timetable by over three months, starting with the Admiralty Islands campaign in February followed by the landings at Hollandia and Aitape in April far behind enemy lines.
General Douglas MacArthur's Operation Cartwheel began with spectacular victories in the landing at Lae and the landing at Nadzab but then faltered in the face of inclement weather, unfavourable terrain, and—above all—tenacious and aggressive Japanese opposition on land and in the air. The initiative passed to Major General Hatazō Adachi's Eighteenth Army which launched a series of counter-attacks against Major General George Wootten's 9th Division in the Battle of Finschhafen. At the Battle of Sattelberg, Wootten finally inflicted a crushing defeat on Adachi.
Although beaten, the Japanese did not leave the area. Lieutenant General Shigeru Katagiri, the commander of the Japanese 20th Division, ordered the 80th Infantry Regiment to hold the Wareo area to protect the withdrawal of the 79th Infantry Regiment and other units. The 2nd Battalion, 238th Infantry Regiment was to act as a rearguard on the coast. Lieutenant General Frank Berryman, the commander of Australian II Corps, now urged Wootten to commence a coastal advance to cut the Japanese supply lines and force Adachi to retreat from the Huon Peninsula if he were not already doing so. Wootten took a more cautious approach. The Battle of Wareo proved that the Japanese intended to defend the area. After a fierce fight, Wootten managed to drive the Japanese from the high ground around Sattelberg and Gusika. In early December, Adachi ordered all his troops to withdraw to Sio. Wareo was captured by the Australians on 8 December and the last Japanese rearguards left the area on 15 December. Meanwhile, Berryman's coastal advance had commenced on 5 December.
Early in October 1943, a special staff was established at II Corps Headquarters to study the Japanese supply system. It did not include an officer with experience in maintaining a large force over a native carrier line, and therefore took time to realise that the Japanese force could not be maintained over an inland track, as was first assumed. Operations soon confirmed that the Japanese were dependent on a coastal supply line. During the Battle of Sattelberg, the Allies set out to cut this supply line. A three-pronged approach was taken:
By December, the pitiful condition of Japanese prisoners confirmed for the Australians that "the Japanese logistic system was in the final stages of breakdown". Between 9 and 13 December, PT boats sank 23 barges, most of them south of Sio. On 7 January, the PT boats also attacked a submarine. No less than twelve barges were destroyed on the night of 8 January, one of which was loaded with ammunition and another with around 70 troops. On 9 January, PT boats attacked a group of six barges, which attempted to fight back. One barge was seen to sink. Another patrol engaged eight barges and destroyed two. A third patrol found six barges on a beach and destroyed them. Then on 10 January, three PT boats sank three troop-carrying barges, taking one Japanese prisoner. The same night, two barges were also sunk north of Sio Island. When General Berryman saw Vice Admiral Thomas C. Kinkaid, the commander of the Allied Naval Forces, on 14 December, he made a point of congratulating him on the work his PT boats were doing.
Battle of Sio
The Battle of Sio, fought between December 1943 and March 1944, was the break-out and pursuit phase of General Douglas MacArthur's Huon Peninsula campaign, part of the New Guinea campaign of World War II.
After the defeat of the Japanese in the Battle of Sattelberg, Australian Army forces broke through the Japanese positions around Finschhafen. Constant pressure from United States Navy PT boats, Australian land forces and Allied aircraft brought the Japanese logistical system to the brink of collapse, resulting in disease, malnutrition, and privation for the Japanese soldiers. Meanwhile, the Allied supply system grappled with the problems of terrain and climate, particularly inclement weather and rough monsoonal seas that hampered and occasionally prevented delivery of supplies by sea.
Australian and Papuan troops advanced along the coast of the Huon Peninsula, using infantry, tanks, and air strikes against the Japanese positions, which were generally sited at creek crossings in the jungle. The advancing infantry kept strictly within range of the supporting artillery, which was liberally employed in the early stages of the operation. Using tactics that exploited the firepower of Australian artillery and armour, the Australian and Papuan troops inflicted heavy and disproportionate casualties on the Japanese as they advanced, ultimately linking up with the American forces at Saidor. Hundreds of Japanese soldiers were killed; thousands more died from disease, malnutrition, exhaustion and suicide. The Allies failed to seize the opportunity to completely destroy the Japanese forces.
During the advance, Australian troops captured Japanese cryptographic materials. This had an important effect on the subsequent course of the war against Japan in the South West Pacific, as it permitted codebreakers in Australia and the United States to read Japanese Army messages on a much greater scale than previously. This major intelligence windfall led to MacArthur accelerating the South West Pacific's timetable by over three months, starting with the Admiralty Islands campaign in February followed by the landings at Hollandia and Aitape in April far behind enemy lines.
General Douglas MacArthur's Operation Cartwheel began with spectacular victories in the landing at Lae and the landing at Nadzab but then faltered in the face of inclement weather, unfavourable terrain, and—above all—tenacious and aggressive Japanese opposition on land and in the air. The initiative passed to Major General Hatazō Adachi's Eighteenth Army which launched a series of counter-attacks against Major General George Wootten's 9th Division in the Battle of Finschhafen. At the Battle of Sattelberg, Wootten finally inflicted a crushing defeat on Adachi.
Although beaten, the Japanese did not leave the area. Lieutenant General Shigeru Katagiri, the commander of the Japanese 20th Division, ordered the 80th Infantry Regiment to hold the Wareo area to protect the withdrawal of the 79th Infantry Regiment and other units. The 2nd Battalion, 238th Infantry Regiment was to act as a rearguard on the coast. Lieutenant General Frank Berryman, the commander of Australian II Corps, now urged Wootten to commence a coastal advance to cut the Japanese supply lines and force Adachi to retreat from the Huon Peninsula if he were not already doing so. Wootten took a more cautious approach. The Battle of Wareo proved that the Japanese intended to defend the area. After a fierce fight, Wootten managed to drive the Japanese from the high ground around Sattelberg and Gusika. In early December, Adachi ordered all his troops to withdraw to Sio. Wareo was captured by the Australians on 8 December and the last Japanese rearguards left the area on 15 December. Meanwhile, Berryman's coastal advance had commenced on 5 December.
Early in October 1943, a special staff was established at II Corps Headquarters to study the Japanese supply system. It did not include an officer with experience in maintaining a large force over a native carrier line, and therefore took time to realise that the Japanese force could not be maintained over an inland track, as was first assumed. Operations soon confirmed that the Japanese were dependent on a coastal supply line. During the Battle of Sattelberg, the Allies set out to cut this supply line. A three-pronged approach was taken:
By December, the pitiful condition of Japanese prisoners confirmed for the Australians that "the Japanese logistic system was in the final stages of breakdown". Between 9 and 13 December, PT boats sank 23 barges, most of them south of Sio. On 7 January, the PT boats also attacked a submarine. No less than twelve barges were destroyed on the night of 8 January, one of which was loaded with ammunition and another with around 70 troops. On 9 January, PT boats attacked a group of six barges, which attempted to fight back. One barge was seen to sink. Another patrol engaged eight barges and destroyed two. A third patrol found six barges on a beach and destroyed them. Then on 10 January, three PT boats sank three troop-carrying barges, taking one Japanese prisoner. The same night, two barges were also sunk north of Sio Island. When General Berryman saw Vice Admiral Thomas C. Kinkaid, the commander of the Allied Naval Forces, on 14 December, he made a point of congratulating him on the work his PT boats were doing.
Recent media
Recent media