

Community hub
Recent from talks
Contribute something
Nothing was collected or created yet.
Blend modes
View on Wikipedia
Blend modes (alternatively blending modes[1] or mixing modes[2]) in digital image editing and computer graphics are used to determine how two layers are blended with each other. The default blend mode in most applications is simply to obscure the lower layer by covering it with whatever is present in the top layer (see alpha compositing); because each pixel has numerical values, there also are many other ways to blend two layers.
Most graphics editing programs, such as Adobe Photoshop and GIMP, allow users to modify the basic blend modes, for example by applying different levels of opacity to the top "layer". The top "layer" is not necessarily a layer in the application; it may be applied with a painting or editing tool. The top "layer" also is called the "blend layer" and the "active layer".
In the formulas shown on this page, values go from 0.0 (black) to 1.0 (white).
Normal blend mode
[edit]This is the standard blend mode which uses the top layer alone,[3] without mixing its colors with the layer beneath it:[example needed]

where a is the value of a color channel in the underlying layer, and b is that of the corresponding channel of the upper layer. The result is most typically merged into the bottom layer using "simple" (b over a) alpha compositing (making the actual formula ), but other Porter-Duff operations are possible.[3] The compositing step results in the top layer's shape, as defined by its alpha channel, appearing over the bottom layer.

Dissolve
[edit]The dissolve mode takes random pixels from both layers. With top layer opacity greater than that of the bottom layer, most pixels are taken from the top layer, while with low opacity most pixels are taken from the bottom layer. No anti-aliasing is used with this blend mode, so the pictures may look grainy and harsh.
Adobe Photoshop generates a pseudo-random noise dither pattern on startup, with each pixel location in a 2D raster array assigned a gray value (R=G=B) and an alpha value of 1 ("on"). As the opacity of the top layer is reduced, the alpha value of some of the gray pixels is switched from 1 to 0 ("off"), with the result that image pixels corresponding to a gray-valued pixel in the raster array are either on (visible, opaque) or off (invisible, transparent), with no opacity gradation.
Multiply and Screen
[edit]Multiply and Screen blend modes are basic blend modes for darkening and lightening images, respectively. There are many combinations of them, such as Overlay, Soft Light (see below), Vivid Light, Linear Light, and Pin Light.
Multiply
[edit]Multiply blend mode takes the RGB channel values from 0 to 1 of each pixel in the top layer and multiplies them with the values for the corresponding pixel from the bottom layer. The composite is darker, unless the pixel is white in either layer or black in both layers. Where either layer is white, the composite is the same as the other layer. Where both layers are black, the composite is the same.

where a is the base layer value and b is the top layer value.
This mode is commutative: exchanging two layers does not change the result. If the two layers contain the same picture, multiply blend mode is equivalent to a quadratic curve, or gamma correction with γ=2. For image editing it is sometimes more convenient to simply go to the Curves dialog of the software, because it gives more flexibility in the shape of the curves. Or one can use Levels dialog: the middle number is usually 1/γ, so one can just type 0.5.
If one layer contains a homogeneous color, such as the gray color (0.8, 0.8, 0.8), multiply blend mode is equivalent to a curve that is simply a straight line. This is also equivalent to using this gray value as opacity when doing "normal mode" blend with a black bottom layer.
Screen
[edit]With Screen blend mode, the values of the pixels in the two layers are inverted, multiplied, and then inverted again. The result is the opposite of Multiply: wherever either layer was darker than white, the composite is brighter.

where a is the base layer value and b is the top layer value.
This mode is commutative: exchanging two layers does not change the result. If one layer contains a homogeneous gray, Screen blend mode is equivalent to using this gray value as opacity when doing "normal mode" blend with white top layer.
-
 Example top layer
 -
 Example bottom layer
 -
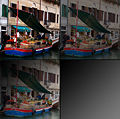 Multiply blend mode applied to the two example layers
 -
 Screen blend mode applied to the two example layers


Overlay
[edit]Overlay combines Multiply and Screen blend modes.[4] Where the base layer is light, the top layer becomes lighter; where the base layer is dark, the top becomes darker; where the base layer is mid grey, the top is unaffected. An overlay with the same picture looks like an S-curve.

where a is the base layer value and b is the top layer value.
When one gets linear interpolation between 0 and ; when one gets linear interpolation between and 1. This mode is not commutative. However, it can be made commutative by changing the condition to be either or .


Hard Light
[edit]Hard Light is also a combination of Multiply and Screen. Hard Light affects the blend layer's relationship to the base layer in the same way Overlay affects the base layer's relationship to the blend layer.

The inverse relationship between Overlay and Hard Light makes them "commuted blend modes". [citation needed]
Soft Light
[edit]
Soft light is most closely related to Overlay and is only similar to Hard Light by name. Applying pure black or white does not result in pure black or white.[example needed]
There are a variety of different methods of applying a soft light blend.[5] All the flavors produce the same result when the top layer is pure black; same for when the top layer is pure neutral gray. The Photoshop and illusions.hu flavors also produce the same result when the top layer is pure white (the differences between these two are in how one interpolates between these 3 results).
These three results coincide with gamma correction of the bottom layer with γ=2 (for top black), unchanged bottom layer (or, what is the same, γ=1; for top neutral gray), and γ=0.5 (for top white).
The formula used by Photoshop as of 2012 has a discontinuity of local contrast, and other formulas correct it. Photoshop's formula is:[6]

where a is the base layer value and b is the top layer value. Depending on b, one gets a linear interpolation between three gamma corrections: γ=2 (for b=0), γ=1 (for b=0.5), and γ=0.5 (for b=1).
Pegtop's formula[6] is smoother and corrects the discontinuity[better source needed] at b = 0.5:

This is a linear interpolation between Multiply (for a=0) and Screen (for a=1) blend modes. It can also be seen as a linear interpolation between the gamma correction with γ=2 (for b=0), and a certain tonal curve (for b=1). (The latter curve is equivalent to applying γ=2 to the negative of image.)
A third formula defined by illusions.hu[7] corrects the discontinuity in a different way, doing gamma correction with γ depending on b:

For b=0, one still gets γ=2, for b=0.5 one gets γ=1, for b=1 one gets γ=0.5, but it is not a linear interpolation between these 3 images.
The formula specified by recent W3C drafts[3] for SVG and Canvas is mathematically equivalent to the Photoshop formula with a small variation where b≥0.5 and a≤0.25:

where:

This is also the formula used by Cairo,[8] and in earlier PDF documentation.[9]
It is still a linear interpolation between 3 images for b=0, 0.5, 1. But now the image for b=1 is not γ=0.5, but the result of a tonal curve which differs from the curve of γ=0.5 for small values of a: while gamma correction with γ=0.5 may increase the value of a many times, this new curve limits the increase of a by coefficient 4.
Dodge and burn
[edit]Dodge and burn change the lightness of the pictures, inspired by the dodging and burning performed in a darkroom. Dodging lightens an image, while burning darkens it. Dodging the image is the same as burning its negative (and vice versa).
- Dodge modes:
- The Screen blend mode inverts both layers, multiplies them, and then inverts that result.
- The Color Dodge blend mode divides the bottom layer by the inverted top layer. This lightens the bottom layer depending on the value of the top layer: the brighter the top layer, the more its color affects the bottom layer. Blending any color with white gives white. Blending with black does not change the image. The operation is not invertible due to possible clipping of highlights. (The clipping happens in the same area as for the Linear Dodge.) When the top layer contains a homogeneous color, this effect is equivalent to changing the white point to the inverted color. The perceived contrast increases when there is no clipping.
- The Linear Dodge blend mode simply sums the values in the two layers (also known as additive blending). Blending with white gives white. Blending with black does not change the image. When the top layer contains a homogeneous color, this effect is equivalent to changing the output black point to this color, and (input) white point to the inverted color. The contrast is decreased when there is no clipping.
- Divide: Same as "Color Dodge", but blending with white does not change the image.
-
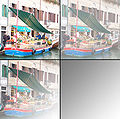
Screen blend mode applied to the example pictures
-
 Color Dodge blend mode applied to the example pictures
 -
 Linear Dodge (Additive) blend mode applied to the example pictures


- Burn modes:
- The Multiply mode simply multiplies each component in the two layers.
- The Color Burn mode divides the inverted bottom layer by the top layer, and then inverts the result. This darkens the top layer increasing the contrast to reflect the color of the bottom layer. The darker the bottom layer, the more its color is used. Blending with white produces no difference. When the top layer contains a homogeneous color, this effect is equivalent to changing the black point to the inverted color. The operation is not invertible due to possible clipping of shadows. The clipping happens in the same area as for the Linear Burn.
- The Linear Burn mode sums the value in the two layers and subtracts 1. This is the same as inverting each layer, adding them together (as in Linear Dodge), and then inverting the result. Blending with white leaves the image unchanged.
- Vivid Light: this blend mode combines Color Dodge and Color Burn (rescaled so that neutral colors become middle gray). Dodge applies when values in the top layer are lighter than middle gray, and burn applies to darker values. The middle gray is the neutral color. When the top layer's color is lighter than this, this effectively moves the white point of the bottom layer down by twice the difference; when it is darker, the black point is moved up by twice the difference. (This increases the perceived contrast.)
- Linear Light: this blend mode combines Linear Dodge and Linear Burn (rescaled so that neutral colors become middle gray). Dodge is applied when the value on the top layer is lighter than middle gray, and burn applies when the top layer value is darker. The calculation simplifies to the sum of the bottom layer and twice the top layer, subtract 1. This mode decreases the contrast.
- Subtract: this blend mode sums the value in the two layers and subtracts 1. Unlike Linear Burn, blending with white affects the image.
Simple arithmetic blend modes
[edit]Divide
[edit]This blend mode divides the RGB channel values of bottom layer by those of the top layer: the darker the top layer, the brighter the bottom layer will appear. Blending any color with black yields white; blending with white has no effect. This operation is not invertible due to possible clipping of highlights.
When blended with a homogeneous color such as gray, this blend mode uniformly increases an image's contrast, especially its highlights. It can also sometimes be used to correct/remove a uniform color tint from an image (similar to adjusting the image's white point) by specifying the color tint itself as the value to divide by.
Addition
[edit]This blend mode simply adds pixel values of one layer with the other. In case of values above 1 (in the case of RGB), white is displayed. "Linear Dodge" produces the same visual result. Since this always produces the same or lighter colors than the input it is also known as 'plus lighter'. A variant subtracts 1 from all end values, with values below 0 becoming black; this mode is known as 'plus darker'.
Subtract
[edit]This blend mode simply subtracts pixel values of one layer with the other. In case of negative values, black is displayed. In some applications such as Krita, "Inverse Subtract" is also available.[1]
Difference
[edit]Difference subtracts the bottom layer from the top layer and takes the absolute value of the result. As such, Difference never returns negative values. Blending with black produces no change, as values for all colors are 0. (The RGB value for black is (0,0,0).) Blending with white inverts the picture.
One of the main utilities for this is during the editing process, when it can be used to verify alignment of pictures with similar content. Exclusion is a very similar blend mode with lower contrast.
Darken Only
[edit]Darken Only creates a pixel that retains the smallest components of the foreground and background pixels. If the foreground pixel has the components , and the background has , the resultant pixel is:[10]


![{\displaystyle [\min(r_{1},r_{2}),\min(g_{1},g_{2}),\min(b_{1},b_{2})]}](https://wikimedia.org/api/rest_v1/media/math/render/svg/eb14e72eb12af7d7b413360d4ed37a294db5888c)
Lighten Only
[edit]Lighten Only has the opposite action of Darken Only. It selects the maximum of each component from the foreground and background pixels. The mathematical expression for Lighten Only is:[10]
![{\displaystyle [\max(r_{1},r_{2}),\max(g_{1},g_{2}),\max(b_{1},b_{2})]}](https://wikimedia.org/api/rest_v1/media/math/render/svg/1aa3d7c797846d0e7f319cd80589de6effbf7830)
Boolean arithmetic blend modes
[edit]A few applications, such as Aviary's Peacock and KDE's Krita,[1] supply boolean arithmetic blend modes. These combine the binary expansion of the hexadecimal color at each pixel of two layers using boolean logic gates. The top layer's alpha controls interpolation between the lower layer's image and the combined image.
Hue, saturation, color and luminosity
[edit]Photoshop's hue, saturation, color, and luminosity blend modes are based on a color space with hue, chroma and luma dimensions. Note: this space is different from both HSL and HSV, and only the hue dimension is shared between the three. See the article HSL and HSV for details.
Unlike all of the previous blend modes described, which operate on each image channel independently, in each of these modes, some dimensions are taken from the bottom layer, while the remainder are taken from the top layer. Colors which end up out of gamut are brought inside by mapping along lines of constant hue and luma. This makes the operations uninvertible – after a top layer has been applied in one of these blend modes, it is in some cases impossible to restore the appearance of the original (bottom) layer, even by applying a copy of the bottom layer in the same blend mode above both.
- The Hue blend mode preserves the luma and chroma of the bottom layer, while adopting the hue of the top layer.
- The Saturation blend mode preserves the luma and hue of the bottom layer, while adopting the chroma of the top layer.
- The Color blend mode preserves the luma of the bottom layer, while adopting the hue and chroma of the top layer.
- The Luminosity blend mode preserves the hue and chroma of the bottom layer, while adopting the luma of the top layer.
Because these blend modes are based on a color space which is much closer than RGB to perceptually relevant dimensions, it can be used to correct the color of an image without altering perceived lightness, and to manipulate lightness contrast without changing the hue or chroma. The Luminosity mode is commonly used for image sharpening, because human vision is much more sensitive to fine-scale lightness contrast than color contrast. (See Contrast (vision))
Few editors other than Photoshop implement this same color space for their analogs of these blend modes.[3] Instead, they typically base their blend modes on HSV (aka HSB) or HSL. Blend modes based on HSV are typically labeled hue, saturation, and brightness. Using HSL or HSV has the advantage that most operations become invertible (at least in theory), but the disadvantage that the dimensions of HSL and HSV are not as perceptually relevant as the dimensions of the space Photoshop uses.
Relation to masking
[edit]The result of applying several of these modes depends linearly on the pixel level of the top layer. In such cases, when the top layer is purely black, one gets a certain transformation of the bottom layer (which may be just a purely black or purely white image). When the top layer is purely white, one gets another such transformation. The intermediate gray values are described above using the opacity slider on the second transformation.
In such cases, applying the blending mode is equivalent to Normal blending:
- Apply two transformations to the bottom layers;
- Use the result of the first transformation as the new bottom layer;
- Put the result of the second transformation as the new top layer;
- Use the initial top layer as the mask on the new top layer.
(This assumes that the mask may be colored, with its R, G, B channels masking the channels of the image independently. Many image manipulation programs do not allow such masks; for them this equivalence holds only for grayscale top layers.)
Differences between layer and tool blending
[edit]Some applications allow the user to apply blending modes to painting tools, such as the Brush tool in Photoshop or any painting tools in GIMP. When blending modes are used with these tools, the result is calculated based on pixels already existing on the target layer. If no pixels currently exist, then the 'painted' pixels are created as if in Normal blending mode. Subsequent strokes that overlap are then calculated based on the tool's blending mode, and the result is applied directly to the layer. A key difference with tool blending versus layer blending is that the results of tool blends are generally not able to be adjusted after the stroke is made, with the exception of stepping backward with the application's Undo command; layer blends may be adjusted with opacity or even switched, as they are applied dynamically between layers. Put differently, painting tools alter the pixels on a layer; blend modes applied to two layers don't alter any pixels, but only affect the resulting visual image.
This distinction is useful to create various effects on a single layer, such as when applying dodge and burn techniques, where painting with a low opacity in screen or multiply modes allows the user to build up or reduce the results in a more organic way on a single layer.
See also
[edit]References
[edit]- ^ a b c "Blending Modes — Krita Manual 5.0.0 documentation". docs.krita.org. Retrieved 2022-03-24.
- ^ "Blending Modes in Photoshop and Elements". Archived from the original on 2014-08-18. Retrieved 2014-08-27.
- ^ a b c d "W3C: Compositing and Blending 1.0". Retrieved 9 November 2012.
- ^ "Pegtop: overlay blend mode". Retrieved 3 November 2012.
- ^ "Developers - Image processing algorithms resources". Archived from the original on 2016-06-17. Retrieved 2012-11-03.
- ^ a b "Pegtop blend modes: soft light". Retrieved 3 November 2012.
- ^ "Illusions.hu: soft light blending". Archived from the original on 2013-02-17.
- ^ "cairographics.org: Cairo's compositing operators". Retrieved 9 November 2012.
- ^ "Adobe.com: PDF Blend Modes: Addendum (to the PDF Reference, fifth edition, version 1.6" (PDF). Retrieved 9 November 2009.
- ^ a b "Gimp Advanced Guide - 5.6.4 The Darken Only and Lighten Only Blending Modes". Linuxtopia. Retrieved 28 March 2013.
- <blend-mode> - CSS: Cascading Style Sheets on MDN Web Docs
- Paul R. Dunn, "Insight into Photoshop 7.0 Blending Modes"
- "Photoshop math with GLSL shaders"
- "Photoshop Blend Mode Math", includes C code.
- Ron Bigelow, "Using Blend Modes in Photoshop – Part I", a tutorial
- The GIMP manual
- Blend modes in Flash
- Adobe Master transparency and blends pdf file
- GIMP and Photoshop Blending Modes visually explained and compared, parts one, two, three, and four
- JAVA demo on the image blending operator, an interactive JAVA-based image blending demo
- All the math behind photoshop compositing (including math for using alpha in complex compositions like softlight)
- Image Blending Algorithm
Books
- Photoshop Blending Modes Cookbook for Digital Photographers (John Beardsworth, O'Reilly 2005) - External
- The Hidden Power of Blend Modes in Adobe Photoshop (Scott Valentine, Adobe Press 20132) - External
Blend modes
View on GrokipediaFundamentals of Blend Modes
Definition and Common Applications
Blend modes are mathematical operations used in digital image editing and computer graphics to combine the colors of overlapping layers or elements on a per-pixel basis, typically within color spaces such as RGB, where colors are represented additively through red, green, and blue channels.[2] These operations take the base layer color (a) and the blend layer color (b) as inputs, producing a resulting color through a function f(a, b) that alters how the pixels interact, often simulating effects like darkening, lightening, or contrast enhancement. Understanding blend modes requires familiarity with underlying color models, such as the RGB additive color space, which defines how light intensities combine to form visible colors.[4] The general structure of blend mode computation yields a result = f(base, blend, opacity), where opacity modulates the influence of the blend layer, allowing for partial transparency and seamless integration between layers.[5] When opacity is 100%, the blend mode fully applies the function; lower values blend the result with the base layer proportionally, enabling nuanced control over visibility and interaction.[6] The normal blend mode serves as the default baseline, simply compositing layers based on opacity without additional color manipulation. Blend modes originated from foundational work in computer graphics compositing, notably the 1984 paper by Thomas Porter and Tom Duff, which introduced algebraic operations for combining digital images and laid the groundwork for modern blending techniques.[7] They were popularized in consumer software through Adobe Photoshop version 3.0 in 1994, which integrated them with layers for widespread use in digital art.[5] Common applications include photo editing in tools like Photoshop and GIMP for non-destructive adjustments and creative effects, web design via the CSS mix-blend-mode property for dynamic visual interactions, and compositing in film post-production software like Adobe After Effects to merge footage realistically.[6][8]Normal Blend Mode
The normal blend mode serves as the foundational blending operation in digital image editing and computer graphics, where the top layer (denoted as the blend layer ) is displayed opaquely over the base layer (), effectively replacing the underlying pixels without any color interaction or modification.[1] This mode operates according to the simple formula , ignoring the base layer's color entirely except in cases involving transparency.[9] As the default setting in applications like Adobe Photoshop, it enables straightforward layering where the blend layer's pixels directly determine the result, preserving the integrity of both layers for non-destructive editing workflows.[10] When the blend layer incorporates partial transparency via an alpha channel, the normal mode aligns with alpha compositing principles, specifically as the source-over operator in the Porter-Duff model.[11] The resulting color is computed as , where and are the premultiplied color and alpha of the blend layer, and is the base layer's color, ensuring the blend layer covers the base proportionally to its opacity.[12] Layer opacity further modulates this by applying a uniform scalar, yielding , which facilitates simple, linear layering without altering the inherent colors of either layer.[13] This behavior supports core compositing tasks, such as stacking elements in graphic design or video editing, where unaltered visibility of the top layer is essential.[10] In essence, the normal blend mode exemplifies a special case of Porter-Duff operations, prioritizing the blend layer's contribution while leveraging alpha for seamless integration, distinct from modes like dissolve that introduce randomized pixel sampling for textured transparency effects.[11]Dissolve Blend Mode
The dissolve blend mode operates by randomly selecting pixels from either the base layer or the blend layer for each position in the resulting image, with the probability of selecting the blend layer pixel determined by its opacity value.[3] For instance, at 50% opacity, approximately half of the pixels will display the blend layer color, while the other half show the base layer color, creating a probabilistic mosaic effect without any intermediate color blending or arithmetic operations between the layers.[5] This mechanism differs from the normal blend mode, which achieves opacity through smooth, linear interpolation rather than random selection.[3] Unlike arithmetic blending modes, dissolve relies on pseudo-random noise generation to determine pixel visibility, producing a granular, dithered appearance that simulates spatial on/off patterns based on opacity thresholds, without anti-aliasing or color interpolation.[14] The output resembles a noisy overlay, where the randomness ensures no predictable pattern, making it computationally straightforward as it involves only selection rather than complex calculations.[3] In applications such as Adobe Photoshop, the dissolve mode is commonly used to create dithered fade transitions between layers, adding a textured, speckled quality that evokes artistic effects like simulated film grain or granular patterns.[14] It proves effective for introducing controlled randomness in composite images, such as enhancing textures on patterns or achieving vintage, noisy aesthetics without dedicated filter tools.[5] However, the mode's noisy, abrupt output limits its suitability for scenarios requiring smooth or precise blends, as the random pixel replacement can appear visually harsh and lacks the subtlety of opacity-based transparency in other modes.[3] This simplicity in computation comes at the cost of predictability, often necessitating additional adjustments like blurring to mitigate the stark granularity.[14]Darken and Lighten Composite Modes
Multiply Mode
The Multiply mode is a fundamental darkening blend operation in digital compositing and image editing software, where the color values of the base layer and blend layer are multiplied channel by channel. The resulting color is computed using the formula , with values normalized to the range [0,1] and the output clamped to prevent overflow, ensuring the final color is always darker or equal to the base unless blending with white. This arithmetic approach simulates light absorption, where midtones progressively darken and pure black remains unchanged regardless of the blend layer.[1][3] In terms of behavior, the mode preserves deep shadows since any value multiplied by 0 yields 0, while whites in the blend layer (value 1) act as neutral, producing no alteration to the base layer. Successive applications with non-black or non-white colors accumulate darkening effects, enhancing depth without introducing highlights, which makes it ideal for subtle tone adjustments. For instance, blending a mid-gray base of RGB(0.5, 0.5, 0.5) with a lighter gray of RGB(0.8, 0.8, 0.8) results in RGB(0.4, 0.4, 0.4), demonstrating uniform darkening across channels.[3][15] Common applications include adding realistic shadows to illustrations, creating vignettes to draw focus in photographs, and overlaying textures like grunge or dirt maps to age digital artwork without harsh edges. In print design, Multiply closely mimics the physical process of ink layering in CMYK workflows, where each successive ink application absorbs more light from the substrate, building density in a subtractive manner.[16][17] It serves as the inverse of the Screen mode, which instead lightens through a complementary inversion of the multiplication operation.[1]Screen Mode
The Screen mode is a blend mode used in digital image compositing that lightens the base layer by simulating the additive effect of multiple light sources. It operates on each color channel independently, applying the formula , where is the base color value (normalized between 0 and 1) and is the blend color value.[18] This equation is equivalent to , which multiplies the inverses of the input colors and then inverts the result, ensuring the output is always at least as light as the lighter of the two inputs.[18] In terms of behavior, Screen mode preserves highlights in the base layer while gradually lightening midtones and shadows based on the blend layer's intensity. Black values in the blend layer (0) act as neutral, leaving the base unchanged, whereas white (1) results in pure white output, effectively erasing darker areas.[3] This mode is the inverse of the Multiply mode, providing a balanced counterpart for lightening operations.[18] Screen mode finds common applications in image editing for brightening overall tones, creating glowing effects around subjects, or applying subtle color tints without altering highlights. For instance, it is often used to simulate light flares or to composite ethereal overlays in photography and digital art.[3] A practical example illustrates its lightening effect: blending a base gray value of (0.5, 0.5, 0.5) with a darker gray blend layer of (0.2, 0.2, 0.2) yields (0.6, 0.6, 0.6) per channel, resulting in a noticeably brighter mid-gray.[18] Historically, this mode draws from analog film techniques, mimicking the additive light projection of multiple photographic slides onto a single screen, where overlapping exposures cumulatively brighten the image.[3]Darken Only Mode
The Darken Only mode, also known as Darken in some software like Adobe Photoshop, is a selection-based blending operation that compares the color values of corresponding pixels in the base and blend layers channel by channel (typically red, green, and blue in RGB color spaces) and retains the darker value for each channel in the resulting composite.[6] The formula for this mode is , where represents the base layer value and the blend layer value per channel, producing the darkest possible composite without introducing intermediate tones or new colors.[6] This results in a binary choice per pixel, ignoring any lighter values from either layer entirely. This mode exhibits commutative behavior, as the minimum operation yields the same result regardless of layer order, and it produces hard edges where transitions occur between retained dark and discarded light areas, preserving the hue and saturation of the selected darker pixels.[6] Unlike gradual darkening methods, it applies a strict per-channel comparison, making it suitable for scenarios requiring precise retention of shadows without affecting darker regions. It shares similar selection logic with Lighten Only mode but inverts the choice by prioritizing minimum values over maximums. Common applications include emphasizing shadows in composite images, correcting overexposure by overlaying darker elements to suppress bright highlights, and masking unwanted bright areas such as flares or hotspots in photography.[6] For instance, in astrophotography, stacking multiple exposures with Darken Only retains only the darkest (non-trailing) star positions across frames.[6] A representative example involves blending two RGB pixels: base (0.6, 0.4, 0.5) with blend (0.3, 0.7, 0.2), yielding the result (0.3, 0.4, 0.2) by selecting the minimum value for each channel.[6] Computationally, this mode is highly efficient, relying solely on simple per-channel comparisons without requiring multiplication or other arithmetic operations, which minimizes processing overhead in image editing software.Lighten Only Mode
The Lighten Only mode, also known as Lighten in many graphics applications, is a composite blend mode that operates on a per-channel basis, selecting the maximum value between the base layer (backdrop) and the blend layer (source) for each color channel to produce the resulting composite image.[1] The formula for this operation is given by , where represents the color value of the backdrop and the source in the relevant channel, ensuring the output retains only the brighter contribution from either layer.[19] This results in the lightest possible composite for the selected channels, effectively discarding any darker values from the blend layer where they are dimmer than the base.[4] In terms of behavior, this mode replaces pixels in the base layer that are darker than the corresponding pixels in the blend layer, while leaving lighter base pixels unchanged, which can produce stark contrasts by emphasizing brighter elements without affecting existing highlights. Unlike more complex illumination modes, Lighten Only performs a straightforward separable operation across RGB or other color channels independently, making it symmetric and independent of layer order in terms of the final pixel values.[20] It serves as the inverse counterpart to the Darken Only mode, which instead selects minimum values for darkening effects. This blend mode finds applications in digital image editing and compositing for highlighting bright areas in layered graphics, such as enhancing light sources or simulating optical flares in visual effects workflows.[1] It is also useful for correcting underexposed regions by blending with a lighter overlay, preserving texture while boosting luminosity in shadowed parts of an image. For instance, when compositing an RGB base layer with values (0.6, 0.4, 0.5) and a blend layer with (0.3, 0.7, 0.2), the result is (0.6, 0.7, 0.5), as the mode selects the brighter value per channel: max(0.6, 0.3) for red, max(0.4, 0.7) for green, and max(0.5, 0.2) for blue.[4] Due to its reliance on simple per-pixel maximum comparisons, Lighten Only is computationally efficient, requiring minimal operations per channel, which makes it suitable for real-time previews in graphics software and hardware-accelerated rendering pipelines.[21]Illumination and Contrast Modes
Overlay Mode
The overlay blend mode is a contrast-enhancing technique that selectively applies the multiply and screen operations to the base and blend layers based on the luminance of the base layer, thereby preserving its highlights and shadows while overlaying the blend layer.[3] It builds on the behaviors of multiply and screen modes by using the former in darker areas of the base and the latter in lighter areas, resulting in increased overall contrast without altering midtones significantly.[22] This mode is particularly effective for compositing images where the goal is to integrate textures or details that adapt to the underlying tonal structure.[23] The mathematical formula for the overlay blend mode, applied independently to each color channel with values normalized to the range [0, 1], is defined as follows: where represents the base layer value and the blend (source) layer value.[23] This conditional application ensures that areas below 50% gray (0.5) are darkened via a scaled multiply operation, while areas above are lightened via a scaled screen operation, avoiding clipping in pure black or white regions.[22] In practice, the overlay mode darkens shadows and brightens highlights relative to a neutral 50% gray, thereby boosting perceived sharpness and detail without introducing halos or excessive saturation. For example, blending a value of 0.8 over a base of 0.3 (dark area) yields , darkening the result, whereas the same blend over a base of 0.7 (light area) yields , lightening it.[3] This selective contrast adjustment makes overlay non-commutative, as swapping base and blend layers produces different outcomes compared to modes like hard light.[22] Common applications include sharpening images via the high-pass filter technique, where a duplicated layer is filtered and set to overlay to emphasize edges while preserving the original tones.[24] It is also widely used for adding textures, such as overlays of grain or patterns, to enhance visual interest in photographs or digital artwork without overwhelming the base composition's luminance range.[3] Blending modes like overlay trace their conceptual roots to darkroom photography techniques, where multiple exposures were combined to achieve similar contrast effects.[25]Soft Light Mode
The Soft Light blend mode simulates the effect of diffused or soft lighting on an image by gently adjusting the contrast of the base layer based on the luminance values of the blend layer. This mode darkens the base colors if the blend color is darker than 50% gray and lightens them if brighter, creating a subtle interplay of tones without replacing the base color entirely. Unlike more intense modes, it produces a natural, gradual transition that mimics indirect light sources, making it ideal for refining image luminosity while preserving details.[26] The mathematical formula for the Photoshop variant of Soft Light, applied per channel with values normalized to [0,1], is defined piecewise based on the blend value : where is the base color value and is the blend color value.[27] This quadratic approach ensures a smooth darkening or lightening effect, with the mode being non-commutative—swapping base and blend layers yields different results.[27] In practice, Soft Light generates subtle glows when blending brighter tones or soft shadows with darker ones, offering less aggressive contrast enhancement compared to Overlay. For instance, applying a low-luminance blend layer (e.g., a textured gray) to a portrait softens shadows on skin without introducing unnatural harshness, enhancing depth while maintaining a realistic appearance.[28] Common applications include subtle illumination in composite images, skin tone enhancement in portrait retouching to add warmth and evenness, and creating atmospheric effects like gentle fog or haze overlays in landscape photography.[29] It is particularly useful in non-destructive workflows, such as pairing with adjustment layers for targeted luminosity tweaks.[26] A variation known as the Pegtop formula addresses potential discontinuities in older implementations by using an alternative expression for brighter blend values, resulting in smoother gradients suitable for modern graphics software: .[27] This ensures consistent tonal blending across the full luminance range.[27]Hard Light Mode
Hard light mode inverts the roles of the base and blend layers compared to overlay mode, treating the blend layer as the light source to produce intense contrast effects.[1] The formula for hard light is defined as follows: if the blend value , apply the screen operation between the base and ; otherwise, apply the multiply operation between and . Mathematically, where Screen. This non-commutative operation means the result depends on layer order, with the blend layer dominating the illumination.[1] In practice, hard light creates stark highlights in brighter areas of the blend layer and deep shadows in darker areas, simulating the effect of a harsh spotlight on the base layer. This mode is commonly applied in graphic design for dramatic lighting effects, such as spotlight simulations, or to enhance metallic textures by emphasizing sharp reflections and contours.[30] For instance, applying a bright white blend layer over a dark base image produces hard, glowing highlights that mimic intense light sources without softening the edges.[31]Dodge and Burn Modes
Dodge and burn modes are blend operations that simulate traditional darkroom techniques for selectively lightening or darkening image areas, adjusting luminance through division-based computations to mimic exposure changes in photography. These modes, digitized in graphics software during the 1990s, provide targeted control over brightness without altering hue or saturation, making them essential for perceptual tone mapping in digital compositing. They build on foundational lighten and darken effects like Screen and Multiply but emphasize exposure simulation for more nuanced results.[15] The classic Color Dodge mode lightens the base layer by dividing its value by the inverted blend layer value, producing a brighter result that decreases contrast between the layers.[32] Mathematically, for base color and blend color in the range [0,1], with clamping to 1 if to avoid division by zero.[15] Conversely, Color Burn darkens the base by inverting the operation, yielding clamped to 0 if .[15] These division-based formulas enhance perceptual brightness in gamma-corrected spaces but risk clipping highlights to white or shadows to black near extreme blend values, potentially losing detail in high-contrast scenarios. Linear variants offer additive alternatives for linear RGB workflows, avoiding perceptual nonlinearity. Linear Dodge simply adds the values, clamped to 1, while Linear Burn subtracts, or equivalently clamped to 0, preserving additive light behavior suitable for HDR processing.[15] These modes maintain detail across midtones better than their classic counterparts in linear spaces. Sub-variants extend these concepts with steeper or combined curves. Vivid Light applies a steepened version, using Color Dodge for blend values above 0.5 and Color Burn below, rescaled around mid-gray for heightened contrast: with appropriate clamping.[15] Linear Light similarly combines the linear modes additively around mid-gray: clamped to [0,1], emphasizing additive effects for vivid tonal shifts.[15] In applications, dodge and burn modes facilitate local exposure corrections by selectively brightening shadows or deepening highlights, as implemented in tools like Photoshop's Dodge and Burn brushes. They are commonly used in HDR merging workflows to refine tone locally after bracketed exposure combination, enhancing dynamic range without global adjustments.[33] Artistically, these modes enable sculpting form through targeted dodging in portraits or landscapes, such as emphasizing facial contours in GIMP or Photoshop by painting on overlay layers.[34][35]Arithmetic Blend Modes
Addition and Subtraction Modes
Addition and subtraction modes perform direct arithmetic operations on the color channels of two layers, typically normalized to the range [0,1], to produce cumulative or reductive effects in digital image editing and compositing. In the addition mode, also known as Linear Dodge (Add) in software like Adobe Photoshop, the result for each channel is calculated as , where represents the base layer value and the blend layer value. This simulates the additive mixing of light sources, brightening the image and creating effects like glows or overexposures, though values exceeding 1 are simply saturated rather than wrapped in most implementations.[36][37] Subtraction mode computes , clamping negative results to 0, which darkens the base layer by removing the blend layer's contribution and can produce negative or desaturated tones depending on the input values.[37] This mode is useful for simulating light subtraction, such as in duotone effects where specific color channels are diminished to emphasize contrasts or create stylized color shifts. Both modes can lead to channel overflow or underflow, requiring careful layer opacity adjustments to maintain detail. These arithmetic operations find applications in creating luminous highlights through addition, such as enhancing warmth by adding a reddish tint— for instance, blending a vector (0.2, 0.0, 0.0) onto a base red image intensifies the hue without altering green or blue channels— or in video compositing to simulate exposure adjustments.[36] Subtraction aids in targeted darkening, like isolating shadows in multilayer setups. For perceptual accuracy in simulating real-world light, these modes benefit from gamma correction, as direct addition in nonlinear (sRGB) space can distort brightness; converting to linear RGB before blending ensures additive effects mimic physical light accumulation more faithfully.[38] Linear Dodge (Add) and Linear Burn—which computes —serve as variants optimized for such linear workflows in tools like Photoshop.[39]Difference and Divide Modes
The Difference blend mode calculates the absolute difference between corresponding pixel values in the base and blend layers across each color channel, using the formula , where and represent the intensity values from the respective layers. This arithmetic operation produces a high-contrast output that emphasizes discrepancies, resulting in brighter areas where variances are larger and darker regions where pixels match closely.[40][41] In practice, Difference generates edge-like maps or inverted textures, with the absolute value ensuring positive results regardless of layer order, unlike basic subtraction which may yield negative values. This makes it effective for tasks like motion detection in computer vision, where applying the mode to consecutive video frames isolates moving elements by revealing pixel-level changes against a static background. It also aids in texture inversion, such as when blending a uniform white layer over a base image to produce a negative-like effect. For instance, blending two identical layers with Difference yields a uniform black result, as all differences are zero, while even minor shifts in alignment or content highlight edges and alterations as bright outlines.[40][42][43] The Divide blend mode divides the base layer's pixel values by those of the blend layer, commonly implemented as in 8-bit color spaces to scale results appropriately and prevent division by zero, though clamping may be applied in other variants. This operation normalizes exposure by compensating for multiplicative effects like uneven illumination, lightening darker areas in the base where the divisor is small and producing an overall brighter, often washed-out appearance. It is particularly applied in image correction workflows, such as removing color casts by dividing the image by a solid layer matching the unwanted tint, effectively flattening tonal inconsistencies.[40][41][44] While Difference is widely available in graphics software, Subtract and Divide—added to Adobe Photoshop in version CS5 (2010)—remain less common than core modes but are standard in open-source applications such as GIMP and Krita for advanced compositing and analysis.[45] Unlike directional subtraction modes, Difference and Divide focus on magnitude and reciprocal relationships to facilitate comparison and correction without signed outputs.[40][41]Boolean Blend Modes
Logical AND and OR Modes
Logical AND and OR blend modes perform bitwise logical operations on the color channels of two layers, treating pixel values as binary data to create masking-like effects in digital compositing. In these modes, each channel (typically 8-bit) is processed bit by bit: for AND, the result is 1 only where both input bits are 1, effectively retaining overlapping opaque areas; for OR, the result is 1 where at least one input bit is 1, combining opaque regions. The formula for AND is , where and are the base and blend layer values, respectively, and denotes bitwise AND per channel. Similarly, the OR mode uses , with as bitwise OR. These operations convert decimal pixel values to their binary representation, apply the logical operator, and convert back to decimal, preserving the per-channel structure.[46] These modes excel with grayscale or binary images, where they mimic set operations: AND produces intersections of white (opaque) regions, while OR generates unions, making them useful for precise compositing tasks. In software like Krita, they support logical compositing for creating complex masks or abstract artwork with fractal-like attributes and smooth falloff when layers have gradual transparencies. Applications include digital painting and image manipulation, where AND can create intersections of opaque regions and OR can combine them. For instance, applying AND to two binary masks—one defining a foreground shape and another a selection—retains only the overlapping white areas, effectively carving intersections for clean cutouts.[46] Despite their utility in binary contexts, logical AND and OR modes have limitations in handling full-color photographs with continuous tones, as the bitwise nature often results in harsh, posterized outputs rather than smooth blends, reducing their effectiveness for realistic imagery. They are incompatible with floating-point images or negative values, further restricting use in advanced rendering workflows. These modes extend arithmetic min/max operations by applying them strictly in a binary framework, emphasizing discrete rather than continuous value comparisons.[46]Exclusion and Other Boolean Variants
The Exclusion blend mode produces a result similar to the Difference mode but with reduced contrast, creating a softer inversion effect where overlapping colors are blended by emphasizing their disparities without fully inverting midtones. This mode operates on a per-channel basis, applying the formula , where represents the backdrop color and the source color, resulting in an output that inverts the base layer when blended with white while leaving black unaffected.[47] Unlike stricter Difference calculations, Exclusion gravitates toward mid-gray tones for similar input values, providing a more subtle differential blend that complements logical AND and OR operations by focusing on inversion and parity rather than union or intersection.[48] Other Boolean variants, such as XOR, extend this differential logic through bitwise operations, where the result toggles bits only in positions where the source and backdrop differ, effectively creating an exclusive output that excludes overlapping opaque areas. The XOR blend mode performs a bitwise exclusive OR operation per channel, , where matching values result in black (0) and differing values produce intermediate colors. It is useful for highlighting differences in image analysis without affecting transparency directly in the blending step.[49][50] In practice, XOR inverts blends without the smoothing of Exclusion, producing stark contrasts suitable for binary-like manipulations. Applications of Exclusion include generating inverse masks for selective compositing, where blending a grayscale layer yields a high-contrast negative effect that highlights tonal differences, and creating duotone-inspired visuals by layering colored overlays to produce stylized, inverted color schemes with lower saturation.[48] In web design, it enables experimental effects like gradual inversion gradients via CSS mix-blend-mode, enhancing interactive elements without harsh edges.[51] XOR finds use in graphics software for image analysis tasks, such as detecting differences in bitmask renders for game development or chiptune artwork, where it facilitates precise overlap exclusion in low-level pixel operations.[49][52] Exclusion has been a core feature in Adobe Photoshop since version 3.0, with ongoing support in updates like those in 2020 for advanced compositing workflows, while XOR appears in specialized tools like Paint.NET for targeted boolean manipulations.[5][49]Color Space Blend Modes
Hue and Saturation Modes
Hue and saturation blend modes operate within the HSL (Hue, Saturation, Lightness) color space, allowing selective manipulation of chromatic components while preserving lightness. These modes are part of a broader set of color blending techniques in digital imaging software, where the base layer (typically the bottom layer) interacts with the blend layer (the top layer) through component-wise replacement. Unlike arithmetic modes that perform channel-wise calculations in RGB space, hue and saturation modes require converting both layers from RGB to HSL, applying the blend selectively, and converting the result back to RGB for display. This process ensures perceptual consistency in color adjustments.[8] In the Hue mode, the resulting color adopts the hue from the blend layer while retaining the saturation and lightness from the base layer. This creates a version of the base image tinted with the blend layer's color angle without altering its tonal range or intensity. The operation is defined conceptually as , where is the base color, is the blend color, is hue, is saturation, and is lightness, followed by conversion back to RGB. Hue mode is non-commutative, meaning swapping the base and blend layers yields a different result, as the base's lightness and saturation anchor the output.[10][8] The Saturation mode, similarly, preserves the hue and lightness of the base layer but replaces its saturation with that of the blend layer. Areas in the base layer with zero saturation, such as grays, remain unchanged since they lack color intensity to modify. Conceptually, , again with RGB-HSL conversions. Like hue mode, it is non-commutative, with the base's hue and lightness fixed as the foundation. This mode enables vibrancy adjustments without shifting colors or tones.[10][8] These modes find applications in digital art and photo editing, particularly for colorizing grayscale images using hue mode, where a solid colored blend layer imparts a uniform tint to black-and-white content while maintaining its original tonal structure. For instance, applying hue mode with a blue blend layer over a grayscale photograph results in a cool-toned image that retains the photo's shadows, midtones, and highlights. Saturation mode is useful for enhancing or desaturating specific elements, such as boosting vibrancy in muted areas without affecting overall hue balance, common in compositing or corrective editing.[10]Color and Luminosity Modes
The color blend mode creates a resulting pixel by combining the hue and saturation values from the blend layer with the luminosity from the base layer, effectively applying the color tint of the blend layer while preserving the tonal structure of the base.[3] This mode operates within the HSL (Hue, Saturation, Luminosity) color space.[3][4] In contrast, the luminosity blend mode reverses this process, taking the hue and saturation from the base layer and the luminosity from the blend layer, which allows for relighting or tonal adjustments without altering the underlying colors.[3] Like the color mode, it relies on HSL for accurate separation of components.[4] These two modes are mathematical inverses of each other: applying luminosity to layers A and B yields the same result as applying color with the layers swapped, enabling precise control over color and tone isolation.[3] Common applications include selective coloring, where the color mode tints grayscale or monochromatic elements with vibrant hues from an overlay, and brightness correction via luminosity, which evens out lighting inconsistencies without introducing unwanted hue shifts—for instance, using a luminosity-blended adjustment layer on a portrait to balance facial shadows while retaining natural skin tones.[3] These modes complement hue and saturation blending by offering holistic adjustments that combine multiple HSL components for more nuanced color control.[4]Advanced Applications and Variations
Relation to Masking and Compositing
Blend modes are integral to compositing techniques, where they define how source and destination images are combined, often integrated with the Porter-Duff compositing model. The Porter-Duff model, introduced in 1984, provides a framework for alpha compositing using 12 operators that determine how pixels from source and backdrop layers contribute based on their alpha values, with the general formula for the composite color being , where and are source and backdrop colors, and are their alphas, and and are coverage factors. Blend modes extend this by specifying the color mixing formula applied before the Porter-Duff operator, typically source-over as the default variant, allowing for effects like darkening or lightening during layer merging.[1] In layer-based compositing, blend modes interact closely with alpha channels to control transparency and visibility, enabling precise control over how layers contribute to the final image without permanent pixel alteration. Alpha channels serve as implicit masks, modulating the blend operation; for instance, a blend mode computes the premultiplied color result using the formula , where is the blend function, before applying alpha compositing to the destination. This interaction supports non-destructive workflows, where layers can be blended, masked, and adjusted iteratively, preserving original content for reversibility in editing software.[1][13] Many blend modes achieve their effects by effectively mimicking the Normal blend mode applied with a transformed mask derived from the layer's content, such as luminance or color values, rather than a simple binary alpha. For example, the Multiply mode, which outputs (clamped to [0,1]), can be equivalent to Normal blending with a curved mask transformation when applied over a uniform gray layer, simulating a quadratic tone curve or gamma correction with . This conceptual equivalence allows blend modes to replicate complex masking behaviors, like tonal adjustments, through mathematical transformations of the effective opacity.[1] Applications of this relation include non-destructive masking in layered compositions, where blend modes combined with explicit layer masks or alpha channels enable selective revealing or concealing of elements, such as using luminosity-derived masks for targeted edits. In web technologies, blend modes are standardized for SVG and CSS compositing via the W3C Compositing and Blending Level 1 specification, published as a Candidate Recommendation in 2015 (with key developments from 2014 drafts), supporting properties likemix-blend-mode for real-time blending in browsers.[13][1]
A practical example is the Overlay mode, which multiplies or screens colors based on the backdrop's luminance—outputting if , or otherwise—functioning as a luminosity mask for non-destructive dodging and burning when painting on a 50% gray layer, lightening midtones and highlights while preserving shadows.[1]