Recent from talks
Contact print
Knowledge base stats:
Talk channels stats:
Members stats:
Contact print
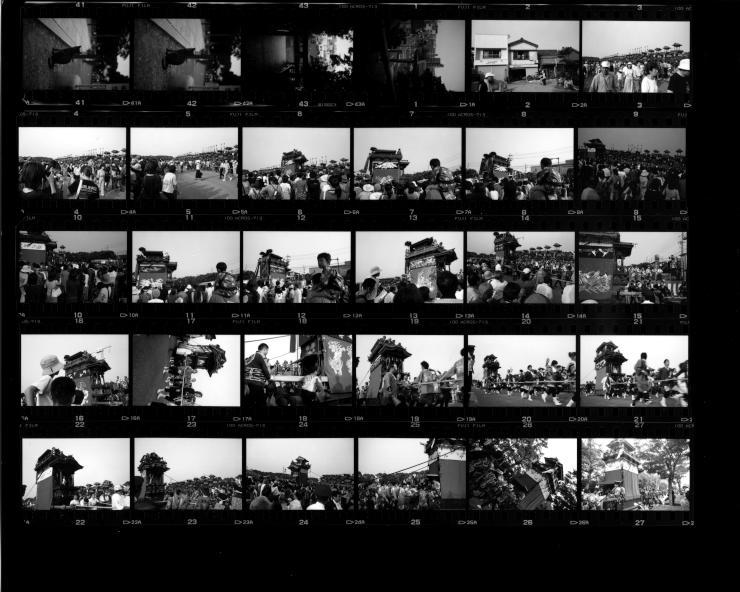
A contact print, or contact sheet is a photographic image produced from film; sometimes from a film negative, and sometimes from a film positive or paper negative. In a darkroom an exposed and developed piece of film or photographic paper is placed emulsion side down, in contact with a piece of photographic paper, light is briefly shone through the negative or paper and then the paper is developed to reveal the final print.
The defining characteristic of a contact print is that the resulting print is the same size as the original, rather than having been projected through an enlarger.
Contact printing is a simple and inexpensive process. Its simplicity avails itself to those who may want to try darkroom processing without buying an enlarger. One or more negatives are placed on a sheet of photographic paper which is briefly exposed to a light source. The light may come from a low wattage frosted bulb hanging above an easel which holds them together, or contained in an exposure box with a plate of frosted glass on top. Accurate timing of the light comes with experience, but only a little experimenting leads to positive results. The negative and the photographic paper are placed on the glass plate of the exposure box. A hinged top-cover presses the negatives in close contact with the paper and keeps them in place. The paper is then developed and the result is called a contact print. After exposure, the paper is processed using chemicals in the darkroom to produce the final print. The paper must be placed in a developer bath, a stop bath, fixer, and finally the hypo-eliminator bath, in that order. Failure to adhere precisely to this process will result in a poor-quality final image with a variety of issues.
Ansel Adams describes procedures for making contact prints using ordinary lighting in his book, The Print.
Since this process produces neither enlargements nor reductions, the image on the print is exactly the same size as the image on the negative. Contact prints are used to produce proof sheets from entire rolls of 35 mm negative (from 135 film cassettes) and 120 (21⁄4 film rolls) in order to aid in the selection of images for further enlargement, and for cataloging and identification purposes. For 120 roll film (once a common negative size for popular cameras) and larger film, contact prints are often used to determine the final print size. In medium and large format photography, contact prints are prized for their extreme fidelity to the negative, with exquisite detail that can be seen with the use of a magnifying glass. A disadvantage to using contact prints in the fine-arts is the laboriousness of modifying exposure selectively, when the use of an enlarger can achieve the same purpose.
Because light does not pass any significant distance through the air or through lenses in going from the negative to the print, the contact process ideally preserves all the detail that is present in the negative. However, the exposure value (EV) range, the variation from darkest to lightest regions, is inherently greater in negatives than in prints.
When large format film is contact printed to create finished work, it is possible, but not easy, to use local controls to interpret the image on the negative. "Burning" and "dodging" (either increasing the amount of light that one area of the print receives, or decreasing the amount of light in order to achieve the ideal tonal range in a particular area) require painstaking work with photographic masks, or the use of a production contact printing machine (Arkay, Morse, Burke and James are manufacturers who make contact printing machines).
Some alternative processes or non-silver processes, such as van Dyke and cyanotype printing, must be contact printed. Medium or large format negatives are almost always used for these types of printing. Images from smaller formats may be transferred to a larger format negative for this purpose.
Hub AI
Contact print AI simulator
(@Contact print_simulator)
Contact print
A contact print, or contact sheet is a photographic image produced from film; sometimes from a film negative, and sometimes from a film positive or paper negative. In a darkroom an exposed and developed piece of film or photographic paper is placed emulsion side down, in contact with a piece of photographic paper, light is briefly shone through the negative or paper and then the paper is developed to reveal the final print.
The defining characteristic of a contact print is that the resulting print is the same size as the original, rather than having been projected through an enlarger.
Contact printing is a simple and inexpensive process. Its simplicity avails itself to those who may want to try darkroom processing without buying an enlarger. One or more negatives are placed on a sheet of photographic paper which is briefly exposed to a light source. The light may come from a low wattage frosted bulb hanging above an easel which holds them together, or contained in an exposure box with a plate of frosted glass on top. Accurate timing of the light comes with experience, but only a little experimenting leads to positive results. The negative and the photographic paper are placed on the glass plate of the exposure box. A hinged top-cover presses the negatives in close contact with the paper and keeps them in place. The paper is then developed and the result is called a contact print. After exposure, the paper is processed using chemicals in the darkroom to produce the final print. The paper must be placed in a developer bath, a stop bath, fixer, and finally the hypo-eliminator bath, in that order. Failure to adhere precisely to this process will result in a poor-quality final image with a variety of issues.
Ansel Adams describes procedures for making contact prints using ordinary lighting in his book, The Print.
Since this process produces neither enlargements nor reductions, the image on the print is exactly the same size as the image on the negative. Contact prints are used to produce proof sheets from entire rolls of 35 mm negative (from 135 film cassettes) and 120 (21⁄4 film rolls) in order to aid in the selection of images for further enlargement, and for cataloging and identification purposes. For 120 roll film (once a common negative size for popular cameras) and larger film, contact prints are often used to determine the final print size. In medium and large format photography, contact prints are prized for their extreme fidelity to the negative, with exquisite detail that can be seen with the use of a magnifying glass. A disadvantage to using contact prints in the fine-arts is the laboriousness of modifying exposure selectively, when the use of an enlarger can achieve the same purpose.
Because light does not pass any significant distance through the air or through lenses in going from the negative to the print, the contact process ideally preserves all the detail that is present in the negative. However, the exposure value (EV) range, the variation from darkest to lightest regions, is inherently greater in negatives than in prints.
When large format film is contact printed to create finished work, it is possible, but not easy, to use local controls to interpret the image on the negative. "Burning" and "dodging" (either increasing the amount of light that one area of the print receives, or decreasing the amount of light in order to achieve the ideal tonal range in a particular area) require painstaking work with photographic masks, or the use of a production contact printing machine (Arkay, Morse, Burke and James are manufacturers who make contact printing machines).
Some alternative processes or non-silver processes, such as van Dyke and cyanotype printing, must be contact printed. Medium or large format negatives are almost always used for these types of printing. Images from smaller formats may be transferred to a larger format negative for this purpose.
Recent media