Hubbry Logo
Large formatLarge formatMain
Open search
Large format
Community hub
Large format
logo
8 pages, 0 posts
0 subscribers
Be the first to start a discussion here.
Contribute something
Large format
Large format
from Wikipedia
Old studio camera
Lens and mounting of a large format camera
Comparison of 35 mm, medium format, and large format

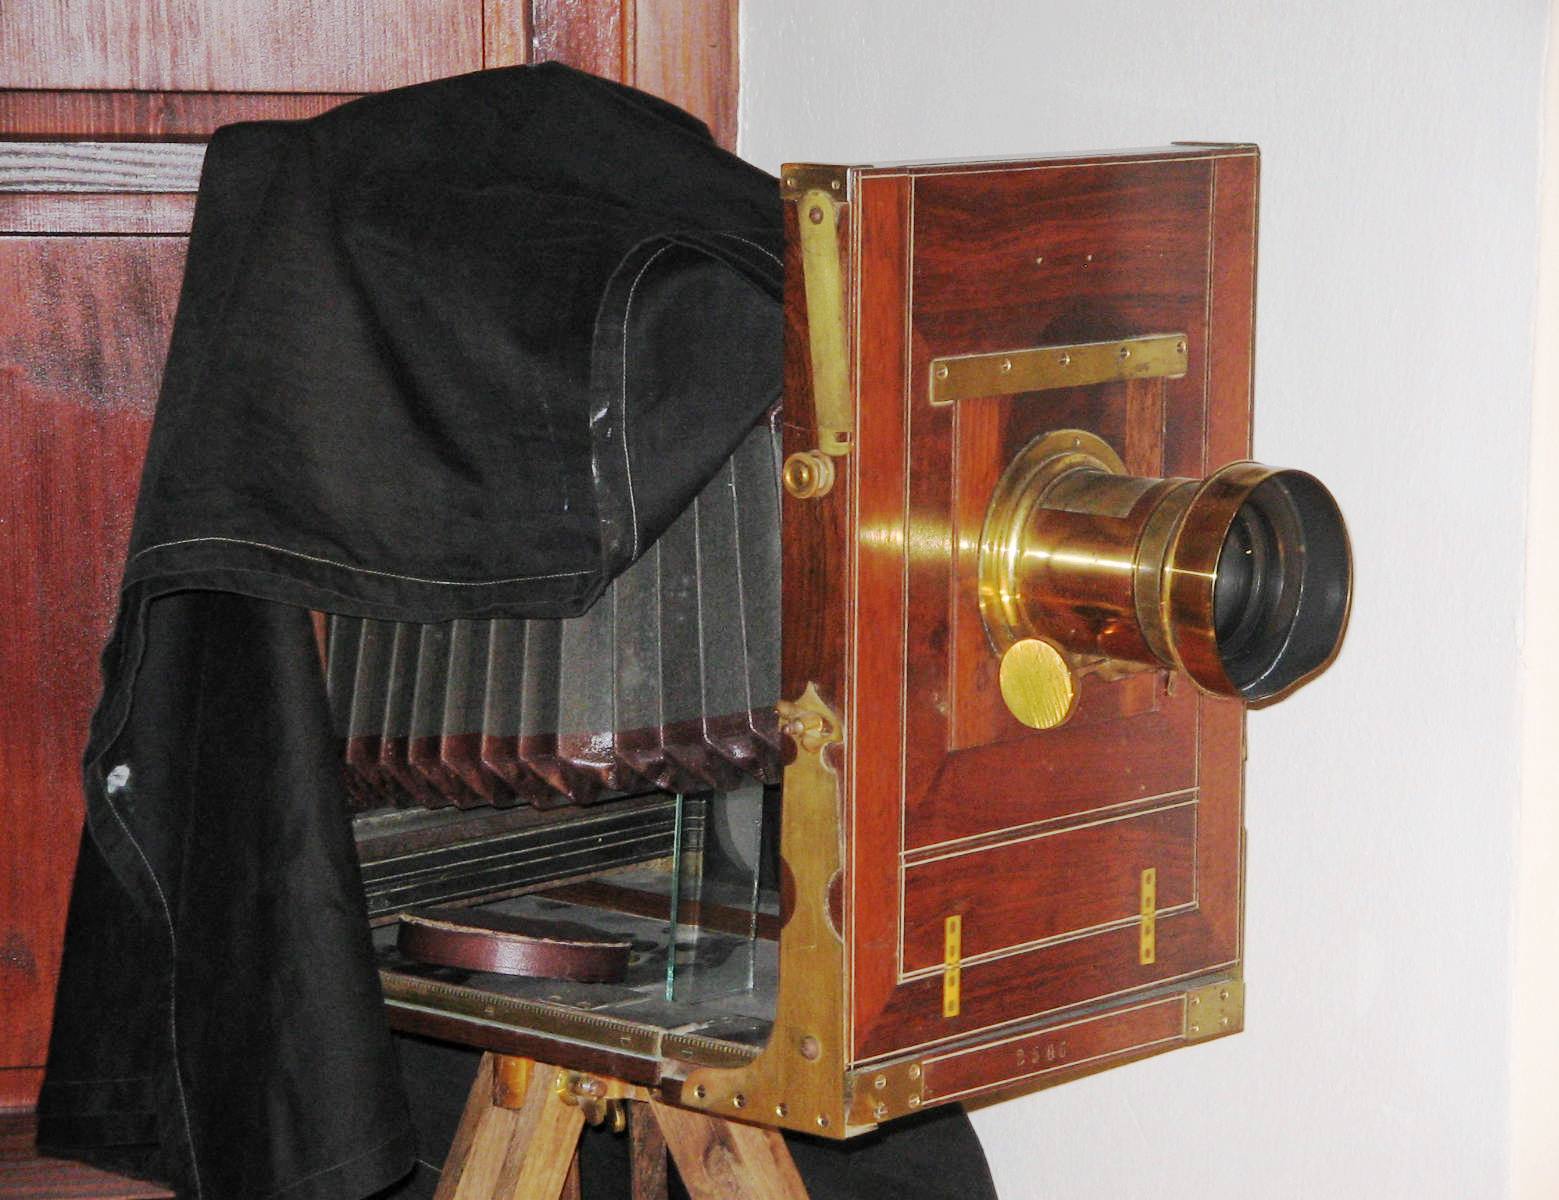
Large format photography refers to any imaging format of 9 cm × 12 cm (3.5 in × 4.7 in) or larger. Large format is larger than "medium format", the 6 cm × 6 cm (2.4 in × 2.4 in) or 6 cm × 9 cm (2.4 in × 3.5 in) size of Hasselblad, Mamiya, Rollei, Kowa, and Pentax cameras (using 120- and 220-roll film), and much larger than the 24 mm × 36 mm (0.94 in × 1.42 in) frame of 35 mm format.

The main advantage of a large format, film or digital, is a higher resolution at the same pixel pitch, or the same resolution with larger pixels or grains which allows each pixel to capture more light enabling exceptional low-light capture. A 4×5 inch image (12.903 mm²) has about 15 times the area, and thus 15 times the total resolution, of a 35 mm frame (864 mm²).

Large format cameras were some of the earliest photographic devices, and before enlargers were common, it was normal to just make 1:1 contact prints from a 4×5, 5×7, or 8×10-inch negative.

Formats

[edit]

The most common large format is 4 in × 5 in (10 cm × 13 cm), which was the size used by cameras like the Graflex Speed Graphic and Crown Graphic, among others. Less common formats include quarter-plate (3.25 in × 4.25 in (8.3 cm × 10.8 cm)), 5 in × 7 in (13 cm × 18 cm), and 8 in × 10 in (20 cm × 25 cm); the size of many old 1920s Kodak cameras (various versions of Kodak 1, 2, and 3 and Master View cameras, to much later Sinar monorail studio cameras) are 11 in × 14 in (28 cm × 36 cm), 16 in × 20 in (41 cm × 51 cm), 20 in × 24 in (51 cm × 61 cm), various panoramic or "banquet" formats (such as 4 × 10 and 8 × 20 inches (10 × 25 and 20 × 51 cm), and metric formats, including 9 cm × 12 cm (3.5 in × 4.7 in), 10 cm × 13 cm (3.9 in × 5.1 in), and 13 cm × 18 cm (5.1 in × 7.1 in) and assorted old and current aerial image formats of 9 in × 9 in (23 cm × 23 cm), 9 in × 18 in (23 cm × 46 cm) (K17, K18, K19, K22 etc.), using roll film of 4, 5, 6, 7, 9, or 10 inches width or, view cameras (including pinhole cameras), reproduction/process cameras, and x-ray film.

Above 8 × 10 inches, the formats are often referred to as Ultra Large Format (ULF) and may be 11 × 14, 16 × 20, or 20 × 24 inches or as large as film, plates, or cameras are available. Many large formats (e.g., 24 × 24, 36 × 36, and 48 × 48 inches) are horizontal cameras designed to make big negatives for contact printing onto press-printing plates.

The Polaroid 20×24 camera is one of the largest format instant cameras in common usage and can be hired from Polaroid agents in various countries.[1] Many well-known photographers have used the 235 pounds (107 kg), wheeled-chassis Polaroid.

Control

[edit]
Scheimpflug principle

Most, but not all, large format cameras are view cameras, with fronts and backs called "standards" that allow the photographer to better control rendering of perspective and increase apparent depth of field. Architectural and close-up photographers in particular benefit greatly from this ability. These allow the front and back of the camera to be shifted up/down and left/right (useful for architectural images where the scene is higher than the camera, and produces images where the scene is lower than the camera), and tilted out of parallel with each other left/right, up/down, or both; based on the Scheimpflug principle. The shift and tilt movements make it possible to solve otherwise impossible depth-of-field problems, and to change perspective rendering, and create special effects that would be impossible with a conventional fixed-plane fixed-lens camera.

Ansel Adams' photographs, and those of the other Group f/64 photographers, demonstrate how the use of front (lens plane) and back (film plane) adjustments can secure great apparent depth of field when using the movements available on large format view cameras.

Operation

[edit]

A number of actions need to be taken to use a typical large format camera, resulting in a slower, often more contemplative, photographic style. For example, film loading using sheet film holders requires a dark space to load and unload the film, typically a changing bag or darkroom, although prepackaged film magazines and large format roll films have also been used in the past.

A tripod is typically used for view camera work, but some models are designed for hand-held use. These "technical cameras" have separate viewfinders and rangefinders for faster handling.

In general large format camera use, the scene is composed on the camera's ground glass, and then a film holder is fitted to the camera back prior to exposure. A separate Polaroid back using instant film is used by some photographers, allowing previewing of the composition, correctness of exposure and depth of field before committing the image to film to be developed later. Failure to "Polaroid" an exposure risks discovery later, at the time of film development, that there was an error in camera setup.

Uses

[edit]
Ansel Adams's large format photograph The Tetons and the Snake River (1942)
Photographer Gregory Crewdson with a large format camera in 2007

The 4×5 inch sheet film format was very convenient for press photography since it allowed for direct contact printing on the printing plate, hence it was widely used in press cameras. This was done well into the 1940s and 1950s, even with the advent of more convenient and compact medium format or 35 mm roll-film cameras which started to appear in the 1930s. The 35 mm and medium format SLR which appeared in the mid-1950s were soon adopted by press photographers.

Large format photography is not limited to film; large digital camera backs are available to fit large format cameras. These are either medium-format digital backs adapted to fit large format cameras (sometimes resulting in cropped images), step and repeat Multishot systems, or scanning backs (which scan the image area in the manner of a flat-bed scanner). Scanning backs can take seconds or even several minutes to capture an image. When using a Sinar Macroscan unit and 54H data files, over 1 gigabyte of data is produced.

Large format, both film-based and digital, is still used for many applications, such as landscape photography, advertising photos, fine-art photography, scientific applications and generally for images that will be enlarged to a high magnification while requiring a high level of detail. High quality fine art prints can be made at sizes in the range of 40x50″ from a 4×5″ original, and well beyond that for larger negatives.

In the printing industry, very large fixed cameras were also used to make large films for the preparation of lithographic plates before computer to film and computer to plate techniques were introduced. These are generally referred to as a "process camera" and consist of vertically mounted models for smaller work and horizontal units mounted on rails for very large works such as maps and plans.

National Park Service documentation programs

[edit]

Large format film is also used to create a record of historic places and things for the National Park Service documentation programs. The Historic American Buildings Survey (HABS), the Historic American Engineering Record (HAER), and the Historic American Landscapes Survey (HALS) require large format film-based photography. 4×5″, 5×7″, and 8×10″ large format film formats are the only acceptable formats for inclusion in these collections at the Library of Congress. 4x5 and 5x7 are generally used in the field (5×7″ is preferred for very significant buildings) and 8×10″ is generally used for photo-duplication of historic photographs, documents and blueprints. Through HABS/HAER/HALS, buildings and sites of historic significance are recorded with large format cameras and black and white film and using techniques that document the key features of the historic resource with special care not to distort the angles and views. This rectified photography can be accomplished with large format cameras by keeping the film, lens and subject perfectly parallel. Smaller format cameras need to be tilted to view high or low subjects, but the same subjects can be captured by shifting the lens element of a large format camera up or down to keep the film, lens, and subject planes parallel.

HABS, HAER, and HALS also requires the increased resolution of large format film. A sheet of 5×7″ film has almost twice the resolution of 4×5″ film, and 4×5″ is almost 16 times larger than a 35 mm film image (24×36 mm). This added negative size not only allows for more detail, but the large format polyester film is also far more durable than acetate 35 mm stock. HABS, HAER, and HALS require that all submissions to the Library of Congress include the original film (archivally washed) and it must also include contact prints on fiber-based paper; these contacts are the same size as the film being submitted, 4×5″, 5×7″, or 8×10″, and the large size allows people to readily see the prints, while 35 mm contacts would be too small and would require magnification.

See also

[edit]

References

[edit]
[edit]
Revisions and contributorsEdit on WikipediaRead on Wikipedia
from Grokipedia
Large format photography is a traditional technique that employs cameras producing negatives or transparencies measuring 4 × 5 inches (10 × 13 cm) or larger, enabling unparalleled detail, resolution, and creative control compared to smaller formats like 35 mm. This format, often using sheet film in view cameras, allows for precise adjustments such as tilt, swing, and shift to correct perspective and focus depth, making it ideal for deliberate, high-fidelity image capture. Common sheet sizes include 4 × 5 inches, 5 × 7 inches, and 8 × 10 inches, with the larger areas capturing maximum tonal range and minimal grain for enlargements up to billboard scale. Originating in the nascent stages of during the mid-19th century, large format dominated early processes like the (introduced in 1839) and wet collodion (popularized in the 1850s), which relied on large glass or metal plates—often 8 × 10 inches or bigger—for direct positives or negatives due to the absence of enlargement technology. These methods required portable darkrooms and on-site development, influencing iconic documentation of events like the , where photographers such as used large plates for their sharpness and archival quality. Large format remained the professional standard through the late 19th and early 20th centuries, powering studio portraits, landscapes, and architectural work until the widespread adoption of smaller roll-film formats in the mid-20th century shifted preferences toward greater portability. As of 2025, large format persists amid a resurgence of , used in , commercial advertising, and architectural , prized for its superior image quality—offering resolutions equivalent to hundreds of megapixels in digital terms for larger sheets like 8 × 10—and its encouragement of a methodical that enhances compositional precision. Photographers value the format's ability to produce contact prints without enlargement, preserving every nuance of and texture, while modern adaptations include digital backs for hybrid workflows and ongoing manufacturer support for custom ultra-large films. Despite its bulkiness and slower pace, large format's enduring appeal lies in its tangible process, fostering deeper engagement with the medium in an era of instant digital capture.

History

Origins in the 19th Century

The origins of large format photography trace back to the mid-19th century, beginning with the process invented by and publicly announced in 1839. This pioneering technique involved sensitizing silver-plated copper sheets to light, producing direct positive images known for their exceptional sharpness and detail. Early daguerreotypes commonly used plate sizes ranging from quarter-plate (3¼ x 4¼ inches) to full-plate (6½ x 8½ inches), with larger formats up to 8 x 10 inches (20 x 25 cm) employed for portraits and landscapes to capture intricate textures and expansive scenes. A major advancement came in 1851 with Frederick Scott Archer's introduction of the wet collodion process, which shifted from direct positives to negative images on glass plates. This method required coating glass with immediately before exposure, allowing for larger negative sizes such as 8 x 10 inches that enhanced resolution and enabled the production of multiple prints via albumen . The process's to support bigger formats made it ideal for detailed outdoor and studio work, though its "wet" nature demanded on-site setups. During the (1861-1865), pioneers like utilized large format wet collodion glass plates to create documentary photographs of battlefields, camps, and casualties, providing the public with stark visual records of the conflict. Brady's team, operating mobile darkrooms, produced thousands of images on plates typically measuring 5 x 7 inches or larger, emphasizing the format's capacity for high-fidelity representation in historical documentation. By the late 1880s, the development of flexible celluloid-based film sheets began supplanting glass plates, offering greater portability and reduced breakage risk while maintaining large format advantages. This transition, spearheaded by innovations from , saw the 4 x 5 inch size emerge as a practical standard, balancing detail with ease of handling for professional photographers.

Evolution Through the 20th Century

In the late , the widespread adoption of gelatin dry plate technology revolutionized large format photography by enabling faster exposures and larger sheet sizes suitable for studio environments, with photographers like employing them for professional portraits and artistic compositions. Steichen, operating a New York studio from 1902, utilized dry plates in large format setups to capture detailed images such as his 1908 moonlight studies of Rodin's Balzac, allowing for formats up to 11x14 inches that supported intricate printing processes like and gum bichromate. This shift from wet plates, which required on-site development, professionalized studio workflows and expanded creative possibilities in controlled settings. During the and 1930s, view cameras gained prominence for their adjustable movements, offering photographers precise control over perspective and focus in large format work, with manufacturers like and Linhof leading standardization efforts. produced a range of view cameras, including the Eastman View models from the onward, which supported 4x5 and 8x10 inch formats and became staples for field and studio applications due to their robust construction and bellows flexibility. Linhof advanced this evolution with the introduction of the all-metal Technika prototype in 1934, fully realized in 1936 as the Technika series, initially in formats equivalent to 4x5 inches, emphasizing portability and technical precision that influenced professional adoption across and the . These innovations solidified 4x5 and 8x10 as industry standards, enabling corrections for lens distortions and in architectural and landscape photography. Following , the introduction of color reversal films like sheets in 1946 spurred a boom in large format during the , providing vibrant transparency options for sheet sizes up to 8x10 inches. Photographers incorporated these films into work, capturing natural hues with the detail afforded by large format cameras in commercial and artistic applications. This era marked a technical leap, with Ektachrome's fine grain and processable sheets enabling high-fidelity color reproductions that enhanced commercial and artistic applications. By the 1980s, large format photography experienced a significant decline in mainstream use, overshadowed by the portability, speed, and advancing optics of 35mm and systems, which better suited and casual professional needs. However, it persisted in circles, where artists like continued employing large format view cameras, such as the Deardorff 8x10, for meticulous still lifes and portraits that prioritized tonal depth and compositional control in works like his 1980s series on flowers and skulls. Penn's adherence to these tools underscored large format's enduring value for high-impact, gallery-oriented output amid broader format shifts.

Technical Specifications

Film and Sheet Formats

Large format photography employs individual sheets of or glass plates measuring 4×5 inches (10×13 ) or larger, distinguishing it from systems that use roll films in dimensions such as 6×4.5 , 6×6 , or 6×7 . This sheet-based allows for precise control over each exposure and supports high-resolution imaging due to the expansive negative area. Among the most prevalent formats, 4×5 inches offers the greatest portability for field use, while 5×7 inches provides an intermediate option suited to detailed outdoor work, and 8×10 inches serves as the longstanding studio benchmark for its substantial detail capture. Ultra-large variants, reaching 20×24 inches, cater to niche applications like panoramic or contact printing setups, often through custom orders. Contemporary materials include black-and-white panchromatic emulsions on or bases, such as Professional Tri-X 320 for fine grain and wide latitude or Ilford HP5 Plus for versatile push-processing. Color options feature negative films like Kodak Portra 400, prized for natural skin tones and scanning performance. Historically, from the 1850s to the 1920s, rigid glass plates coated with wet or dry emulsions dominated large format practice, offering superior sharpness before flexible films supplanted them for practicality. Lens compatibility hinges on the , which must encompass the format's diagonal at minimum—roughly 163 mm for 4×5 inches, 218 mm for 5×7 inches, and 325 mm for 8×10 inches—to ensure full frame coverage, with excess diameter enabling tilt, shift, and swing movements without .

Camera Designs and Movements

Large format cameras are distinguished by their mechanical designs that prioritize precision and adjustability, enabling photographers to achieve exact control over image composition and focus. The primary types include field cameras, which are lightweight and folding for portability in outdoor settings, such as the Wista models that collapse into a compact form for easy transport. Studio view cameras, like the rigid Sinar systems, provide stability for controlled environments, supporting extensive adjustments without compromising alignment. cameras offer modular construction, with front and rear standards mounted on a single rail for customizable configurations and maximum flexibility in movements. A hallmark of these cameras is their adjustable movements, which allow independent manipulation of the lens and planes to correct perspective and . Tilt adjusts the lens plane to align with the subject plane via the , extending sharpness across inclined surfaces like landscapes without stopping down the excessively. Swing operates similarly but horizontally, enabling selective sharpening of off-center elements, such as isolating a foreground subject while blurring distractions. Shift moves the lens parallel to the plane left or right to alter the field of view and eliminate converging lines, ideal for architectural shots to keep verticals plumb. Rise and fall provide vertical shifts for framing without distortion, such as including more sky in a building photograph while maintaining straight lines. Central to the design is the , a flexible accordion-like component connecting the lens standard to the back, accommodating variable lens-to-film distances typically ranging from 100 to 500 mm to focus lenses from wide-angle to telephoto. This extensibility supports work and , with the bellows material—often coated fabric—ensuring light-tight seals. Essential accessories include double-sided film holders for 4x5 sheets, which load two exposures per holder for efficient workflow in standard view cameras. focusing screens allow direct viewing of the inverted image for precise composition and focus, often enhanced with a for brightness. Cable releases attach to lens shutters for vibration-free exposures, preventing camera shake during long exposures common in large format work.

Photographic Process

Setup and Control Mechanisms

In large format photography, pre-exposure setup begins with loading individual sheets of into dedicated holders, a process typically performed in a completely environment to prevent light exposure. Photographers first prepare by their hands and the workspace to avoid , then place unexposed film sheets, holders, and tools like a blower brush inside a light-tight changing bag or tent, or within a darkroom. The film box is opened in darkness, protective cardboard is removed, and each sheet—oriented with emulsion side facing the lens and notches aligned in the upper right corner—is slid under the holder's guides until it seats properly. Practice in daylight with dummy sheets is recommended to ensure smooth insertion without damaging the emulsion. Once loaded, the dark slide is reinserted to protect the film, with the white or silver side facing out to indicate unexposed sheets, and the holder is then inserted into the camera's film back for use. Focusing in large format cameras relies on a screen at the film plane, where the image appears inverted and laterally reversed, requiring a dark cloth draped over the photographer's head and the camera back to block ambient light and enhance visibility of the dim projection. The , which connect the lens board to the camera body, is extended or compressed using a focusing knob to achieve rough sharpness, after which finer adjustments are made by observing critical focus points through a pressed against the glass. This manual process allows precise control over the plane of focus, often taking several minutes to refine, especially with longer focal lengths where small bellows movements correspond to significant distance changes. Composition controls in large format photography involve selective movements of the lens board and film back to correct perspective and optimize without altering the photographer's position. Tilts adjust the lens board forward or backward along the vertical axis, while swings rotate it left or right along the horizontal axis; these are applied to align the lens plane, film plane, and subject plane according to the , which ensures sharpness across tilted planes like landscapes or by intersecting these planes at a common line. Such movements are viewed and adjusted on the ground glass, typically in small increments of a few millimeters combined with selection for extended . Light metering precedes exposure to determine optimal settings, often using handheld spot meters that measure reflected light from specific scene areas via a narrow-angle viewfinder (1-5 degrees), or incident meters that assess light falling on the subject with a translucent dome. In large format practice, spot metering involves taking multiple readings from shadows, midtones, and highlights—up to 10 or more—storing them in the meter's memory, and averaging with emphasis on critical zones to avoid clipping details. This approach follows the , developed by and Fred Archer, which visualizes the scene's tonal range as 11 zones from black (Zone 0) to white (Zone X), allowing photographers to "place" important elements (e.g., shadows at Zone III for texture) and adjust exposure accordingly for balanced negatives. Incident metering complements this for even illumination, such as in portraits, by providing a direct reading at the subject position.

Exposure and Development Operation

In large format photography, exposure execution involves cocking the leaf shutter mounted in the lens board, which typically offers speeds up to 1/400 second for common models like #3 or Prontor shutters. settings, adjustable via the lens iris, commonly range from f/5.6 to f/64, enabling precise control over intake and ; smaller apertures like f/32 or f/64 are standard for achieving extensive sharpness in scenes. To capture the , the removes the dark slide from the film holder, triggers the shutter with a cable release to minimize vibration, and then reinserts the slide, often employing multi-second exposures for low-light or static subjects like landscapes where shutter speeds exceed 1 second. For exposures longer than 1 second, reciprocity failure—a phenomenon where sensitivity decreases at low light intensities—requires compensation to maintain proper . In films such as HP5 Plus, this is addressed by extending the exposure time using the formula Ta=Tm1.31T_a = T_m^{1.31}, where TaT_a is the adjusted time and TmT_m is the metered time; for example, a 10-second metered exposure becomes approximately 20 seconds. Long exposures can also increase negative contrast, which may necessitate reduced development times to avoid overly harsh tones. The development process for large format sheet film occurs in a using trays for individual or small-batch or rotary drums for even agitation. With D-76 developer at stock strength and 20°C, sheets like Kodak Tri-X are developed for 8 minutes with agitation every 30 seconds, followed by a , fixer for 5-10 minutes, thorough washing in running water for 30 minutes, and air drying on clips or screens to prevent damage. For Ilford HP5 Plus in D-76 diluted 1:1, times range from 11 to 13 minutes at 20°C with intermittent agitation, ensuring consistent results across sheets. Printing from large format negatives, particularly 8x10 sheets, favors contact printing, where the negative is placed emulsion-to-emulsion against and exposed to light without an , preserving full resolution and avoiding optical distortion or grain magnification. This method yields prints at the native negative size with superior sharpness and tonal fidelity, ideal for or archival applications.

Advantages and Challenges

Image Quality Benefits

One of the primary image quality benefits of large format photography stems from its superior resolution and capture, enabled by the large physical size of the film or . High-quality black-and-white films used in large format systems can achieve resolving powers of up to 80-125 line pairs per millimeter (lp/mm), far exceeding typical smaller formats and allowing for intricate reproduction of fine textures and subtle patterns. This capability supports extensive enlargements—for instance, a 4x5-inch negative can be scaled to 40x60 inches—while maintaining sharpness without visible grain, preserving the integrity of minute details in landscapes or portraits. Large format cameras provide unparalleled control through adjustable movements of the lens and film planes, governed by the . This geometric rule states that when the image plane, lens plane, and subject plane intersect along a common line, the plane of critical focus aligns precisely, enabling selective sharpness across tilted or uneven subjects without relying solely on adjustments. Such precision is particularly advantageous in architectural , where tilts and swings correct for and ensure uniform focus from foreground elements to distant structures, resulting in images with natural proportions and extended sharpness. The tonal range in large format black-and-white negatives offers exceptional , typically spanning 10-14 stops, which captures a wide spectrum of values from deep shadows to bright highlights. This broad allows for subtle gradients and nuanced transitions in high-contrast scenes, such as mountain ranges under varying light, where details in both low and high tones remain discernible without clipping. Photographers like exploited this through the , metering to place key tones optimally within the negative's capacity for rich, printable gradations. Additionally, large format systems mitigate limitations at small apertures, sustaining high sharpness even at f/45 to f/64. The Group's f/64 , co-founded by Adams, championed these tiny stops to maximize and overall image clarity, as the large film area reduces the perceptual impact of diffraction blur during viewing or minimal enlargement. This approach yields tack-sharp results across the frame, ideal for contact prints or moderate enlargements where fine detail is paramount.

Practical Limitations

Large format cameras, particularly field models in 4x5 and 8x10 formats, typically weigh between 2 and 6 kilograms on their own, but when including sturdy tripods (often 2-5 kg) and protective transport cases, the total setup can exceed 5-15 kg, significantly restricting mobility during fieldwork such as hiking or remote location shoots. This bulk necessitates robust support systems and careful planning for transportation, making spontaneous photography challenging compared to smaller formats. The financial barriers are substantial, with individual sheets of 4x5 or 8x10 film costing $2-5 for black-and-white emulsions like HP5 or Tri-X in bulk packs, though color films can exceed $10 per sheet. Additionally, establishing a home for processing and enlarging large format negatives requires an investment of at least 1,000,coveringessentialssuchasa4x5compatible[enlarger](/page/Enlarger)(1,000, covering essentials such as a 4x5-compatible [enlarger](/page/Enlarger) (300-800), chemical trays, safelights, and ventilation systems. These ongoing expenses, combined with the need for specialized storage and processing equipment, often deter amateur photographers from adopting the format. The workflow demands considerable time per image, with setup, composition, focusing, and exposure adjustments routinely taking 15-30 minutes or more, rendering large format unsuitable for capturing fast-moving subjects or dynamic events like or sports. This deliberate pace, while fostering precision, contrasts sharply with the rapid operation of 35mm or digital systems, limiting its use in time-sensitive scenarios. Sheet films used in large format are highly sensitive to environmental conditions. Unexposed sheet films should be stored in a cool, dry place; for long-term storage, refrigerate at 2-10°C (35-50°F) or freeze at -18°C (0°F) or lower, with relative humidity of 40-60% to prevent degradation, warping, or issues from , , or excess . Furthermore, at low light levels leading to exposures longer than one second, reciprocity law failure occurs, necessitating —often doubling or tripling the indicated time—via manufacturer charts to maintain proper . Such adjustments add complexity, particularly in varying field conditions.

Applications and Uses

Landscape and Architectural Photography

Large format photography excels in capturing the vastness and detail of natural landscapes, particularly through the use of 8x10-inch view cameras that allow for precise control over composition and focus. Ansel Adams extensively employed this format during his decades-long documentation of Yosemite National Park from the 1920s to the 1960s, producing iconic images that emphasize tonal range and environmental grandeur. The view camera's movements, such as tilt and swing, enabled Adams to adjust perspective and maintain sharp horizons across expansive scenes, correcting for uneven terrain and ensuring balanced foreground-to-background depth. In architectural photography, large format cameras provide essential tools for distortion correction, making them ideal for documenting built structures with geometric accuracy. Julius Shulman, a pivotal figure in mid-20th-century architectural imaging, relied on 4x5 view cameras to photograph modernist homes and buildings, avoiding the converging lines that plague wide-angle shots from lower viewpoints. Rise and fall shifts on the camera front standard allowed him to elevate or lower the lens plane independently of the film back, straightening verticals and preserving proportional accuracy in his images of designs by architects like and . This technique contributed to Shulman's ability to convey the clean lines and spatial harmony of architecture during the 1940s to 1960s. Contemporary photographers continue to leverage large format for intimate, atmospheric interpretations of landscapes, often through contact printing to retain the negative's full resolution and subtlety. Artists working with 11x14-inch negatives create direct contact prints that yield ethereal, high-contrast effects, emphasizing and tonal delicacy in natural scenes. For instance, Michael Kenna's black-and-white landscapes, though primarily from , inspire similar approaches in large format practice, where contact printing enhances the dreamlike quality through extended exposures and precise control. Technical adaptations in large format outdoor shoots often involve specialized filters to manage light and reflections, enhancing the medium's suitability for challenging environmental conditions. Polarizing filters reduce glare from water surfaces and foliage, allowing clearer views of skies and while deepening color saturation in black-and-white conversions. Neutral density filters extend exposure times for motion blur in flowing water or clouds, controlling without overexposing highlights in bright landscapes. These tools, mounted on the lens or via holders, are particularly valuable in setups where precise alignment is critical before exposure.

Scientific and Archival Documentation

The National Park Service's Historic American Buildings Survey (HABS) and Historic American Engineering Record (HAER) programs, established in 1933, standardize large format photography with 4x5, 5x7, and 8x10 inch sheet film to create precise, high-resolution records of U.S. historic buildings, engineering sites, and landscapes. These programs require tripod-mounted view cameras to capture detailed black-and-white negatives, ensuring durability and fidelity for long-term preservation. The resulting , including more than 500,000 drawings, photographs, and reports from over 46,000 sites (as of 2025), is archived in the Prints and Photographs Division for public access and research. In scientific research, large format aerial cameras such as the Wild RC8 have supported photogrammetric mapping for and surveys since the mid-20th century. This 9x9 inch format camera, equipped with a 6-inch lens and rotary shutter, was employed by agencies like the from 1956 to 1990 for topographic analysis, resource inventory, and , producing stereoscopic images that enable accurate three-dimensional modeling of and . Archival standards for artifact often incorporate orthochromatic in large format photography to achieve more natural tonal reproduction, as these emulsions sensitize to and for better color fidelity in black-and-white images compared to early blue-sensitive materials. The applies large format techniques to photograph its extensive collections of artifacts, exhibits, and historical reproductions, supporting conservation and scholarly analysis. In , metric formats like 13x18 cm glass plates are prevalent in cultural heritage documentation, aligning with photogrammetric practices for architectural and site surveys under international preservation frameworks established in the . These sizes ensure flatness and precision in metric cameras, facilitating standardized recording of monuments and artifacts.

Contemporary Adaptations

In the , digital backs have been adapted to large format cameras, enabling high-resolution captures that rival traditional . For instance, Phase One's IQ4 150-megapixel digital back, when mounted on technical cameras like the Phase XT with Rodenstock lenses, produces files suitable for large prints, though comparisons show 8x10 can exceed this resolution at an estimated 300-600 megapixels for ultimate detail. These scanning and full-frame backs, often used on 8x10 setups, allow photographers to leverage large format movements while benefiting from digital immediacy and up to 15 stops. Hybrid workflows have emerged, integrating large format optics with digital sensors to combine precision control with electronic efficiency. The Cambo Actus series of technical view cameras exemplifies this, featuring full movements such as tilt, swing, shift, rise, and fall, and compatibility with sensors from brands like GFX or Hasselblad, enabling focal lengths from 24mm to 600mm via adapted large format lenses. This setup supports non-destructive editing and live view, making it ideal for architectural and product where perspective correction is essential. Niche revivals have sustained interest in analog large format through experimental practices. Pinhole photography in 4x5 and 8x10 formats has gained traction for , producing soft-focus, infinite-depth images that evoke dreamlike or minimalist aesthetics, as seen in contemporary exhibits like "Poetics of Light". Ultra-large formats, particularly the 20x24-inch Polaroid system, continue in dedicated studios; the 20x24 Studio in New York, preserved post-Polaroid's 2008 closure by figures like John Reuter and Elsa Dorfman, produces instant portraits using original cameras and custom chemistry. A studio, operational since 2019 and run by Markus Mahla and Oliver Blohm, further revives this format with camera #5, hosting artist collaborations for unique, unretouched large-scale prints. Independent efforts, such as Ethan Moses's Cameradactyl project, adapt self-processing backs for 20x24 , enabling portable instant captures without reliance. Sustainability concerns prompted shifts in response to global film shortages in the early 2020s (2020–2023), driven by supply chain disruptions during the and heightened analog demand; these issues have since largely resolved with increased production. Photographers have turned to eco-friendly films and developers, such as plant-based options like (using , , and washing soda) or bio-eco formulas derived from rosemary and other botanicals, which reduce toxic chemical use in black-and-white processing. For large format, these alternatives support sheet films from producers like , minimizing environmental impact during development. like has emerged as a virtual alternative, offering non-destructive raw processing, , and GPU-accelerated workflows to simulate traditional editing without physical chemicals. In recent years (as of 2025), advancements include higher-resolution digital backs surpassing 150 megapixels and AI tools for automated perspective correction in hybrid setups, further expanding large format applications in and commercial work.

References

Add your contribution
Related Hubs
Contribute something
User Avatar
No comments yet.