
Community hub
Recent from talks
Contribute something
Nothing was collected or created yet.
Operation Paravane
View on Wikipedia
| Operation Paravane | |||||||
|---|---|---|---|---|---|---|---|
| Part of World War II | |||||||
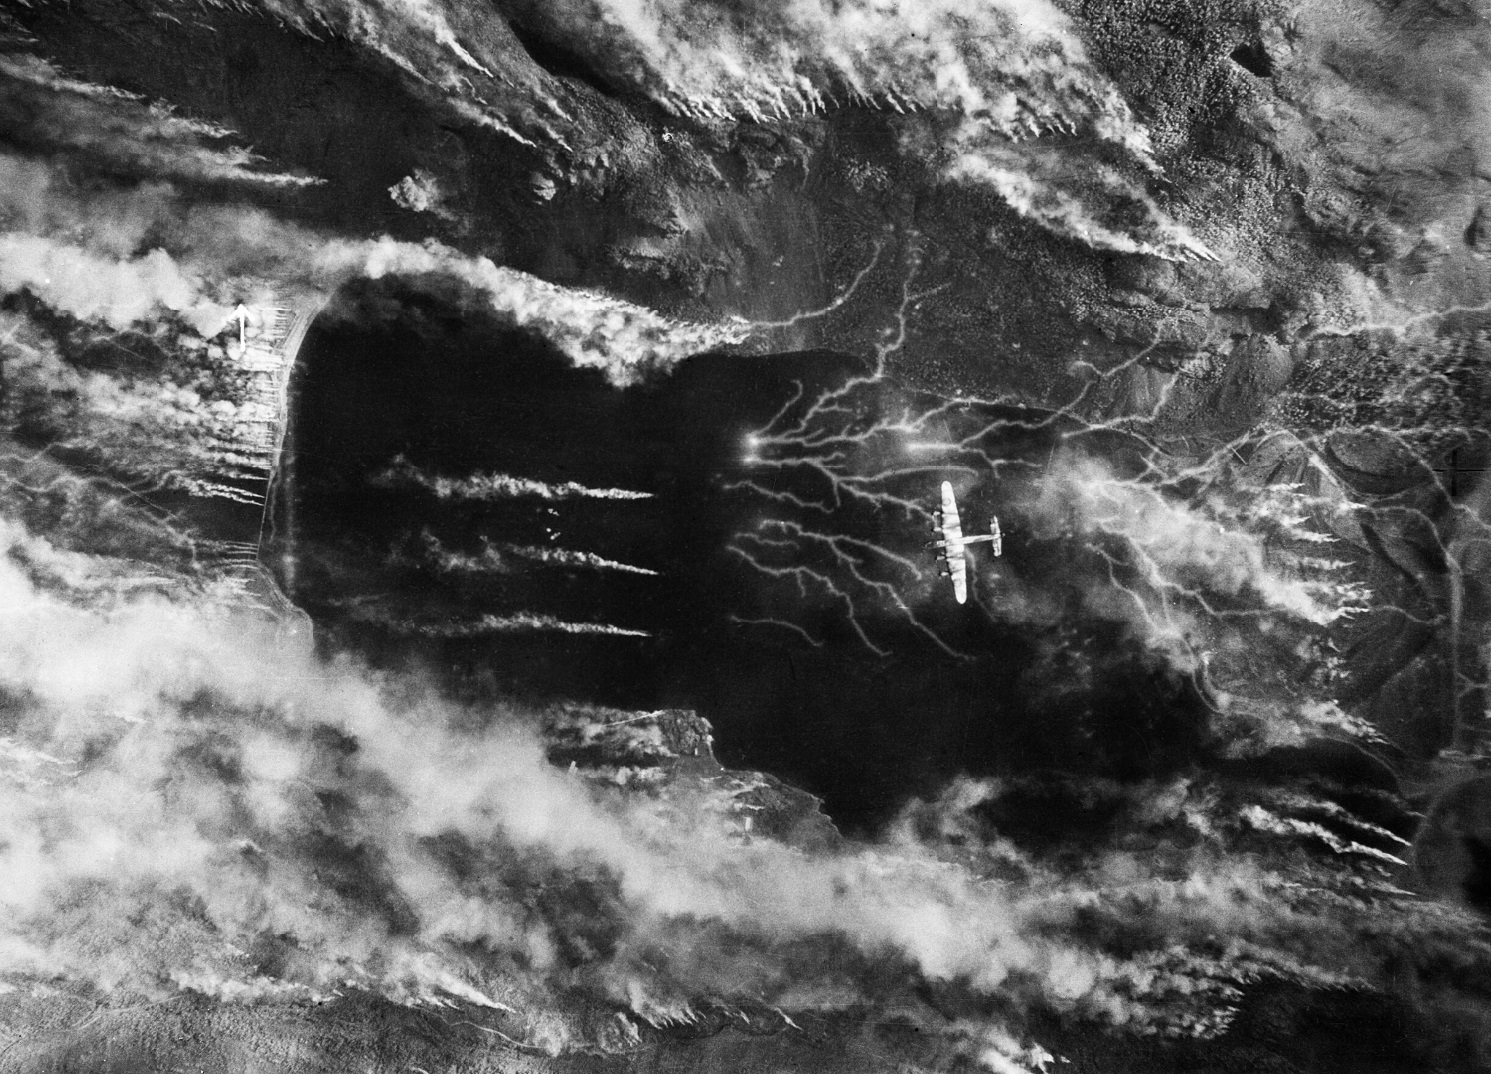
 A British Lancaster bomber over Kaafjord during Operation Paravane | |||||||
| |||||||
| Belligerents | |||||||
|
|
| ||||||
| Commanders and leaders | |||||||
|
|
| ||||||
| Casualties and losses | |||||||
|
11 killed 6 or 7 heavy bombers destroyed in accidents |
Battleship Tirpitz heavily damaged 5 killed, 15 wounded | ||||||
 | |||||||
Operation Paravane was a British air raid of World War II that inflicted heavy damage on the German battleship Tirpitz, at anchor in Kaafjord in the far north of German-occupied Norway. The attack was conducted on 15 September 1944 by 21 Royal Air Force heavy bombers, which flew from an airfield in the north of the Soviet Union. The battleship was struck by one bomb, and further damaged by several near misses. This damage rendered Tirpitz unfit for combat, and she could not be repaired as it was no longer possible for the Germans to sail her to a major port.
The attack on 15 September followed a series of raids conducted against Tirpitz with limited success by Royal Navy carrier aircraft between April and August 1944, seeking to sink or disable the battleship at her anchorage, so that she no longer posed a threat to Allied convoys travelling to and from the Soviet Union. The first of these raids was successful, but the other attacks failed due to shortcomings with the Fleet Air Arm's strike aircraft and the formidable German defences. As a result, the task of attacking the battleship was transferred to the RAF's Bomber Command. Avro Lancaster bombers from the Command's two elite squadrons flew to their staging airfield in the Soviet Union on the night of 11/12 September, and attacked on 15 September using heavy bombs and air-dropped mines. All of the British aircraft returned to base, though one of the Lancasters later crashed during its flight back to the United Kingdom.
Following Operation Paravane, the German Navy's commander decided to use Tirpitz as a static artillery battery to protect the town of Tromsø. The Allies were unable to confirm the extent of the battleship's damage, and conducted two more heavy bomber raids against her in late 1944, Operation Obviate on 29 October, and Operation Catechism on 12 November. Tirpitz was sunk with considerable loss of life during the second of these attacks.
Background
[edit]From early 1942, Tirpitz posed a significant threat to the Allied convoys transporting supplies through the Norwegian Sea to the Soviet Union. Stationed in fjords on the Norwegian coast, the battleship was capable of overwhelming the close-escort forces of Arctic convoys or breaking out into the North Atlantic. Owing to the superiority of the Allied navies, Tirpitz rarely put to sea and only conducted three brief combat operations into the Norwegian Sea during her career.[2] The Allies needed to keep a powerful force of warships with the British Home Fleet to counter the threat she posed and capital ships accompanied most convoys part of the way to the Soviet Union.[3][4]
Royal Air Force (RAF) heavy bombers conducted a series of abortive raids on Tirpitz shortly after the battleship arrived in Norway from Germany in January 1942. Tirpitz was initially based at Fættenfjord near Trondheim, which lay within range of British bombers flying from Scotland.[5] The first raid on 30 January involved nine Handley Page Halifax and seven Short Stirling bombers. Owing to cloud over the target area, only one of the bombers sighted Tirpitz and none inflicted damage. One Halifax crashed into the sea on its way back to Scotland and its crew were rescued.[6] The next raid on Fættenfjord took place on 30 March, with the attacking force comprising 33 Halifaxes. The operation was again frustrated by heavy clouds over the target area. Four of the Halifaxes were shot down and two others crashed while returning to base.[7] Another attack was mounted by 30 Halifaxes and 11 Avro Lancasters on the night of 27/28 April. Aircraft of the first wave located and attacked Tirpitz but no damage was inflicted and five bombers were lost.[8] The final raid in this series took place the next night and involved 21 Halifaxes and 12 Lancasters. The attackers found Tirpitz covered in a protective smokescreen and the battleship again escaped damage; two British aircraft were destroyed.[9]

Plans for further heavy bomber attacks on Tirpitz were developed throughout 1942, none took place.[10] One of the options considered was to stage the bombers through a base in the northern Soviet Union but this was judged impractical as little was known about the suitability of Soviet airfields for heavy bombers.[11] Two squadrons of RAF Coastal Command Handley Page Hampden torpedo bombers operated from Vaenga in northern Russia during mid-September 1942 to counter Tirpitz or any other German warships which attempted to attack Allied convoys but these aircraft did not make contact with the ship.[12]
Further plans for air attacks on Tirpitz were developed during 1943 but none took place. During 1942 and 1943 British inventor Barnes Wallis tried to develop a version of his "bouncing bomb" for use against Tirpitz alongside the larger weapons that were used to attack several German dams during Operation Chastise on 16/17 May 1943.[13] No. 618 Squadron was formed in April 1943 and equipped with de Havilland Mosquitos for this attack but trials of the "Highball" bouncing bombs during the year were unsuccessful and the plan was abandoned in September.[14][15] Tirpitz was transferred to a new base at Kaafjord in the far north of Norway in late May 1943.[16] This anchorage was well protected, with the defences including equipment capable of rapidly generating an artificial smokescreen as well as many anti-aircraft guns located in shore batteries and warships.[17] During June 1943, consideration was given to attacking the battleship with United States Army Air Forces Boeing B-17 Flying Fortress heavy bombers. These aircraft would have flown from the United Kingdom to Kaafjord, landed in the Soviet Union and made another attack against Tirpitz on their return flight. Such a mission was judged to be impractical by the RAF as it was expected that German fighter aircraft would attack the bombers and Kaafjord would be covered by a smokescreen by the time they arrived over the target area.[18] The only attack made against Tirpitz at Kaafjord by land-based aircraft prior to September 1944 was a small raid conducted by 15 Soviet bombers on the night of 10/11 February 1944, but it did not inflict any damage on the battleship.[19]
The Royal Navy attacked Tirpitz at Kaafjord from September 1943 until August 1944. On 23 September 1943, the crews of two British midget submarines penetrated the defences around the battleship during Operation Source, and placed explosive charges in the water beneath her. This attack caused extensive damage to Tirpitz, putting her out of service for six months.[20] Further midget submarine attacks were not considered feasible and an air raid designated Operation Tungsten was conducted by Royal Navy aircraft carriers on 3 April 1944 as repairs to the battleship neared completion. Tirpitz did not suffer heavy damage in this operation but was out of action for several more months while repairs were completed.[21][22] The Home Fleet sortied to attack Kaafjord on a further four occasions between April and July; all but the last of these operations were frustrated by bad weather and the Operation Mascot raid on 17 July did not inflict any damage on Tirpitz.[23] Four more carrier attacks targeting Tirpitz were undertaken between 22 and 29 August during Operation Goodwood but again resulted in only minor damage to the battleship.[24]
Planning
[edit]
Senior Royal Navy officers attributed the failure of the raids conducted between April and August 1944 to shortcomings with the Fleet Air Arm's main attack aircraft, the Fairey Barracuda. Although Operation Tungsten succeeded because the Germans were taken by surprise, during subsequent raids the slow speed of the Barracudas gave Kaafjord's defenders time to cover the area with artificial smoke before the British aircraft arrived over the target area. Moreover, the Barracudas were unable to carry bombs large enough to significantly damage Tirpitz when hits were achieved.[25] As a result, before and after Operation Goodwood, further consideration was given to using Mosquitos to attack the battleship; under initial plans developed in mid-August these aircraft would have been launched from aircraft carriers and attacked Tirpitz with 2,000-pound (910 kg) or 4,000-pound (1,800 kg) armour-piercing bombs before landing in northern Russia.[26] These proposals came to nothing as the Supreme Allied Commander of the Allied Expeditionary Force, General Dwight D. Eisenhower, was unwilling to release any Mosquitos in July,[Note 1] and in August the Mosquitos were also judged to be too slow to successfully reach Kaafjord from aircraft carriers before it was covered by smoke.[28][29]
In August RAF Bomber Command, which controlled the force's heavy bombers, began developing plans to strike Tirpitz at Kaafjord. During a meeting on 28 August between the head of Bomber Command, Air Chief Marshal Sir Arthur Harris, and Vice-Chief of the Air Staff Air Marshal Douglas Evill, to discuss the feasibility of dispatching Mosquitos against Kaafjord, Harris stated that he had ready a plan to attack the battleship with Lancaster bombers.[30] Under this plan, 24 Lancasters were to depart a base in the far north of Scotland, bomb Tirpitz, and return to an airstrip in the Shetland Islands. If the return trip was judged impossible, the bombers would instead land at Murmansk in northern Russia before returning to the United Kingdom. Bomber Command's staff had contacted Soviet officials about the latter element of the plan, and concluded that it would be feasible. Owing to the complex nature of the mission, Bomber Command's two elite special duties units, No. 9 and No. 617 Squadrons, would conduct the attack. This proposal was viewed favourably, and was approved by Eisenhower's headquarters on 5 September.[31]
No. 5 Group was assigned responsibility for planning the attack on Tirpitz in late August.[32] The group's staff officers judged that it was essential for the raid to surprise Kaafjord's defenders so that the battleship was not covered in smoke by the time the Lancasters arrived. As the seaward approaches to the fjord were covered by a comprehensive radar network, the planners decided that the attack force should approach the region overland from the south-east and at a high speed to limit the defenders' warning time to eight minutes or less.[33] Due to the difficulty of damaging the heavily armoured battleship, the main weapon selected for this operation was the Tallboy bomb, the largest then in service with the RAF and capable of penetrating well-protected targets.[34] Some of the bombers were to be armed with "Johnnie Walker" (commonly called "JW") mines, which were designed to be dropped from aircraft and move through the water by rapidly diving and surfacing until they struck their target.[35] The Tallboy had been successfully used by No. 617 Squadron against tunnels and other facilities, but the mines had not been used in combat, and Harris and several other senior RAF officers were sceptical of their effectiveness.[36]

As test flights conducted by No. 617 Squadron proved that it was not possible to make a return trip to Kaafjord from Scotland, and an evaluation of the main airstrip in Shetland determined that it was unsuitable for Lancasters, No. 5 Group's staff officers judged that it would be necessary for the aircraft to refuel in the Soviet Union. Detailed investigation of the airstrips near Murmansk found that they were at best marginal for heavy bombers and had almost no accommodation or aircraft servicing facilities. Moreover, the airstrips were vulnerable to attack from fighters operating from nearby German bases. Instead, it was decided that the attack force should fly over northern Sweden and Finland after raiding Kaafjord and refuel at Yagodnik airstrip, which was on an island near Arkhangelsk. This plan was accepted by the Air Ministry on 6 September.[37] Soviet Naval Aviation offered to attack German fighter bases at the same time as the British bombers arrived over the target area, but No. 5 Group rejected this proposal and requested that Soviet aircraft not fly near Kaafjord, to avoid alerting the Germans.[38] Also in early September, five aircraft from No. 192 Squadron, which specialised in monitoring enemy radars, conducted sorties to locate German radar stations in northern Norway and identify any gaps in their coverage.[39]
The operation order setting out how the raid was to be conducted was issued by No. 5 Group on 7 September. It stated that Kaafjord was believed to be protected by 16 heavy and 16 light anti-aircraft guns, as well as Tirpitz's guns, and that it took the defenders ten minutes to cover the battleship with a smokescreen.[40] The attack force was to be organised into two groups. Force A, comprising twelve Lancasters from No. 9 Squadron and an equal number from No. 617 Squadron armed with a single Tallboy each, was to continue to Yagodnik after bombing. Force B was to comprise six Lancasters from each of the squadrons armed with twelve JW mines and return directly to either Scotland or the Shetland Islands. A Lancaster from the RAF Film Unit, which was attached to No. 463 Squadron RAAF, would accompany Force B and also return to the United Kingdom after the bombers completed their attack. It was intended that the attack would be conducted in daylight, and that the Lancasters would assemble into formations near Kaafjord before attacking. If the fjord was covered by cloud or smoke, Force A was ordered to not drop its valuable bombs and continue onto Yagodnik. Force B was directed to drop the JW mines regardless of cloud or smoke cover as long as an aiming point could be identified. The entire attack group was to maintain strict radio silence.[41] Two No. 511 Squadron Consolidated B-24 Liberator transport aircraft were assigned to carry maintenance personnel and supplies from the United Kingdom to Yagodnik, and a Mosquito fitted for photo reconnaissance tasks from No. 540 Squadron would scout ahead of the attack force.[42] All aircrew were briefed on this plan on either 8 or 9 September.[43] Group Captain C.C. McMullen, the commander of No. 9 Squadron's home base of RAF Bardney, was appointed the overall leader of the detachment. No. 617 Squadron's commanding officer, Wing Commander "Willy" Tait, was selected to lead the strike force.[44][45]
To provide weather reports and damage assessments from Kaafjord, agents on the ground were needed, but the last radio group in the area had exfiltrated in May 1944. The first attempt at re-establishing a presence near Tirpitz occurred in August 1944, when a Norwegian Secret Intelligence Service (SIS) agent was dispatched to the nearby village of Alta.[Note 2] The agent infiltrated with a radio transmitter codenamed "Sinding" from neutral Sweden, but only managed to begin transmissions to the United Kingdom on 22 September, too late for the preparation stage for the operation.[47] In a second attempt at establishing an agent group in the area, the Norwegian SIS agents Knut Moe and Anton Arild were dropped by parachute into the wilderness between Kaafjord and Alta on 8 September by an American Operation Carpetbagger Liberator. During the drop the agents became separated from most of their equipment, with the exception of the radio transmitter. Without weapons and equipment, the agents were forced to relocate to the village of Bossekop, where Moe's mother lived. The radio transmitter operated by the SIS team, codenamed "Aslaug", was operational by 13 September, sending weather reports to the United Kingdom every other hour.[48][49] As well as reporting on the weather, Moe and Arild radioed assessments of the damage Tirpitz had suffered in the air attacks prior to Operation Paravane.[50] Local contacts helped the agents in spying on Tirpitz before and after the 15 September attack.[51] By the time of the attack, Moe and Arild had established an observation post overlooking Tirpitz's anchorage in Kaafjord.[52]
Preparations
[edit]The attack force was placed on alert to launch what had been designated Operation Paravane on 8 September. Good weather was vital for the operation, and the airmen waited at their home bases for the next two days as forecasts proved unfavourable.[53] Meanwhile, the Air Ministry, No. 5 Group and British military liaison officers in the USSR continued to work with the relevant Soviet headquarters to finalise the arrangements for Force A's flight from Norway to Yagodnik.[54]
Subsequent forecasts indicated that weather conditions at Kaafjord were changing rapidly, and during the morning of 11 September Harris judged that it would not be feasible to launch the bombers from Scotland with confidence that Kaafjord would be free of cloud by the time they arrived. Accordingly, he decided to change the plans for the operation, with all of the bombers now flying to Yagodnik first and mounting the attack from that airfield.[54][55] Harris ordered the attack force to depart that afternoon, before advising the Air Ministry or Soviets of the change in plans.[55]
Both British bomber squadrons began to take off at 5 pm local time.[56] No. 9 Squadron dispatched 18 Lancasters from RAF Bardney and 20 No. 617 Squadron Lancasters departed from RAF Woodhall Spa. A total of 26 Lancasters were armed with Tallboys and the remainder with JW mines. The Film Unit Lancaster also flew out of Bardney carrying three RAF cameramen as well as an Associated Press journalist and a radio reporter from the BBC.[56] The Liberators departed Bardney just before the bombers, carrying McMullen, maintenance personnel and spare parts. The No. 540 Squadron Mosquito left Bardney the next day.[42] Despite not being notified of the new plan until after all of the Lancasters were airborne, the Soviet military quickly agreed to the changed arrangements.[54]

The Lancasters' flight to Yagodnik initially went well. After departing their bases, the 39 aircraft flew north to Shetland before turning east. During the early stages of the flight one of the No. 9 Squadron Lancasters was forced to dump its Tallboy into the North Sea after it became decoupled from its mounting; the bomber returned to base.[42] The remaining aircraft passed over neutral Sweden where the aircrew, most of whom had only conducted night flying over countries observing blackouts, were pleased to see towns lit up.[57] After crossing the Gulf of Bothnia the Lancasters continued over Finland towards the USSR. Several aircraft were fired on by Swedish, Finnish and Soviet anti-aircraft defences, but only one suffered any damage.[57]
Despite pre-departure forecasts of good weather, the force encountered thick clouds after entering Finnish airspace; this continued for the remainder of the flight. The conditions made navigation difficult, and forced the pilots to fly at a low altitude so that they could use features on the ground to determine their location.[44] Only 26 of the Lancasters were able to locate Yagodnik and land there during the morning of 12 September, the other 13 touching down at other airfields or crash landing in open spaces.[58] Five or six of the latter aircraft were written off, and two of the seven which eventually reached Yagodnik were too badly damaged to be used in operations.[Note 3][59][60] Despite the number of crashes, none of the airmen on board these aircraft were injured.[61] McMullen recorded that it was "extraordinary that so few crashes occurred" given the adverse circumstances, and that the majority of the aircraft dispatched could have been destroyed.[62]
After being concentrated at Yagodnik, the attack force was readied to strike Kaafjord. The Soviet personnel at the airfield provided considerable assistance, but the process of refuelling the aircraft could not be completed until 13 September due to inadequate facilities. The ground crew also repaired some of the damaged bombers, in some cases with parts salvaged from the aircraft which had been written off.[61][63] The British officers and senior non-commissioned officers were accommodated in a boat, and all other personnel slept in overcrowded underground huts. Both the boat and the huts were infested with bed bugs, and almost all of the airmen were bitten before the accommodation was fumigated by the detachment's medical officer.[64]
By the morning of 14 September, 26 Lancasters from the attack forces and the Film Unit aircraft were ready; 20 of the bombers were armed with Tallboys and the remainder with JW mines. The Mosquito took off bound for Kaafjord at 2:10 am, but the planned departure of the bombers at 8:00 am was cancelled when it returned to Yagodnik at 6:45 and reported that conditions over the target area were unsuitable.[61] For the remainder of the day the Soviets provided hospitality including a formal lunch, a football tournament and a film that night.[65] Some of the Allied airmen were disturbed to see political prisoners being beaten by overseers while undertaking forced labour.[66] Work on repairing the damaged Lancasters also continued on 14 September, and an additional Tallboy-armed aircraft was ready by the next morning.[67]
The plans for the raid were further adjusted while No. 9 and No. 617 Squadrons were waiting at Yagodnik. The Lancasters were to take off together, and fly at low altitude until they reached the border between Finland and the USSR to avoid detection by German radar stations located around Kirkenes. The Force A aircraft would then climb to around 20,000 feet (6,100 m) and the six Force B bombers to 16,000 feet (4,900 m). Three Lancasters from No. 9 Squadron would proceed ahead of the main body to determine wind conditions over Kaafjord. When the main body reached a position around 60 miles (97 km) from the fjord, at which point the British expected that the Germans would have detected the bombers, the Lancasters would move into attack formations and commence their bombing run. It was decided that all of the aircraft should attack simultaneously, with Force A flying in four groups of five aircraft which would approach Kaafjord from the south and drop Tallboys from altitudes between 18,000 feet (5,500 m) and 14,000 feet (4,300 m). Force B was to fly in two lines abreast, pass over the fjord from south-east to north-west, and release the JW mines from between 12,000 feet (3,700 m) and 10,000 feet (3,000 m).[68]
Attack
[edit]The No. 540 Squadron Mosquito reconnoitred Kaafjord again in the morning of 15 September, and at 7 am Yagodnik time reported that conditions were suitable for an attack.[67] The 27 bombers and the Film Unit Lancaster began taking off shortly afterwards. The aircraft flew in a loose formation and the journey to northern Norway went as planned, though six Lancasters were forced to abort and return to Yagodnik.[69][70] Despite passing near several German bases, the British force was undetected and no German fighters were airborne over Kaafjord at the time of the attack.[71]
Kaafjord's defenders detected the Lancasters approximately ten minutes before they arrived, and the protective smokescreen was beginning to form when the attack commenced at 10:55 am GMT.[72] Only the first group of Lancasters, led by Tait, were able to aim their bombs at Tirpitz before she was obscured by smoke. It is believed that the bomb dropped from Tait's aircraft struck the battleship, and the other bombs dropped by this group landed in the water nearby.[45] All the other Force A aircraft aimed their Tallboys at the anti-aircraft gunfire rising from the ship; 17 of the weapons were dropped.[73][74] Several Lancasters made more than one pass over the target area as their bomb aimers sought to locate Tirpitz or technical problems prevented their Tallboy from being dropped on the initial pass.[75]
Force B commenced its attack after the Tallboy Lancasters had completed theirs so that the shock waves from bomb explosions did not prematurely set off the JW mines. As none of the Force B aircrew were able to spot Tirpitz due to the smokescreen, they dropped the mines on the battleship's estimated position.[75] These weapons did not cause any damage.[76] The smokescreen over Kaafjord prevented the Allied aircrew from being able to assess the results of their bombing, though several large spouts of water and explosions were observed.[75] Tait was also pleased to see a column of black smoke rising through the smokescreen.[74] Some of the bombs and mines landed up to a mile from the battleship.[45] Tirpitz's anti-aircraft guns and a further 98 guns located in nearby shore batteries and warships fired on the bombers throughout the attack, but only four Lancasters suffered any damage.[77][78]
All of the Lancasters had completed their attacks by 11:07 am GMT, and the 21 bombers began the return journey to Yagodnik.[79] The Force A aircraft which had not been able to bomb brought their Tallboys back. This flight proved uneventful, and all 27 Lancasters landed at Yagodnik in the evening.[74] The Film Unit aircraft flew directly from Kaafjord to the United Kingdom, and arrived at its home station after a fifteen-and-a-half hour flight; this was the longest operational Lancaster mission of World War II.[80]
The Mosquito conducted a reconnaissance sortie over Kaafjord on the afternoon of 15 September, arriving at about 1:30 pm GMT. Its crew found that the fjord was covered with cloud and smoke. They could briefly see Tirpitz, and reported that no damage was evident to the battleship, which remained afloat.[72] The Mosquito conducted further reconnaissance sorties on 16 September, but the fjord was completely obscured on all occasions.[77] McMullen considered launching a second attack, but decided against doing so as only two Tallboys and one load of JW mines were available.[72]
Aftermath
[edit]Tirpitz was rendered unfit for combat by Operation Paravane. The Tallboy bomb that struck the battleship passed through the foredeck and hull, and exploded in the water on the starboard side of her bow. This damage wrecked the bow, and left the battleship's forward compartments flooded with 2,000 tons of water. The explosions of several other Tallboys in the water near Tirpitz also buckled some of her hull plates and bulkheads. The battleship's casualties were not heavy, with five men killed and fifteen wounded.[81] The damage was assessed as needing nine months' worth of work to repair.[82] After reporting on the damage, Tirpitz's commanding officer, Kapitän zur See Wolf Junge, recommended to the German Navy's high command that the battleship be removed from service.[83]
The attack force returned to the United Kingdom in several groups. Tait led 16 Lancasters out of Yagodnik in the evening of 16 September; most of these aircraft flew over southern Finland, Sweden and Denmark. One of the Lancasters went off course and crashed on a mountain near Nesbyen in Norway, killing all eleven airmen aboard,[84] the only Allied casualties of Operation Paravane.[85] Nine other Lancasters departed on 17 September, followed by five the next day and two on 21 September. The remaining Lancasters had been judged to be damaged beyond repair, and were handed over to the Soviets. The Mosquito, which had been damaged by anti-aircraft fire during a sortie over Kaafjord, returned once repairs were complete on 26 September. The two Liberators were the final aircraft to depart, and flew out of Yagodnik carrying McMullen on 27 September.[60]
Following the attack, the British intelligence services sought to determine the extent of Tirpitz's damage. During late September, Norwegian SIS agents in the Kaafjord area reported that the battleship had been struck by a bomb and appeared damaged.[86] German radio signals that were intercepted and decoded on 25 and 29 September also stated that Tirpitz had suffered a single hit from a large bomb.[87] Photographs taken by the No. 540 Squadron Mosquito and a Soviet aircraft on 20 September indicated that the bow of the ship was damaged, though it was not possible to determine how badly.[86] Drawing on this evidence, the Royal Navy's Naval Intelligence Division concluded on 30 September that Tirpitz had "almost certainly" been struck by a Tallboy and may have been further damaged by near misses, and that the damage to the ship may have been "considerable" and rendered her unable to put to sea. A report from a Norwegian agent on 30 September was more specific, stating that Tirpitz had suffered a direct hit, which had opened a 17-metre (56 ft) gash on her bow. Further agent reports in early October provided little new evidence.[88] By late October, with no major German warships left in Kaafjord, the agents operating the "Aslaug" transmitter left the area, sending their last transmission to the United Kingdom on 22 October. Moe and Arild made their way on foot across the Finnmarksvidda plateau to Kautokeino and from there through Finland to Karesuando in Sweden, arriving on 5 December.[89][90] The agents carried out the march without resupplies of food, as Operation Carpetbagger had ceased using Soviet airbases after a Liberator was inadvertently shot down by a Soviet fighter during a follow-up operation to Finnmark shortly after the insertion of Moe and Arild.[91]
A meeting involving Großadmiral Karl Dönitz, the commander of the German Navy, was held in Berlin on 23 September to discuss the damage to Tirpitz. Dönitz was informed that it would take nine months to repair the ship, and that all the work had to be done at Kaafjord as the battleship would be extremely vulnerable if she tried to sail to a major port. As Soviet forces were also rapidly advancing towards northern Norway, Dönitz judged that it was not feasible to either return the ship to ocean-going service or retain her at Kaafjord. Instead, he decided to use Tirpitz as a floating artillery battery to defend the town of Tromsø. Dönitz also expressed hope that retaining the ship in commission would "continue to tie down enemy forces and by her presence ... confound the enemies' intentions".[82][92] The commander of the German Navy's task force in northern Norway, Konteradmiral Rudolf Peters, was accordingly directed to anchor Tirpitz at a location near Tromsø where the water was shallow enough to prevent the battleship from sinking completely if she suffered further damage.[93]
As the intelligence available to them was not conclusive, the Allies believed that Tirpitz still posed a potential threat.[94] Accordingly, Nos. 9 and 617 Squadrons made two further attacks on the battleship after she moved to Tromsø on 15 October; these operations were more straightforward to conduct than Operation Paravane as the port was within the range of Lancasters flying from airfields in northern Scotland.[83][95] The first raid, Operation Obviate, took place on 29 October but caused only minor damage to the battleship. During the subsequent attack conducted on 12 November, Operation Catechism, Tirpitz was struck by several Tallboy bombs and capsized with heavy loss of life among her crew.[96]
References
[edit]Footnotes
[edit]- ^ Eisenhower was involved in this decision as RAF Bomber Command was under his command at the time to support the invasion of Normandy.[27]
- ^ During World War II, the British Secret Intelligence Service cooperated with exiled Norwegian authorities in dispatching more than 100 radio transmitters with Norwegian operators to German-occupied Norway. The first transmitter became operational on 10 June 1940, the same day regular fighting ceased in Norway. Located almost exclusively along the coast, the SIS agents primarily reported on shipping movements. In all, some 200 Norwegian SIS agents operated clandestinely in occupied Norway, supported by around 2,000 local helpers. Of the people involved, 26 agents and at least 9 locals lost their lives, either by being killed in action with German troops, being executed, or dying as a consequence of captivity.[46]
- ^ Webster and Frankland wrote that six Lancasters were written off.[59] Sweetman states that McMullen requested permission to hand six crashed Lancasters over to the Soviet Union on 18 September, but lists 32 of the 37 aircraft which originally reached the Soviet Union as departing for the United Kingdom between 16 and 21 September.[60]
Citations
[edit]- ^ Bishop 2012, pp. 339, 341.
- ^ Ellis 1999, pp. 294–295.
- ^ Bennett 2012, p. 9.
- ^ Faulkner & Wilkinson 2012, p. 109.
- ^ Sweetman 2000, pp. 14–16.
- ^ Sweetman 2000, pp. 16–17, 170.
- ^ Sweetman 2000, p. 27.
- ^ Sweetman 2000, pp. 31–33, 170.
- ^ Sweetman 2000, pp. 33–34, 170.
- ^ Sweetman 2000, p. 43.
- ^ Sweetman 2000, pp. 46–47.
- ^ Herington 1954, pp. 295–297.
- ^ Sweetman 2000, p. 51.
- ^ "618 Squadron". Historical Structure of the Royal Air Force. Royal Air Force. Archived from the original on 28 August 2016. Retrieved 30 July 2016.
- ^ Sweetman 2000, pp. 51–52.
- ^ Sweetman 2000, p. 52.
- ^ Tactical, Torpedo and Staff Duties Division (Historical Section) 2012, p. 135.
- ^ Sweetman 2000, p. 53.
- ^ Bishop 2012, p. 295.
- ^ Woodman 2004, p. 340.
- ^ Bennett 2012, pp. 14–17.
- ^ Garzke & Dulin 1985, p. 267.
- ^ Roskill 1961, pp. 156, 170.
- ^ Roskill 1961, pp. 159–161.
- ^ Roskill 1961, pp. 156, 161.
- ^ Sweetman 2000, pp. 86–87.
- ^ Bishop 2012, p. 316.
- ^ Roskill 1961, p. 156.
- ^ Sweetman 2000, p. 88.
- ^ Bishop 2012, pp. 317, 319.
- ^ Bishop 2012, p. 319.
- ^ Sweetman 2000, p. 89.
- ^ Sweetman 2000, p. 95.
- ^ Sweetman 2000, p. 92.
- ^ Sweetman 2000, pp. 92–93.
- ^ Sweetman 2000, pp. 92, 94.
- ^ Sweetman 2000, pp. 95–96.
- ^ Sweetman 2000, p. 97.
- ^ Harrington 2015, pp. 105, 108.
- ^ Sweetman 2000, pp. 97–98.
- ^ Sweetman 2000, p. 99.
- ^ a b c Sweetman 2000, p. 101.
- ^ Sweetman 2000, p. 98.
- ^ a b Bishop 2012, p. 331.
- ^ a b c Brown 1977, p. 41.
- ^ Nøkleby 1995, pp. 371–373.
- ^ Nøkleby 1988, p. 112.
- ^ Hafsten et al. 2005, pp. 261–262.
- ^ Nøkleby 1988, pp. 112–113.
- ^ Pedersen 1982, p. 114.
- ^ Ulstein 1992, p. 94.
- ^ Nøkleby 1988, p. 113.
- ^ Bishop 2012, pp. 328–329.
- ^ a b c Sweetman 2000, p. 100.
- ^ a b Bishop 2012, p. 329.
- ^ a b Bishop 2012, p. 330.
- ^ a b Nichol 2015, p. 198.
- ^ Sweetman 2000, p. 106.
- ^ a b Webster & Frankland 1961, p. 193.
- ^ a b c Sweetman 2000, pp. 116–117.
- ^ a b c Sweetman 2000, p. 107.
- ^ Bishop 2012, p. 332.
- ^ Bishop 2012, pp. 332–333.
- ^ Sweetman 2000, pp. 108–109.
- ^ Sweetman 2000, pp. 107–108.
- ^ Nichol 2015, p. 207.
- ^ a b Sweetman 2000, p. 111.
- ^ Sweetman 2000, pp. 109–111.
- ^ Bishop 2012, pp. 335–336.
- ^ Sweetman 2000, p. 119.
- ^ Nichol 2015, p. 208.
- ^ a b c Sweetman 2000, p. 112.
- ^ Webster & Frankland 1961, p. 194.
- ^ a b c Bishop 2012, p. 338.
- ^ a b c Sweetman 2000, pp. 113–114.
- ^ Roskill 1961, p. 162.
- ^ a b Zetterling & Tamelander 2009, p. 293.
- ^ Sweetman 2000, p. 120.
- ^ Sweetman 2000, p. 115.
- ^ Nichol 2015, p. 211.
- ^ Bishop 2012, p. 339.
- ^ a b Sweetman 2000, p. 121.
- ^ a b Garzke & Dulin 1985, p. 268.
- ^ Sweetman 2000, pp. 115–116.
- ^ Zetterling & Tamelander 2009, p. 294.
- ^ a b Sweetman 2000, pp. 117–118.
- ^ Hinsley 1984, p. 277.
- ^ Sweetman 2000, p. 118.
- ^ Christensen 1990, pp. 254–255.
- ^ Ulstein 1992, p. 469.
- ^ Rørholt & Thorsen 1990, pp. 399–400.
- ^ Bishop 2012, pp. 340–341.
- ^ Bishop 2012, p. 341.
- ^ Zetterling & Tamelander 2009, p. 295.
- ^ Bennett 2012, p. 19.
- ^ Bennett 2012, pp. 19–21.
Works consulted
[edit]- Bennett, G.H. (2012). "Introduction". In Bennett, G.H. (ed.). Hunting Tirpitz: Naval Operations Against Bismarck's Sister Ship. Plymouth, Devon: University of Plymouth Press. pp. 7–25. ISBN 978-1-84102-310-6.
- Bishop, Patrick (2012). Target Tirpitz. London: Harper Press. ISBN 978-0-00-743119-9.
- Brown, David (1977). Tirpitz: The Floating Fortress. London: Arms and Armour Press. ISBN 0-85368-341-7.
- Christensen, Dag (1990). Den skjulte hånd: historien om Einar Johansen – britenes toppagent i Nord-Norge under krigen [The Hidden Hand: The story of Einar Johansen – the top agent of the British in northern Norway during the war] (in Norwegian). Oslo: Damm. ISBN 82-517-9982-1.
- Ellis, John (1999). One Day in a Very Long War: Wednesday 25th October 1944 (Pimlico ed.). London: Pimlico. ISBN 0-7126-7465-9.
- Faulkner, Marcus; Wilkinson, Peter (2012). War at Sea: A Naval Atlas, 1939–1945. Annapolis, Maryland: Naval Institute Press. ISBN 978-1-59114-560-8.
- Garzke, William H.; Dulin, Robert O. (1985). Battleships: Axis and Neutral Battleships in World War II. Annapolis, Maryland: Naval Institute Press. ISBN 978-0-87021-101-0.
- Hafsten, Bjørn; Larsstuvold, Ulf; Olsen, Bjørn; Stenersen, Sten (2005). Flyalarm – luftkrigen over Norge 1939–1945 [Air Alert – the Air War over Norway 1939–1945] (in Norwegian) (2nd, revised ed.). Oslo: Sem & Stenersen Forlag. ISBN 82-7046-074-5.
- Harrington, Janine (2015). RAF 100 Group: The Birth of Electronic Warfare. Stroud, United Kingdom: Fonthill Media. ISBN 9781781554586.
- Herington, John (1954). Air War Against Germany and Italy, 1939–1943. Australia in the War of 1939–1945. Series 3 – Air. Volume III. Canberra: Australian War Memorial. OCLC 569627837.
- Hinsley, F.H.; et al. (1984). British Intelligence in the Second World War: Its Influence on Strategy and Operations. Volume Three, Part I. History of the Second World War. London: Her Majesty's Stationery Office. ISBN 0-11-630935-0.
- Nichol, John (2015). After the Flood: What the Dambusters Did Next. London: William Collins. ISBN 978-0-00-810084-1.
- Nøkleby, Berit (1988). Pass godt på Tirpitz! – norske radioagenter i Secret Intelligence Service 1940–1945 [Look well after Tirpitz! – Norwegian radio agents in the Secret Intelligence Service 1940–1945] (in Norwegian). Oslo: Gyldendal. ISBN 82-05-17705-8.
- Nøkleby, Berit (1995). "Secret Intelligence Service, SIS". In Dahl; Hjeltnes; Nøkleby; Ringdal; Sørensen (eds.). Norsk krigsleksikon 1940–1945 (in Norwegian). Oslo: Cappelen. ISBN 82-02-14138-9.
- Pedersen, Gunnar (1982). Militær motstand i nord 1940–45 : jakten på Tirpitz, Arnøytragedien, Operasjon MARTIN og SEPALS [Military resistance in the north from 1940 to 1945: The Hunt for Tirpitz, the Arnøy tragedy, Operation MARTIN and SEPALS] (in Norwegian). Tromsø: Universitetsforlaget. ISBN 82-00-06328-3.
- Rørholt, Bjørn; Thorsen, Bjarne (1990). Usynlige soldater: nordmenn i Secret Service forteller [Invisible Soldiers: Norwegians in the Secret Service relate] (in Norwegian). Oslo: Aschehoug. ISBN 82-03-16046-8.
- Roskill, S.W. (1961). The War at Sea 1939–1945. Volume III: The Offensive Part II. History of the Second World War. London: Her Majesty's Stationery Office. OCLC 59005418.
- Sweetman, John (2000). Tirpitz: Hunting the Beast: Air Attacks on the German Battleship, 1940–44. Annapolis, Maryland: Naval Institute Press. ISBN 1-55750-822-4.
- Tactical, Torpedo and Staff Duties Division (Historical Section) (2012) [1944]. "Naval Aircraft Attack on the Tirpitz (Operation 'Tungsten') 3 April 1944". In Bennett, G.H. (ed.). Hunting Tirpitz: Naval Operations Against Bismarck's Sister Ship. Plymouth, United Kingdom: University of Plymouth Press. pp. 133–177. ISBN 978-1-84102-310-6.
- Ulstein, Ragnar (1992). "Etterretningstjenesten i Norge 1940–45. 3: Nettet strammes". Etterretningstjenesten i Norge 1940–45 [The Intelligence Service in Norway 1940–1945] (in Norwegian). Vol. 3. Oslo: Cappelen. ISBN 82-02-13822-1.
- Webster, Charles; Frankland, Noble (1961). The Strategic Air Offensive Against Germany, Volume III: Victory. History of the Second World War. London: Her Majesty's Stationery Office. OCLC 614956318.
- Woodman, Richard (2004). The Arctic Convoys: 1941–1945 (Paperback ed.). London: John Murray. ISBN 0-7195-6617-7.
- Zetterling, Niklas; Tamelander, Michael (2009). Tirpitz: The Life and Death of Germany's Last Super Battleship. Philadelphia: Casemate. ISBN 978-1-935149-18-7.