Hubbry Logo
LensmeterLensmeterMain
Open search
Lensmeter
Community hub
Lensmeter
logo
8 pages, 0 posts
0 subscribers
Be the first to start a discussion here.
Lensmeter
Lensmeter
from Wikipedia
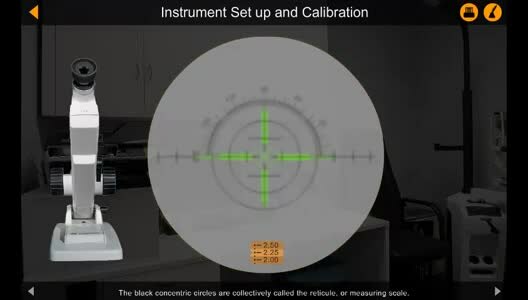
One of five comprehensive instructional videos derived from the original Flash animation on the use of the Topcon lensmeter (vertometer). Produced by Dr Suzane Vassallo with La Trobe University. These videos are also available Wikiversity, Youtube and Archive.org.
A Lensmeter in an Optical shop
A simple lensmeter cross sectional view. 1 – Adjustable eyepiece 2 – Reticle
3 – Objective lens 4 – Keplerian telescope
5 – Lens holder 6 – Unknown lens
7 – Standard lens 8 – Illuminated target
9 – Light source 10 – Collimator
11 – Angle adjustment lever
12 – Power drum (+20 and -20 Diopters)
13 – Prism scale knob

A lensmeter or lensometer (sometimes even known as focimeter or vertometer),[1][2] is an optical instrument used in ophthalmology. It is mainly used by optometrists and opticians to measure the back or front vertex power of a spectacle lens and verify the correct prescription in a pair of eyeglasses, to properly orient and mark uncut lenses, and to confirm the correct mounting of lenses in spectacle frames. Lensmeters can also verify the power of contact lenses, if a special lens support is used.

The parameters appraised by a lensmeter are the values specified by an ophthalmologist or optometrist on the patient's prescription: sphere, cylinder, axis, add, and in some cases, prism. The lensmeter is also used to check the accuracy of progressive lenses, and is often capable of marking the lens center and various other measurements critical to proper performance of the lens. It may also be used prior to an eye examination to obtain the last prescription the patient was given, in order to expedite the subsequent examination.

History

[edit]

In 1848, Antoine Claudet produced the photographometer, an instrument designed to measure the intensity of photogenic rays; and in 1849 he brought out the focimeter, for securing a perfect focus in photographic portraiture. [3] In 1876, Hermann Snellen introduced a phakometer which was a similar set up to an optical bench which could measure the power and find the optical centre of a convex lens. Troppman went a step further in 1912, introducing the first direct measuring instrument.

In 1922, a patent was filed for the first projection lensmeter, which has a similar system to the standard lensmeter pictured above, but projects the measuring target onto a screen eliminating the need for correction of the observer's refractive error in the instrument itself and reducing the requirement to peer down a small telescope into the instrument. Despite these advantages the above design is still predominant in the optical world.[4]

See also

[edit]

References

[edit]
[edit]
Revisions and contributorsEdit on WikipediaRead on Wikipedia
from Grokipedia
A lensmeter, also known as a lensometer, focimeter, or vertometer, is an used in and to measure the refractive power ( and ), axis, optical center, prism, and other properties of eyeglass lenses and contact lenses. It enables professionals to verify prescriptions, ensure lens accuracy during manufacturing and dispensing, and support eye examinations by quickly retrieving prior patient data. The modern lensmeter was invented by Edgar D. Tillyer and Estelle Glancy at , with its introduction in 1921 marking a pivotal advancement in the optical industry. Prior devices, such as Herman Snellen's 1876 phakometer, laid foundational principles but were cumbersome optical benches unsuitable for routine clinical use. The Lensometer's commercial success stemmed from its efficient design, which reduced measurement time from hours to minutes, revolutionizing spectacle verification and enabling precise lens production. In 2023, the recognized it as a Landmark for its enduring impact on eyecare. Lensmeters operate on the principle of neutralizing the lens under test by projecting a target—such as intersecting lines or a circle of light dots—through the lens onto a at the instrument's focal point. For spherical lenses, the power drum is adjusted until the target appears clear, with the reading in diopters indicating the lens power; cylindrical lenses require rotating the axis wheel to align the image. Early manual models used analog dials, while contemporary digital versions incorporate automated detection, green light sources for better accuracy on photochromic lenses, and features like distance . Beyond prescription verification, lensmeters play a in for optical laboratories, fitting assessments for progressive and bifocal lenses, and even forensic of unknown lenses. Their widespread adoption has standardized optical measurements, contributing to advancements in lens design and patient care efficiency.

Overview

Definition and Purpose

A lensmeter, also known as a lensometer or focimeter, is an designed to measure the refractive power of ophthalmic lenses, such as lenses and contact lenses. It quantifies key optical parameters including spherical power in diopters, cylindrical power, axis orientation, optical center, and prism diopters, enabling precise evaluation of lens performance at the plane (back vertex power). The primary purpose of a lensmeter is to verify eyeglass prescriptions against the specified values from an or ophthalmologist, ensuring the fabricated lenses match the required correction for a patient's vision. This verification process helps detect discrepancies in lens power or alignment that could affect or comfort. In opticianry and clinical , lensmeters play a critical role in during lens fabrication, where they confirm that produced lenses meet standards before dispensing. They are also indispensable for prescription verification in eye care settings and for making fitting adjustments to optimize patient outcomes, such as compensating for variations in high-power prescriptions. Invented in the early , the lensmeter addressed the limitations of manual measurement techniques that were prone to inaccuracies in practices of the time.

Basic Components

A standard lensmeter consists of several key physical and functional components that enable the measurement of lens refractive properties at the . The serves as the viewing portal for the operator, allowing observation of the projected target through the test lens, and is typically adjustable to accommodate the user's . The target, or , features mires such as intersecting lines (e.g., the American cross ) or a of dots, which are projected to facilitate power assessment. The objective lens system focuses the and target image, positioning the test lens at its rear focal point to ensure accurate vertex power measurement. The lens holder, often referred to as or spectacle table, securely positions the test lens, with a lens stop to center it properly and prevent slippage during evaluation. A power drum or dial provides a rotatable mechanism for reading spherical and cylindrical refractive values in diopters, displaying the measurements on an integrated scale. The in the includes concentric rings to quantify prismatic effects, including base direction. An internal illuminated scale employs a light source—such as a traditional or modern LED—to backlight the target and , projecting clear patterns through the lens for visibility. Alignment mechanisms include an axis wheel or marker with a circular scale for orienting the axis of cylindrical lenses. Safety features encompass dust covers to shield internal from contaminants and a stable base to maintain the instrument's integrity in settings.

History

Early Developments

The origins of lens measurement for ophthalmic purposes trace back to the late 19th century. In 1876, Dutch ophthalmologist Herman Snellen introduced the phakometer, an instrument similar to an optical bench that could measure the power and locate the optical center of convex lenses. However, it was cumbersome and unsuitable for routine clinical use. By the late 19th century, optometry relied on trial-and-error methods, where practitioners fitted trial lenses to patients' eyes and adjusted based on subjective feedback during refraction, lacking practical instruments for verifying manufactured lens power. These approaches, while foundational, were inefficient and prone to inconsistency in measuring spherical or cylindrical corrections. The breakthrough invention of a practical lensmeter occurred in 1921 with the introduction of the Wellsworth Lensometer by the (AO). Developed over a decade by optical engineer Edgar D. Tillyer and Estelle Glancy, this manual device utilized a telescopic projection system to observe mires—a patterned target of lines—through the test lens, allowing direct measurement of effective spherical and cylindrical power at the spectacle plane. Tillyer's contributions included key patents on lens-testing mechanisms, such as US Patent 1,454,774 for an eye-testing instrument filed in 1919, which underpinned the Lensometer's design. This innovation addressed the limitations of prior focimeters, providing opticians and optometrists with a reliable, objective tool for the first time, revolutionizing prescription verification. During the to , manual lensmeters gained widespread adoption among optical professionals, with AO's models setting the standard for measuring spherical and powers. The original Wellsworth Lensometer quickly became a staple in optometric practices, enabling accurate neutralization of lens effects by aligning the projected mires. Competing manufacturers, including , entered the market with their own manual devices, such as early 1930s models like the Type 21-65 series, which emphasized precision in power readings for everyday clinical use. These instruments focused on core dioptric measurements, supporting the growing demand for standardized production amid expanding services. A significant advancement in the 1930s was the integration of prism measurement capabilities into lensmeters, addressing the need to detect and quantify effects from lens decentration. In 1938, AO introduced the Model 620 Lensometer, featuring a frame table stage that allowed direct assessment of prism in mounted by observing mire displacement, a feature that enhanced accuracy for complex prescriptions. followed with similar enhancements in their 1940s models, making evaluation routine for handling off-axis lenses without additional tools. This development marked a key milestone, broadening the utility of early lensmeters up to the mid-20th century.

Modern Advancements

The electronic era of lensmeters began in when American Optical introduced the first automatic focusing model equipped with a precision digital readout, revolutionizing lens power measurement by automating focus adjustment and reducing operator variability. This innovation marked a shift from purely manual devices to electronically assisted systems, enabling faster and more consistent readings. In the 1970s and , lensmeter technology transitioned to digital formats, exemplified by American Optical's 1978 Model 12620, which featured an electronic readout with 0.01 diopter precision through averaging multiple readings. By the early , microprocessor-based automated lensmeters emerged, incorporating intelligent software for axis detection via multiple beam arrays and analysis of multifocal lenses, such as progressive addition lenses, by identifying corridors and add values. These advancements compensated for lens material properties like Abbe value and adhered to regional wavelength standards (e.g., 546 nm in , 589 nm in the ), enhancing accuracy for complex prescriptions. Twenty-first-century lensmeters incorporate user-friendly interfaces, (UV) coating detection, and integration with (EHR) systems for seamless data sharing. For instance, the Reichert LensChek Pro combines UV measurement with (PD) functionality within a digital exam suite, while the CL-300 offers operation and UV metering for broad lens compatibility. As of 2025, recent innovations include AI-assisted error correction for automated detection and , improving measurement reliability in clinical settings. Additionally, wireless data export capabilities support tele-optometry by enabling remote prescription verification and integration with platforms.

Operating Principles

Optical Theory

The lensmeter measures the effective power of an ophthalmic lens at its posterior vertex plane, which for a is defined by the lens formula P=1fP = \frac{1}{f}, where PP is the power in diopters (D) and ff is the in meters. This back-vertex power represents the reciprocal of the distance from the lens's rear surface to its second focal point, ensuring accurate assessment of how the lens alters vergence for rays entering from the eye side. The instrument operates on the principle of projecting mires—luminous targets such as grids or lines—through the test lens, where the resulting is viewed via a with crosshairs. rays from the mire pass through the lens and form an whose position depends on the lens power; the observer adjusts the mire's position until the image aligns precisely with the telescope's crosshairs, a state known as neutralization, indicating that the emergent rays are parallel. This setup leverages the Badal principle, with a fixed field lens positioned such that its focal point coincides with the posterior vertex of the test lens, allowing the to remain focused at while the target movement directly corresponds to power. For lenses with , the mires appear sharp in one principal meridian and blurred in the other due to differing powers in the two principal meridians caused by varying curvatures. The cylinder power is determined as the difference between the neutralized powers in these orthogonal meridians, and the axis aligns with the meridian requiring the for neutralization; the combined power along a principal meridian is then Ptotal=Psphere+PcylinderP_{\text{total}} = P_{\text{sphere}} + P_{\text{cylinder}}. Prism power, arising from lens decentration, is quantified by the deviation angle using Prentice's rule: Δ=P×d\Delta = P \times d, where Δ\Delta is the prism diopters, PP is the lens power in diopters, and dd is the decentration in centimeters from the optical center. This formula derives from the prismatic effect produced when parallel rays incident on an off-center lens are deviated proportionally to the product of power and displacement.

Measurement Techniques

The neutralization method forms the core of lensmeter measurements, wherein the instrument's internal are adjusted to produce an equal and opposite dioptric power to the test lens, rendering the projected mires—typically radial lines or cross patterns—undistorted and in focus, thereby indicating a power match. This process relies on the observer aligning the mires through adjustments until they appear sharp and unbroken, with the dial reading directly corresponding to the lens's spherical or cylindrical power in diopters. For spherical lenses, all mire lines converge simultaneously upon neutralization, confirming uniform power across the lens. In measuring cylindrical lenses, which possess power varying along two principal meridians 90 degrees apart, the lens holder is rotated to align the instrument's with the lens's axis, identifying the meridians where maximum and minimum powers occur. The neutralization then proceeds by first focusing the mires along the meridian of least power (spherical equivalent), followed by adjustment for the meridian to determine the cylindrical component as the difference between the two readings. This axis-specific measurement ensures accurate capture of astigmatic correction, with the rotation facilitating precise meridian detection to avoid errors from misalignment. For multifocal lenses, such as or progressives, measurement involves sequential neutralization of distinct zones to quantify segment heights and add powers, often employing in automated systems to scan and delineate boundaries between distance and near vision areas. In , the upper segment is neutralized first for distance power, followed by vertical displacement of the lens to align the lower segment for add power calculation as the difference, with aiding in precise height localization from the optical center. Progressive lenses require targeted neutralization at the distance portion (typically 4 mm above the pupillary center) and the near portion (about 20 mm below and 2 mm nasal), where scanning algorithms detect gradient changes in power to map corridor heights and intermediate zones without visible lines. Contact lens measurement incorporates adaptations like wet cells or specialized holders to evaluate hydrated soft lenses, preventing dehydration-induced distortions by immersing the lens in saline solution that mimics ocular conditions and eliminates air gaps between the lens and support surface. The lens is placed concave side down in the saline-filled cell, which is then positioned against the lensmeter's stop, allowing neutralization similar to spectacle lenses while accounting for the of saline (approximately 1.3345) to convert measurements to air-equivalent power. This method ensures accurate power assessment for soft materials, as air exposure can alter hydration and thus , with adapters maintaining lens curvature to avoid induced cylindrical errors.

Types of Lensmeters

Manual Lensmeters

Manual lensmeters, also known as focimeters, feature a mechanical design centered around dials and knobs for precise adjustments. Key components include a power adjustment wheel for and measurements, an axis knob for cylindrical alignment, and an focusing mechanism to accommodate the operator's vision. The instrument typically employs a mire target, such as crosslines in American-style models or a dot pattern in European variants, which the operator views through the lens being measured. These devices offer a range of ±25 diopters for spherical and cylindrical power, with cylindrical axis readings from 0 to 180 degrees in 1-degree increments, and prism detection up to 5 diopters in the field of view (extendable to 15-20 diopters via compensator). In operation, the user manually aligns the lens on the support and visually neutralizes target by rotating the power and axis knobs until the lines or dots appear clear and undistorted, indicating the lens power has been matched. This hands-on process requires the operator to interpret the neutralization directly through the , making it suitable for low-volume optical laboratories where detailed verification of eyeglass prescriptions occurs without high throughput demands. Classic examples include the Model 70, a durable steel-constructed unit known for its clear optics and smooth mechanical controls, which has been a staple in optometric practices for decades. Manual lensmeters provide advantages such as cost-effectiveness. Traditional models typically require electrical outlets for illumination, while some modern variants use battery-powered LEDs or ambient light. For maintenance, regular cleaning of optical surfaces with a soft cloth, bulb syringe, or prevents dust accumulation, while calibration involves verifying zero power without a lens and using certified test lenses (e.g., ±0.25 diopter standards) to ensure accuracy, with professional servicing recommended annually or when calibration errors are detected.

Digital and Automatic Lensmeters

Digital and automatic lensmeters represent an evolution in lens measurement technology, incorporating electronic sensors and computational algorithms to enhance speed, accuracy, and ease of use compared to their manual counterparts. These devices employ sensing principles, typically using a that captures distorted light patterns through the lens to derive optical parameters. The Hartmann sensor, often integrated with a (CCD) camera, divides incoming light into multiple points—such as 108 measurement points in advanced models—for simultaneous analysis, enabling precise detection of lens distortions across the field. Software algorithms process the captured data to automatically compute key metrics, including spherical power, cylindrical power and axis, and prismatic effects, without requiring manual alignment or fogging adjustments. Measurement ranges typically extend from -25 to +25 diopters for and 0 to ±10 diopters for , with a precision of 0.01 diopters, allowing for fine-grained assessment suitable for high-index and progressive lenses. This automated computation reduces operator error and supports rapid evaluation of complex lens designs, such as those with aspheric surfaces. Automation features streamline the , featuring one-touch operation where the device detects lens insertion and initiates autonomously, often completing the process in under 30 seconds. Data output capabilities include USB and connectivity for seamless transfer to electronic health records or integrated systems, enhancing in clinical settings. Some models incorporate user-friendly interfaces, such as tiltable touch-screen displays, to facilitate quick result interpretation and printing. Specialized capabilities extend functionality beyond basic power measurement, including UV transmittance detection to quantify lens protection against ultraviolet radiation (0-100% in 1% increments) and topographic mapping for free-form lenses, which visualizes power distribution across the lens surface for verification of custom designs. Integration with phoropters allows direct data import for refraction workflows, supporting automated lens trials during eye exams. These enhancements make digital and automatic lensmeters indispensable for modern practices handling diverse lens technologies. Prominent examples include the Nidek LM-1800 series, which utilizes a 108-point sensor for expanded measurement and includes built-in UV and green light transmittance analysis, and the Visionix VX 40 Couture, a 2025 model offering fully automated one-touch verification of single-vision, bifocal, and free-form lenses with topographic PowerMaps in 30 seconds.

Usage and Procedure

Step-by-Step Measurement

Before conducting measurements with a lensmeter, proper preparation is essential to ensure accuracy. Begin by cleaning the surfaces of the lens to be measured using a lens cleaning solution and a cloth to remove any smudges, dust, or debris that could distort the readings. Next, select the appropriate measurement scale on the device, such as mode for eyeglass lenses (typically calibrated at a 12 mm ) or mode for contact lenses, which accounts for the zero and may require a special holder to maintain lens curvature. Finally, calibrate the lensmeter by focusing the for the operator's vision—rotate it until the is clear without a lens in place—and verify the power wheel reads zero when no lens is present; if not, adjust for any offset or consult protocols. Periodic with a known power lens of verified dioptric value confirms the device's accuracy. The core measurement procedure for a standard spherical or follows these steps on a manual lensmeter. First, place the lens on the support stage with the optical center aligned and the back surface facing the eyepiece, ensuring the lens is centered using the adjustment knobs. Second, for , rotate the axis dial to align the cylinder axis until one set of mires (target lines or dots) appears straight and in focus. Third, neutralize the spherical power by rotating the power drum from a high plus value toward minus until both sets of mires sharpen and focus simultaneously; the reading on the power wheel indicates power. Fourth, measure the power and axis by first focusing the mires along the axis (recording the sphere), then rotating the axis dial to focus the perpendicular mires; the algebraic difference between the two power readings gives the power, with the axis noted from the dial. Fifth, assess prism by decentering the lens slightly on the stage and observing the displacement of the mires relative to the reticle scale, where each ring typically represents 1 prism diopter. For special lenses, additional steps apply. With bifocal or , first mark the segment lines using a lens marker aligned with the visible division to identify the near vision portion, then measure the distance (upper) power as usual before repositioning the lens to center the segment and neutralizing the add power. High-index or aspheric lenses may require adapters or supports on the stage to minimize and ensure stable positioning during neutralization. Safety considerations are paramount to prevent damage and ensure reliable results. Avoid scratching the lensmeter's optical components or the measured lenses by handling them gently and using only approved cleaning materials; never use abrasive cloths or solvents. All lens measurements should adhere to the standard 12 mm unless otherwise specified, as deviations can introduce errors in power readings.

Interpreting Results

The lensmeter displays the spherical power as the primary dial or digital reading in diopters, representing the lens curvature in the meridian of least power, which corrects for myopia or hyperopia. The cylindrical power is determined as the algebraic difference between the two principal meridians' powers, measured by rotating the device to focus on the thinnest and thickest mires separately, and is expressed in diopters to address astigmatism. The axis indicates the orientation of the cylinder in degrees from 0 to 180, aligned by rotating the axis wheel until the mires clarify in the second meridian. Prism is quantified in prism diopters, with the base direction (in, out, up, or down) inferred from the displacement of the mires relative to the optical center; for small values under 5 prism diopters, it is counted via the number of concentric rings (one ring equaling one prism diopter). To verify a lens against a prescription, the measured spherical and cylindrical powers should align within ±0.13 diopters for prescriptions up to ±6.50 diopters, with tighter tolerances of ±2% of the power for higher values; axis deviations exceeding ±2 degrees for cylinders greater than 2.00 diopters warrant flagging for potential regrinding or remounting. These criteria ensure the lens provides the intended visual correction without inducing blur or discomfort, as per industry standards like ANSI Z80.1. For multifocal lenses, the addition power—typically ranging from +1.00 to +3.00 diopters for near vision—is calculated by measuring the spherical power in the near segment (e.g., bifocal bottom or progressive near zone) and subtracting the distance vision spherical power, such as +2.00 diopters for a standard reading add. The lensmeter can also estimate the material's index of refraction using the measured power FF in diopters, center thickness ss in millimeters, and a semi-diameter yy (often 30 mm for standard verification), via the approximate n=1+y2F2000sn = 1 + \frac{y^2 F}{2000 s}, which derives from the lens sagitta equation and helps confirm lens material without specialized . In clinical practice, lensmeter results may require adjustment for —the gap between the lens and —to approximate power at the corneal plane, using the Pv=P1dPP_v = \frac{P}{1 - d P} where PP is the spectacle power in diopters and dd is the distance in meters (typically 0.012 m); this brief correction, applied particularly for powers exceeding ±4.00 diopters, ensures accurate translation to equivalents or patient-specific fitting.

Limitations and Considerations

Sources of Error

Operator errors represent a significant source of inaccuracy in lensmeter readings, particularly with manual instruments. Misalignment of the lens, such as off-center placement or improper angle relative to the optical axis, can distort power and axis measurements by failing to position the lens at its optical center. Improper focusing of the eyepiece to the examiner's eye leads to blurred mires and inaccurate power determination. In manual lensmeters, parallax errors occur when the observer's eye is not aligned perpendicular to the scale, potentially introducing inaccuracies in readings. Low-power cylinders are difficult to detect accurately, with challenges noted for those around 0.25 diopters. Inadequate lighting can further obscure the mires, exacerbating alignment issues. Lens-specific factors can also compromise measurement accuracy. Edge thickness variations in high-power lenses can affect readings if the measurement is not taken precisely at the optical center, leading to discrepancies in vertex power. For contact lenses, hydration levels influence the ; dehydration reduces water content, altering the effective power by up to several diopters in materials, as decreases with increasing hydration from 1.552 to 1.372 in tested samples. Instrument-related issues and environmental conditions contribute additional s. Out-of-calibration , where the power wheel does not read zero without a lens, systematically offsets all measurements and requires compensation by subtracting the value. Worn or dirty mires reduce sharpness, complicating focus and alignment. Environmental factors like temperature fluctuations affect the of lens materials; for many glasses, the index decreases by approximately 10^{-5} per degree , potentially shifting power readings by 0.01 to 0.05 diopters over typical variations. To mitigate these errors, daily using certified test lenses of known power is essential to verify instrument accuracy and adjust for any offsets. Taking multiple readings at different orientations and averaging the results helps reduce variability from operator or minor alignment issues. Regular maintenance, such as cleaning mires and checking for wear, further ensures reliable performance. Digital lensmeters offer an advantage by automating alignment and reducing subjective errors inherent in manual reading.

Comparison with Other Devices

The lens clock, also known as a lens measure or lens gauge, primarily measures the sagittal of a lens surface in diopters, providing data essential for frame fitting and base curve verification during lens edging and mounting processes. In contrast, the lensmeter quantifies the overall refractive power of the lens, including spherical, cylindrical, and prismatic components, focusing on optical performance rather than surface geometry; these tools are often used complementarily in optometric workflows, with the lens clock addressing fabrication fit and the lensmeter ensuring prescription accuracy. Unlike the , which objectively assesses the of the living eye by analyzing light reflection from the to determine , , and axis for initial prescription estimation, the lensmeter performs measurements on fabricated ophthalmic lenses to verify their alignment with the prescribed parameters. This distinction positions the as a diagnostic tool for patient evaluation during , while the lensmeter serves in lens production and dispensing. The phoropter facilitates by allowing patients to compare trial lenses for optimal , enabling fine-tuning of the prescription through patient feedback on clarity and comfort. By comparison, the lensmeter provides objective, non-subjective verification of the final lens product's power and alignment, without patient involvement, thus bridging the gap between clinical prescription and delivered . Wavefront aberrometers extend beyond basic by mapping both lower-order aberrations (such as defocus and ) and higher-order aberrations across the eye's optical system using Shack-Hartmann sensors to analyze distortions, aiding in customized treatments like or advanced contact lenses. The lensmeter, however, concentrates on standard sphero-cylindrical power measurements for conventional spectacle lenses, lacking the capacity to detect subtle optical irregularities.

References

Add your contribution
Related Hubs
User Avatar
No comments yet.