
Community hub
Recent from talks
Contribute something
Nothing was collected or created yet.
SMS Derfflinger
View on Wikipedia
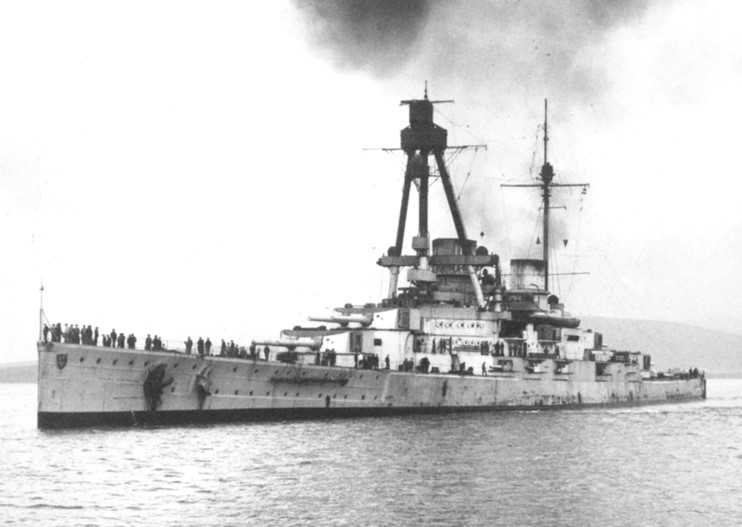
 Derfflinger interned at Scapa Flow | |
| History | |
|---|---|
| Name | Derfflinger |
| Namesake | Georg von Derfflinger |
| Ordered | 1912–1913 Naval Program |
| Builder | Blohm & Voss, Hamburg |
| Laid down | January 1912 |
| Launched | 12 July 1913 |
| Commissioned | 1 September 1914 |
| Nickname(s) | "Iron Dog" |
| Fate | Scuttled at Scapa Flow on 21 June 1919, wreck raised 1939, broken up after 1946 |
| General characteristics | |
| Class & type | Derfflinger-class battlecruiser |
| Displacement | |
| Length | 210.4 m (690 ft 3 in) (o/a) |
| Beam | 29 m (95 ft 2 in) |
| Draft | 9.2 m (30 ft 2 in) |
| Installed power |
|
| Propulsion |
|
| Speed | 26.5 knots (49.1 km/h; 30.5 mph) |
| Range | 5,600 nmi (10,400 km; 6,400 mi) at 12 knots (22 km/h; 14 mph) |
| Complement |
|
| Armament |
|
| Armor |
|
SMS Derfflinger[a] was a battlecruiser of the German Kaiserliche Marine (Imperial Navy) built in the early 1910s during the Anglo-German naval arms race. She was the lead ship of her class of three ships; her sister ships were Lützow and Hindenburg. The Derfflinger-class battlecruisers were larger and featured significant improvements over the previous German battlecruisers, carrying larger guns in a more efficient superfiring arrangement. Derfflinger was armed with a main battery of eight 30.5 cm (12 in) guns, compared to the 28 cm (11 in) guns of earlier battlecruisers. She had a top speed of 26.5 knots (49.1 km/h; 30.5 mph) and carried heavy protection, including a 30-centimeter (11.8 in) thick armored belt.
Derfflinger was completed shortly after the outbreak of World War I in 1914; after entering service, she joined the other German battlecruisers in I Scouting Group of the High Seas Fleet, where she served for the duration of the conflict. As part of this force, she took part in numerous operations in the North Sea, including the Raid on Scarborough, Hartlepool and Whitby in December 1914, the Battle of Dogger Bank in January 1915, and the Bombardment of Yarmouth and Lowestoft in April 1916. These operations culminated in the Battle of Jutland on 31 May – 1 June 1916, where Derfflinger helped to sink the British battlecruisers HMS Queen Mary and Invincible. Derfflinger was seriously damaged in the action and was out of service for repairs for several months afterward.
The ship rejoined the fleet in late 1916, though by this time the Germans had abandoned their strategy of raids with the surface fleet in favor of the U-boat campaign. As a result, Derfflinger and the rest of the High Seas Fleet saw little activity for the last two years of the war apart from patrol duty in the German Bight. The fleet conducted one final operation in April 1918 in an unsuccessful attempt to intercept a British convoy to Norway. After the end of the war in November 1918, the fleet was interned in Scapa Flow. On the order of Rear Admiral Ludwig von Reuter, the interned ships were scuttled on 21 June 1919 to prevent them from being seized by the Allied powers.
Design
[edit]The Derfflinger class was authorized for the 1911 fiscal year as part of the 1906 naval law; design work had begun in early 1910. After their British counterparts had begun installing 34.3 cm (13.5 in) guns in their battlecruisers, senior officers in the German naval command concluded that an increase in the caliber of the main battery guns from 28 cm (11 in) to 30.5 cm (12 in) would be necessary. To keep costs from growing too quickly, the number of guns was reduced from ten to eight, compared to the earlier Seydlitz, but a more efficient superfiring arrangement was adopted.[1]
Characteristics
[edit]
Derfflinger was 210.4 m (690 ft 3 in) long overall, with a beam of 29 m (95 ft 2 in) and a draft of 9.2 m (30 ft 2 in). She displaced 26,600 t (26,200 long tons) normally and up to 31,200 t (30,700 long tons) at full load.[2] The ship had a crew of 44 officers and 1,068 enlisted men.[3] In early August 1915, a derrick was mounted amidships, and tests with Hansa-Brandenburg W seaplanes were conducted.[4]
Derfflinger was propelled by two pairs of high- and low-pressure steam turbines that drove four screw propellers, with steam provided by fourteen coal-burning water-tube boilers ducted into two funnels.[4] Her engines were rated to produce 63,000 metric horsepower (62,000 shp) for a top speed of 26.5 knots (49.1 km/h; 30.5 mph). She could steam for 5,600 nautical miles (10,400 km; 6,400 mi) at a cruising speed of 14 knots (26 km/h; 16 mph).[5]
Mounting a main battery of eight 30.5 cm (12 in) guns, Derfflinger was the largest and most powerful German battlecruiser at the time.[2] The ship's secondary battery consisted of twelve 15 cm (5.9 in) SK L/45 guns in single casemates in the superstructure, six per broadside. For defense against torpedo boats, she carried eight 8.8 cm (3.5 in) SK L/45 guns in individual pivot mounts on the superstructure, four of which were removed in 1916. An additional four 8.8 cm flak guns were installed amidships. Four 50 cm (19.7 in) submerged torpedo tubes were carried; one was located in the bow, two on the broadside, and one in the stern.[6]
Derfflinger was protected by an armor belt that was 300 mm (11.8 in) thick in the central citadel of the ship where it protected the ammunition magazines and propulsion machinery spaces. Her deck was 30 to 80 mm (1.2 to 3.1 in) thick, with the thicker armor sloping down at the sides to connect to the lower edge of the belt. Her main battery turrets had 270 mm (10.6 in) thick faces. Her secondary casemates received 150 mm (5.9 in) of armor protection. The forward conning tower, where the ship's commander controlled the vessel, had 300 mm walls.[2]
Service history
[edit]
Built by Blohm & Voss at their yard in Hamburg, Derfflinger's keel was laid down on 30 March 1912 under the provisional designation "K".[b] The ship was named for Georg von Derfflinger, a Prussian field marshal during the Thirty Years' War. She was to have been launched on 14 June 1913, and at the launching ceremony, the German General August von Mackensen gave a speech. The wooden sledges upon which the ship rested became jammed, because the yard had used three sledges instead of four; as a result, the central sledge had too much weight on it and the lubrication had been forced out. The ship moved only 30–40 cm (12–16 in). The center sledge was removed entirely and a second attempt was successful on 12 July 1913. A crew composed of dockyard workers took the ship around the Skagen to Kiel in early 1914; there she would complete fitting out. While the ship was still under construction, plans were made to send Derfflinger to represent Germany at the opening of the Panama Canal in late 1914, followed by the 1915 Panama–Pacific International Exposition in San Francisco, United States. As Europe drifted toward war during the July Crisis, the German naval command issued orders on the 27th placing the fleet on a state of heightened alert, though Derfflinger was not yet complete. The Germans feared that the Russian Baltic Fleet would launch a surprise torpedo-boat attack at the start of the war, as the Japanese navy had done to the Russians in the Russo-Japanese War, but the attack did not materialize when World War I broke out the next day.[8][9]
The ship was placed in commission on 1 September to begin sea trials. Most of the crew had recently returned from a tour in the East Asia Squadron aboard the armored cruisers Scharnhorst and Gneisenau, and as such they were an experienced crew. Later that day, the ship left Hamburg and passed through the Kaiser Wilhelm Canal on 2 September. Two days later, the ship suffered damage to some of its turbines, which necessitated docking in Kiel on 11 September. Reports that the British were planning to enter the Baltic Sea on 24 September led Derfflinger to be readied for action, but by 26 September, it had become clear that the rumored attack would not happen, and so work on the turbines resumed. She returned to trials in October, including shooting practice on 9 and 13 October. Further damage to the turbines occurred on 15 October, which led to a return to the shipyard that lasted until 9 November. In the meantime, in late October, the vessel was assigned to I Scouting Group. Trials concluded on 13 November and the ship passed back through the canal to the North Sea the next day. Derfflinger arrived in the Schillig roadstead outside Wilhelmshaven on 16 November; there, she joined the other ships of I Scouting Group. The ship's first wartime operation took place on 20 November; Derfflinger sortied with the light cruisers Stralsund and Strassburg and V Torpedoboat Flotilla for a sweep some 80 nautical miles (150 km; 92 mi) northwest of the island of Helgoland. They failed to locate any British forces, but conducted some shooting practice and thereafter returned to port. Derfflinger next went to sea on 24 November for training exercises with the large armored cruiser Blücher that lasted into the following day. Another uneventful sweep out to the Helgoland Bight followed on 9 December.[10][11]
Bombardment of Scarborough, Hartlepool, and Whitby
[edit]Derfflinger's first combat operation was a raid on the English coastal towns of Scarborough, Hartlepool, and Whitby. One raid had already been conducted by the battlecruisers of I Scouting Group, on the town of Yarmouth in late 1914. Admiral Friedrich von Ingenohl, the commander of the High Seas Fleet, decided to conduct another raid on the English coast. His goal was to lure a portion of the Grand Fleet into combat where it could be isolated and destroyed.[12] At 03:20 on 15 December,[c] Konteradmiral (KAdm—Rear Admiral) Franz von Hipper, with his flag aboard Seydlitz, departed the Jade estuary. Following Seydlitz were Derfflinger, Moltke, Von der Tann, and Blücher, along with the light cruisers Kolberg, Strassburg, Stralsund, and Graudenz, and two squadrons of torpedo boats.[13] The ships sailed north past the island of Heligoland, until they reached the Horns Reef lighthouse, at which point they turned west towards Scarborough. Twelve hours after Hipper left the Jade, the High Seas Fleet departed to provide distant cover. The main fleet consisted of fourteen dreadnoughts, eight pre-dreadnoughts and a screening force of two armored cruisers, seven light cruisers, and fifty-four torpedo boats.[13]
On 26 August 1914, the German light cruiser Magdeburg had run aground in the Gulf of Finland; the wreck was captured by the Russian navy, which found code books used by the German navy, along with navigational charts for the North Sea. The Russians passed these documents to the Royal Navy, whose cryptographic unit—Room 40—began decrypting German signals. On 14 December, they intercepted messages relating to the planned bombardment of Scarborough.[13] The exact details of the plan were unknown, and the British assumed the High Seas Fleet would remain safely in port, as in the previous bombardment. Vice Admiral David Beatty's four battlecruisers, supported by the 3rd Cruiser Squadron and the 1st Light Cruiser Squadron, along with the 2nd Battle Squadron's six dreadnoughts, were to ambush Hipper's battlecruisers.[14]

During the night of 15 December, the main body of the High Seas Fleet encountered British destroyers. Fearing a nighttime torpedo attack, Ingenohl ordered the ships to retreat.[14] Hipper was unaware of Ingenohl's reversal, and so he continued with the bombardment. Upon reaching the British coast, Hipper's battlecruisers split into two groups. Derfflinger and Von der Tann went south to shell Scarborough and Whitby while Seydlitz, Moltke, and Blücher went north to shell Hartlepool.[15] By 09:45 on the 16th, the two groups had reassembled, and they began to retreat eastward.[16]
By this time, Beatty's battlecruisers were positioned to block Hipper's chosen withdrawal route, while other forces were en route to complete the encirclement. At 12:25, the light cruisers of II Scouting Group began to pass through the British forces searching for Hipper.[17] One of the cruisers in the 2nd Light Cruiser Squadron spotted Stralsund and signaled a report to Beatty. At 12:30, Beatty turned his battlecruisers towards the German ships. Beatty presumed the German cruisers were the advance screen for Hipper's ships; however, those were some 50 km (31 mi) ahead.[17] The 2nd Light Cruiser Squadron, which had been screening for Beatty's ships, detached to pursue the German cruisers, but a misinterpreted signal from the British battlecruisers sent them back to their screening positions. This confusion allowed the German light cruisers to slip away and alerted Hipper to the location of the British battlecruisers. The German battlecruisers wheeled to the northeast of the British forces and escaped.[17]
Both the British and the Germans were disappointed that they failed to effectively engage their opponents. Ingenohl's reputation suffered greatly as a result of his timidity. Moltke's captain was furious; he said Ingenohl had turned back "because he was afraid of 11 British destroyers which could have been eliminated ... under the present leadership we will accomplish nothing."[18] The official German history criticized Ingenohl for failing to use his light forces to determine the size of the British fleet, stating: "he decided on a measure which not only seriously jeopardized his advance forces off the English coast but also deprived the German Fleet of a signal and certain victory."[18]
Battle of Dogger Bank
[edit]In early January 1915, the German naval command became aware that British ships were reconnoitering in the Dogger Bank area. Ingenohl was initially reluctant to attempt to destroy these forces, because I Scouting Group was temporarily weakened while Von der Tann was in drydock for periodic maintenance. KAdm Richard Eckermann, the Chief of Staff of the High Seas Fleet, insisted on the operation, and so Ingenohl relented and ordered Hipper to take his battlecruisers to the Dogger Bank.[19] On 23 January, Hipper sortied, with Seydlitz in the lead, followed by Moltke, Derfflinger, and Blücher, along with the light cruisers Graudenz, Rostock, Stralsund, and Kolberg and 19 torpedo boats from V Flotilla and II and XVIII Half-Flotillas. Graudenz and Stralsund were assigned to the forward screen, while Kolberg and Rostock were assigned to the starboard and port, respectively. Each light cruiser had a half-flotilla of torpedo boats attached.[19]
Again, interception and decryption of German wireless signals played an important role. Although they were unaware of the exact plans, the cryptographers of Room 40 deduced that Hipper would be conducting an operation in the Dogger Bank area.[19] To counter it, Beatty's 1st Battlecruiser Squadron, Rear Admiral Archibald Moore's 2nd Battlecruiser Squadron and Commodore William Goodenough's 2nd Light Cruiser Squadron were to rendezvous with Commodore Reginald Tyrwhitt's Harwich Force at 08:00 on 24 January, approximately 48 km (30 mi) north of the Dogger Bank.[19]
At 08:14, Kolberg spotted the light cruiser Aurora and several destroyers from the Harwich Force.[20] Aurora challenged Kolberg with a search light, at which point Kolberg attacked Aurora and scored two hits. Aurora returned fire and scored two hits on Kolberg in retaliation. Hipper immediately turned his battlecruisers towards the gunfire, when, almost simultaneously, Stralsund spotted a large amount of smoke to the northwest of her position. This was identified as a number of large British warships steaming towards Hipper's ships.[20]

Hipper turned south to flee, but was limited to 23 knots (43 km/h; 26 mph), which was the maximum speed of the older armored cruiser Blücher. The pursuing British battlecruisers were steaming at 27 knots (50 km/h; 31 mph), and quickly caught up to the German ships. At 09:52, the battlecruiser Lion opened fire on Blücher from a range of approximately 18,300 m (20,000 yd); shortly thereafter, Queen Mary and Tiger began firing as well.[20] At 10:09, the British guns made their first hit on Blücher. Two minutes later, the German ships began returning fire, primarily concentrating on Lion, from a range of 16,500 m (18,000 yd). At 10:28, Lion was struck on the waterline, which tore a hole in the side of the ship and flooded a coal bunker.[21] At 10:30, New Zealand, the fourth ship in Beatty's line, came within range of Blücher and opened fire. By 10:35, the range had closed to 16,000 m (17,500 yd), at which point the entire German line was within the effective range of the British ships. Beatty ordered his battlecruisers to engage their German counterparts.[d] Confusion aboard Tiger led the captain to believe he was to fire on Seydlitz, which left Moltke able to fire without distraction.[21] During this period of the battle, Derfflinger was hit once, but the shell did only minor damage. Two armor plates in the hull were forced inward and some of the protective coal bunkers were flooded.[22]
At 10:40, one of Lion's 34 cm (13.5 in) shells struck Seydlitz causing nearly catastrophic damage that knocked out both rear turrets and killed 159 men.[23] The executive officer ordered both magazines flooded to avoid a flash fire that would have destroyed the ship.[e] By this time, the German battlecruisers had zeroed in on Lion, scoring repeated hits. At 11:01, an 28 cm shell from Seydlitz struck Lion and knocked out two of her dynamos. At 11:18, two of Derfflinger's 30.5 cm shells hit Lion, one of which struck the waterline and penetrated the belt, allowing seawater to enter the port feed tank. Lion had to turn off its engines due to seawater contamination[23] and as a result fell out of the line.
By this time, Blücher was severely damaged after having been pounded by heavy shells. The chase ended when there were several reports of U-boats ahead of the British ships; Beatty quickly ordered evasive maneuvers, which allowed the German ships to increase the distance to their pursuers.[24] At this time, Lion's last operational dynamo failed, which dropped her speed to 15 knots (28 km/h). Beatty, in the stricken Lion, ordered the remaining battlecruisers to "engage the enemy's rear," but signal confusion caused the ships to solely target Blücher, allowing Moltke, Seydlitz, and Derfflinger to escape.[25] Blücher was hit by more than 70 shells from the British battlecruisers over the course of the battle. The severely damaged warship capsized and sank at approximately 13:10. By the time Beatty regained control over his ships, after having boarded Princess Royal, the German ships had too great a lead for the British to catch them; at 13:50, he broke off the chase.[26] Derfflinger was hit once by a large caliber shell, which had struck the armor belt and not caused significant damage or any casualties.[27]
1915–1916
[edit]Derfflinger went into drydock on 27 January for repairs that lasted until 16 February. Late that day, the ship moved back to the harbor and took on coal and other stores. She thereafter took part in routine patrols to support the picket line guarding the approaches to the Helgoland Bight. This duty continued for the next month, and was interrupted from 21 to 24 March, when Derfflinger had her coal-fired boilers modified to use supplemental fuel oil. I Scouting Group sortied for another sweep into the North Sea on 29 March; by that time, command of the fleet had passed to VAdm Hugo von Pohl. Derfflinger returned to patrol duties, which lasted through April. During this period, she briefly went back to the Baltic for combat training from 6 to 10 April. On 17 April, the ship's next major offensive operation took place; she sailed to cover a pair of light cruisers laying a minefield in the North Sea. A similar operation took place on 17 May. The battlecruisers sortied again on 29 May to cover the departure of the commerce raider Meteor.[28]
The ship saw little activity of note in June, until 25 June, when she and Von der Tann sailed for Kiel for training. Soon after arriving, Derfflinger nearly collided with the old battleship Kaiser Wilhelm der Grosse. The narrowly avoided accident revealed that the starboard low-pressure turbine had been damaged at some point, as it failed to respond to commands from the helm. The ship was accordingly dry docked for repairs in Kiel that lasted until 26 August. The ship spent the rest of the month on testing in the Baltic, including experiments with a floatplane. By 31 August, she had arrived back in Wilhelmshaven. The next day, the ship returned to guard duty. Another sweep covering a minelaying operation took place on 11–12 September. Picket duty occupied the ship's activities for the next several weeks. On 16 October, the ship conducted an experimental refueling at sea with the torpedo boat V30. On 23–24 October, she and the rest of the fleet swept into the North Sea in another fruitless attempt to locate British warships.[29]
Derfflinger made another voyage to the Baltic on 7 November for tactical training that lasted until 13 November, by which time she had returned to Wilhelmshaven. The ship returned to the Baltic again on 23 November, though while in the Kaiser Wilhelm Canal, she briefly ran aground. Training during this period included practice with a group of torpedo boats. The battlecruiser then returned to Wilhelmshaven, arriving on 5 December. She was docked in the Kaiserliche Werft (Imperial Shipyard) there for improvements to her fire-control equipment; the work lasted from 16 December until 15 January 1916. Shooting tests were carried out from 19 to 26 January. By that time, VAdm Reinhard Scheer had replaced Pohl as the fleet commander, and he would embark upon a more aggressive strategy that year.[30]
On 2 February, Derfflinger and Von der Tann sailed to search for the zeppelin L 19, which had gone missing over the North Sea. The ships of I Scouting Group sortied on 11 February to support a group of torpedo boats that had encountered British forces. Derfflinger and several other ships sailed on 4 March to cover the return of the commerce raider Möwe. The next day, the High Seas Fleet conducted a sweep out to the Hoofden. Another Baltic training period lasted from 18 to 23 March. Early on 25 March, a British seaplane carrier raided the German coast, prompting Derfflinger and several other warships to sortie to try to catch the raiders, though the British made good their escape. Derfflinger returned to picket duty, and on 16 April she and sailed as far as Helgoland. The next day, she and her recently completed sister ship Lützow sailed out to search for a missing airplane. On 21 April, Derfflinger and Moltke left port to cover the return of a group of torpedo boats.[31]
Bombardment of Yarmouth and Lowestoft
[edit]
Derfflinger also took part in the bombardment of Yarmouth and Lowestoft on 24–25 April 1916. Hipper was away on sick leave, so the German ships were under the command of KAdm Friedrich Boedicker. Derfflinger, Lützow, Moltke, Seydlitz and Von der Tann left the Jade Estuary at 10:55 on 24 April. They were supported by a screening force of six light cruisers and two torpedo boat flotillas.[32] The heavy units of the High Seas Fleet sailed at 13:40, with the objective to provide distant support for Boedicker's ships. The British Admiralty was made aware of the German sortie through the interception of German wireless signals, and deployed the Grand Fleet at 15:50.[32]
By 14:00, Boedicker's ships had reached a position off Norderney, at which point he turned his ships northward to avoid the Dutch observers on the island of Terschelling. At 15:38, Seydlitz struck a naval mine, which tore a 15 m (50 ft) hole in her hull, just abaft the starboard broadside torpedo tube, allowing 1,300 tonnes (1,400 short tons) of water to enter the ship.[32] Seydlitz turned back, with the screen of light cruisers, at a speed of 15 knots (28 km/h; 17 mph). The four remaining battlecruisers turned south immediately in the direction of Norderney to avoid further mine damage. By 16:00, Seydlitz was clear of imminent danger, so the ship stopped to allow Boedicker to disembark. The torpedo boat V28 brought Boedicker to Lützow.[33]
At 04:50 on 25 April, the German battlecruisers were approaching Lowestoft when the light cruisers Rostock and Elbing, which had been covering the southern flank, spotted the light cruisers and destroyers of Commodore Tyrwhitt's Harwich Force. Boedicker refused to be distracted by the British ships, and instead trained his ships' guns on Lowestoft. At a range of approximately 13,000 m (14,000 yd), the German battlecruisers destroyed two 152 mm (6 in) shore batteries and inflicted other damage to the town, including the destruction of some 200 houses.[33]
At 05:20, the German raiders turned north, towards Yarmouth, which they reached by 05:42. The visibility was so poor that the German ships fired one salvo each, with the exception of Derfflinger, which fired fourteen rounds from her main battery. The German ships turned back south, and at 05:47 encountered for the second time the Harwich Force, which had by then been engaged by the six light cruisers of the screening force. Boedicker's ships opened fire from a range of 11,887.20 m (13,000 yd).[34] Tyrwhitt immediately turned his ships around and fled south, but not before the cruiser Conquest sustained severe damage. Due to reports of British submarines and torpedo attacks, Boedicker broke off the chase and turned back east towards the High Seas Fleet. At this point, Scheer, who had been warned of the Grand Fleet's sortie from Scapa Flow, turned back towards Germany.[34]
Derfflinger embarked on a series of short sweeps into the North Sea between 26 and 28 April, which ended without contact with British forces. She and Lützow sortied on 3 May in response to reports that the British would attempt another seaplane raid, but the Germans returned to port early on 5 May having failed to locate the supposed raiders. The ship was docked for periodic maintenance from 22 to 26 May.[35]
Battle of Jutland
[edit]
Almost immediately after the Lowestoft raid, Scheer began planning another foray into the North Sea. He had initially intended to launch the operation in mid-May, but the mine damage to Seydlitz had proved difficult to repair, and Scheer was unwilling to embark on a major raid without his battlecruiser forces at full strength. At noon on 28 May, the repairs to Seydlitz were finally completed, and the ship returned to I Scouting Group.[36]
Derfflinger and the rest of Hipper's I Scouting Group battlecruisers lay anchored in the outer Jade roadstead on the night of 30 May. At 02:00 CET, the ships steamed out towards the Skagerrak at a speed of 16 knots (30 km/h; 18 mph). Derfflinger was the second ship in the line of five, ahead of Seydlitz, and to the rear of Lützow, which had by that time become the group flagship. II Scouting Group, consisting of the light cruisers Frankfurt, Boedicker's flagship, Wiesbaden, Pillau, and Elbing, and 30 torpedo boats of II, VI, and IX Flotillas, accompanied Hipper's battlecruisers.[36]
An hour and a half later, the High Seas Fleet left the Jade; the force was composed of 16 dreadnoughts. The High Seas Fleet was accompanied by IV Scouting Group, composed of the light cruisers Stettin, München, Hamburg, Frauenlob, and Stuttgart, and 31 torpedo boats of I, III, V, and VII Flotillas, led by the light cruiser Rostock. The six pre-dreadnoughts of II Battle Squadron had departed from the Elbe roads at 02:45, and rendezvoused with the battle fleet at 05:00.[36]
Run to the south
[edit]
Shortly before 16:00, Hipper's force encountered the six ships of Vice Admiral Beatty's 1st and 2nd Battlecruiser Squadrons. The German ships were the first to open fire, at a range of approximately 14,000 m (15,000 yd).[37] When the British ships began returning fire, confusion among the British battlecruisers resulted in Moltke being engaged by both New Zealand and Tiger. The British rangefinders had misread the range to their German targets, and so the first salvos fired by the British ships fell a mile past the German battlecruisers. Due to errors in British communication, Derfflinger was not engaged during the first ten minutes of the battle. Derfflinger's gunnery officer, Korvettenkapitän Georg von Hase later remarked "By some mistake we were being left out. I laughed grimly and now I began to engage our enemy with complete calm, as at gun practice, and with continually increasing accuracy."[38] At 17:03, the British battlecruiser HMS Indefatigable exploded after fifteen minutes of gunfire from Von der Tann.[39] Shortly thereafter the second half of Beatty's force, the four Queen Elizabeth-class battleships of the 5th Battle Squadron, came into range and began firing at Von der Tann and Moltke.[40]
Following severe damage inflicted by Lützow on Lion, Derfflinger lost sight of the British ship, and so at 17:16 transferred her fire to Queen Mary. Seydlitz was also engaging Queen Mary, and under the combined fire of the two battlecruisers, Queen Mary was hit repeatedly in quick succession. Observers on New Zealand and Tiger, the ships behind and ahead respectively, reported three shells from a salvo of four struck the ship at the same time. Two more hits followed, and a gigantic explosion erupted amidships; a billowing cloud of black smoke poured from the burning ship, which had broken in two.[41] The leading ships of the German High Seas fleet had by 18:00 come within effective range of the British battlecruisers and Queen Elizabeth-class battleships and had begun trading shots with them. Between 18:09 and 18:19, Derfflinger was hit by a 38 cm (15 in) shell from either Barham or Valiant.[42] At 18:55, Derfflinger was hit again; this shell struck the bow and tore a hole that allowed some 300 tons of water to enter the ship.[43]
Battlefleets engage
[edit]Shortly after 19:00, the German cruiser Wiesbaden had become disabled by a shell from the battlecruiser Invincible; the German battlecruisers made a 16-point turn to the northeast and made for the crippled cruiser at high speed. At 19:15, they spotted the British armored cruiser Defence, which had joined the attack on Wiesbaden. Hipper initially hesitated, believing the ship was the German cruiser Rostock, but at 19:16, Kapitan zur See Harder, Lützow's commanding officer, ordered his ships' guns to fire. The other German battlecruisers and battleships joined in the melee; Defence was struck by several heavy-caliber shells from the German ships. One salvo penetrated the ship's ammunition magazines and a massive explosion destroyed the cruiser.[44]

By 19:24, the 3rd Battlecruiser Squadron had formed up with Beatty's remaining battlecruisers ahead of the German line. The leading British ships spotted Lützow and Derfflinger and began firing on them. In the span of eight minutes, the battlecruiser Invincible scored eight hits on Lützow. In return, both Lützow and Derfflinger concentrated their fire on their antagonist, and at 19:31 Derfflinger fired her final salvo at Invincible. Shortly thereafter the forward magazine detonated and the ship disappeared in a series of massive explosions.[45]
By 19:30, the High Seas Fleet, which was by that point pursuing the British battlecruisers, had not yet encountered the Grand Fleet. Scheer had been considering retiring his forces before darkness exposed his ships to torpedo boat attack.[46] He had not yet made a decision when his leading battleships encountered the main body of the Grand Fleet. This development made it impossible for Scheer to retreat, for doing so would have sacrificed the slower pre-dreadnought battleships of II Battle Squadron. If he chose to use his dreadnoughts and battlecruisers to cover their retreat, he would have subjected his strongest ships to overwhelming British fire.[47] Instead, Scheer ordered his ships to turn 16 points to starboard, which would bring the pre-dreadnoughts to the relative safety of the disengaged side of the German battle line.[48]
Derfflinger and the other battlecruisers followed the move, which put them astern of the leading German battleship, König.[49] Hipper's badly battered ships gained a temporary moment of respite, and uncertainty over the exact location and course of Scheer's ships led Admiral Jellicoe to turn his ships eastward, towards what he thought was the likely path of the German retreat.[50] The German fleet was instead sailing west, but Scheer ordered a second 16-point turn, which reversed course and pointed his ships at the center of the British fleet.[51] The German fleet came under intense fire from the British line, and Scheer sent Derfflinger, Seydlitz, Moltke, and Von der Tann at high speed towards the British fleet, in an attempt to disrupt their formation and gain time for his main force to retreat.[52] By 20:17, the German battlecruisers had closed to within 7,000 m (7,700 yd) of Colossus, at which point Scheer directed the ships to engage the lead ship of the British line.[53] Three minutes later, the German battlecruisers turned in retreat, covered by a torpedo boat attack.[54]
Withdrawal
[edit]A pause in the battle at dusk (approximately 20:20 to 21:10) allowed Derfflinger and the other German battlecruisers to cut away wreckage that interfered with the main guns, extinguish fires, repair the fire control and signal equipment, and prepare the searchlights for nighttime action.[55] During this period, the German fleet reorganized into a well-ordered formation in reverse order, when the German light forces encountered the British screen shortly after 21:00. The renewed gunfire gained Beatty's attention, so he turned his battlecruisers westward. At 21:09, he sighted the German battlecruisers, and drew to within 7,800 m (8,500 yd) before opening fire at 21:20.[56] In the ensuing melee, Derfflinger was hit several times; at 21:34, a heavy shell struck her last operational gun turret and put it out of action.[57] The German ships returned fire with every gun available, and at 21:32 hit both Lion and Princess Royal in the darkness.[57]

The maneuvering of the German battlecruisers forced the leading I Battle Squadron to turn westward to avoid collision. This brought the pre-dreadnoughts of II Battle Squadron directly between the two lines of battlecruisers. In doing so, this prevented the British ships from pursuing their German counterparts when they turned southward. The British battlecruisers opened fire on the old battleships; the German ships turned southwest to bring all their guns to bear against the British ships. This engagement lasted only a few minutes before the II Battle Squadron turned eight points to starboard; the British inexplicably did not pursue.[58]
Close to the end of the battle, at 03:55, Hipper transmitted a report to Scheer informing him of the tremendous damage his ships had suffered. By that time, Derfflinger and Von der Tann had only two operational guns each, Moltke was flooded with 1,000 tons of water, Lützow had sunk, and Seydlitz was severely damaged.[59] Hipper reported: "I Scouting Group was therefore no longer of any value for a serious engagement, and was consequently directed to return to harbor by the Commander-in-Chief, while he himself determined to await developments off Horns Reef with the battlefleet."[59]
During the course of the battle, Derfflinger was hit 17 times by heavy caliber shells and nine times by secondary guns.[60] Derfflinger fired 385 shells from her main battery, another 235 rounds from her secondary guns, and one torpedo.[61] Her crew suffered 157 men killed and another 26 men wounded; this was the highest casualty rate on any ship not sunk during the battle.[62] Because of her stalwart resistance at Jutland, the British nicknamed her "Iron Dog".[63] The ship was taken to Kiel on 10 June for repairs and modifications, including the installation of a new tripod mast fitted with fire-control equipment. The work was completed by 16 October.[64]
Later operations
[edit]
After returning to the fleet, Derfflinger conducted battle readiness training in the Baltic Sea for the rest of October and most of November; from 9 to 20 November, she was joined by the other vessels of I Scouting Group. The ships returned to the North Sea on 21 November. By this time, the Germans had abandoned offensive use of the surface fleet, favoring instead the U-boat campaign against British merchant shipping. Derfflinger and the rest of the fleet were used to defend German waters so the U-boats could continue to operate. The following months were only punctuated by periodic training exercises and occasional docking for maintenance.[64][65] Derfflinger escorted the new battleship Baden to Helgoland, the latter vessel carrying Kaiser Wilhelm II. On 2 November, Derfflinger joined four battleships to guard a group of U-boats departing on raiding operations, as well as to protect a group of minesweepers. The battlecruiser carried a floatplane for the operation, which ended on 4 November.[66] During the Second Battle of Heligoland Bight on 17 November 1917, Derfflinger sailed from port to assist the German light cruisers of II Scouting Group, but by the time she and the other battlecruisers arrived on the scene, the British raiders had fled northward.[67] On 20 April 1918, Derfflinger covered a minelaying operation off Terschelling.[68]
Beginning in late 1917, the High Seas Fleet had begun to conduct raids on the supply convoys between Britain and Norway. In October and December, German cruisers and destroyers intercepted and destroyed two British convoys to Norway. This prompted Beatty, now the Commander in Chief of the Grand Fleet, to detach several battleships and battlecruisers to protect the convoys. This presented to Scheer the opportunity for which he had been waiting the entire war: the chance to isolate and eliminate a portion of the Grand Fleet. Hipper planned the operation: the battlecruisers, including Derfflinger, and their escorting light cruisers and destroyers, would attack one of the large convoys, while the rest of the High Seas Fleet stood by, ready to attack the British battleship squadron.[69]
At 05:00 on 23 April 1918, the German fleet departed from the Schillig roadstead. Hipper ordered wireless transmissions be kept to a minimum to prevent radio intercepts by British intelligence.[70] At 06:10 the German battlecruisers had reached a position approximately 60 kilometers (37 mi) southwest of Bergen when Moltke lost her inner starboard propeller, which severely damaged the ship's engines.[71] The crew effected temporary repairs that allowed the ship to steam at 4 knots (7.4 km/h; 4.6 mph), but it was decided to take the ship under tow. Despite this setback, Hipper continued northward. By 14:00, Hipper's force had crossed the convoy route several times but had found nothing. At 14:10, Hipper turned his ships southward. By 18:37, the German fleet had made it back to the defensive minefields surrounding their bases. It was later discovered that the convoy had left port a day later than expected by the German planning staff.[70]
Fate
[edit]
Derfflinger was to have taken part in what would have amounted to the "death ride" of the High Seas Fleet shortly before the end of World War I. The bulk of the High Seas Fleet was to have sortied from its base in Wilhelmshaven to engage the British Grand Fleet; Scheer—by now the Großadmiral of the fleet—intended to inflict as much damage as possible on the British navy, in order to retain a better bargaining position for Germany, whatever the cost to the fleet.[72] While the fleet was consolidating in Wilhelmshaven, war-weary sailors began deserting en masse. As Derfflinger and Von der Tann passed through the locks that separated Wilhelmshaven's inner harbor and roadstead, some 300 men from both ships climbed over the side and disappeared ashore.[73]
On 24 October 1918, the order was given to sail from Wilhelmshaven. Starting on the night of 29 October, sailors mutinied on several battleships; three ships from III Squadron refused to weigh anchor, and the battleships Thüringen and Helgoland reported acts of sabotage. The order to sail was rescinded in the face of this open revolt. The following month, the German Revolution toppled the monarchy and was quickly followed by the Armistice that ended the war.[74]

Following Germany's capitulation, the Allies demanded that the majority of the High Seas Fleet be interned in the British naval base at Scapa Flow pending an ultimate resolution of their fate.[75] On 21 November 1918, under the command of KAdm Ludwig von Reuter, the ships sailed from their base in Germany for the last time. The fleet rendezvoused with the light cruiser Cardiff, before meeting a flotilla of 370 British, American, and French warships for the voyage to Scapa Flow.[76] Once the ships were interned, their breech blocks were removed, which disabled their guns.[77]
The fleet remained in captivity during the negotiations that ultimately produced the Versailles Treaty. It became apparent to Reuter that the British intended to seize the German ships on 21 June 1919, which was the deadline by which Germany was to have signed the peace treaty. Unaware the deadline had been extended to 23 June, Reuter ordered his ships be sunk. On the morning of 21 June, the British fleet left Scapa Flow to conduct training maneuvers. With the majority of the British fleet away, Reuter transmitted the order to his ships at 11:20.[78] Derfflinger sank at 14:45. The ship was raised in 1939 and was anchored, still capsized, off the island of Risa until 1946, at which point the ship gained the dubious distinction of having spent more time afloat upside down than she had right way up.[79] Derfflinger was then sent to Faslane Port and broken up by 1948. One of the ship's bells was delivered to the German Federal Navy on 30 August 1965;[80] the other is exhibited outside St Michael's Roman Catholic Church on the Outer Hebrides island of Eriskay.[81]
Notes
[edit]Footnotes
[edit]- ^ "SMS" stands for "Seiner Majestät Schiff", or "His Majesty's Ship" in German.
- ^ German warships were ordered under provisional names. Additions to the fleet were given a single letter; ships intended to replace older or lost vessels were ordered as "Ersatz (name of the ship to be replaced)".[7]
- ^ The times used in this article are in CET, which is congruent with the German perspective. This is one hour ahead of UTC, which is commonly used in British works.
- ^ Thus, Lion on Seydlitz, Tiger on Moltke, Princess Royal on Derfflinger, and New Zealand on Blücher'.
- ^ This was to have far-reaching consequences, for immediately after the battle, the German Naval Command launched an investigation which resulted in the adoption of anti-flash measures to prevent the type of spectacular explosions that resulted in the destruction of Indefatigable and Queen Mary at Jutland a year later. See: Tarrant, p. 40.
Citations
[edit]- ^ Dodson, p. 91.
- ^ a b c Gröner, pp. 56–57.
- ^ Staff 2006, p. 35.
- ^ a b Staff 2006, p. 37.
- ^ Gröner, p. 56.
- ^ Staff 2006, p. 36.
- ^ Dodson, pp. 8–9.
- ^ Staff 2014, pp. 211–212.
- ^ Hildebrand, Röhr, & Steinmetz, pp. 224–225.
- ^ Staff 2014, pp. 212–217.
- ^ Hildebrand, Röhr, & Steinmetz, pp. 225–226.
- ^ Tarrant, p. 30.
- ^ a b c Tarrant, p. 31.
- ^ a b Tarrant, p. 32.
- ^ Tarrant, p. 33.
- ^ Scheer, p. 70.
- ^ a b c Tarrant, p. 34.
- ^ a b Tarrant, p. 35.
- ^ a b c d Tarrant, p. 36.
- ^ a b c Tarrant, p. 38.
- ^ a b Tarrant, p. 39.
- ^ Tarrant, p. 43.
- ^ a b Tarrant, p. 40.
- ^ Tarrant, pp. 40–41.
- ^ Tarrant, p. 41.
- ^ Tarrant, p. 42.
- ^ Staff 2014, p. 218.
- ^ Staff 2014, pp. 218–219.
- ^ Staff 2014, pp. 219–221.
- ^ Staff 2014, p. 221.
- ^ Staff 2014, pp. 221–222.
- ^ a b c Tarrant, p. 52.
- ^ a b Tarrant, p. 53.
- ^ a b Tarrant, p. 54.
- ^ Staff 2014, p. 222.
- ^ a b c Tarrant, p. 62.
- ^ Bennett, p. 183.
- ^ Tarrant, p. 90.
- ^ Tarrant, p. 94.
- ^ Tarrant, p. 96.
- ^ Tarrant, pp. 100–101.
- ^ Tarrant, p. 118.
- ^ Tarrant, p. 126.
- ^ Tarrant, p. 140.
- ^ Tarrant, pp. 147–149.
- ^ Tarrant, p. 150.
- ^ Tarrant, p. 152.
- ^ Tarrant, pp. 152–153.
- ^ Tarrant, pp. 155–156.
- ^ Tarrant, p. 163.
- ^ Tarrant, p. 165.
- ^ Tarrant, p. 173.
- ^ Tarrant, p. 179.
- ^ Tarrant, p. 181.
- ^ Tarrant, p. 188.
- ^ Tarrant, p. 193.
- ^ a b Tarrant, p. 195.
- ^ Tarrant, pp. 195–196.
- ^ a b Tarrant, p. 255.
- ^ Tarrant, p. 277.
- ^ Tarrant, p. 292.
- ^ Tarrant, p. 298.
- ^ Staff 2006, p. 66.
- ^ a b Staff 2014, p. 239.
- ^ Hildebrand, Röhr, & Steinmetz, pp. 226–227.
- ^ Staff 2014, pp. 239–241p.
- ^ Staff 2006, p. 40.
- ^ Hildebrand, Röhr, & Steinmetz, p. 227.
- ^ Massie, pp. 747–748.
- ^ a b Massie, p. 748.
- ^ Staff 2006, p. 17.
- ^ Tarrant, pp. 280–281.
- ^ Massie, p. 775.
- ^ Tarrant, pp. 281–282.
- ^ Tarrant, p. 282.
- ^ Herwig, pp. 254–255.
- ^ Herwig, p. 255.
- ^ Herwig, p. 256.
- ^ Heath, Kevin; Thomson, Malcolm (15 January 2019). "Scapa Flow Underwater Salvage Sites Survey: Phase 2 Report" (PDF). scapaflowwrecks.com. Historic Environment Scotland. p. 69. Retrieved 1 November 2020.
- ^ Gröner, p. 57.
- ^ Jellicoe, Nick. "The Scuttle". scapaflow1919.com. Orkney Island Council. Retrieved 1 November 2020.
References
[edit]- Bennett, Geoffrey (2005). Naval Battles of the First World War. Barnsley: Pen & Sword Military Classics. ISBN 978-1-84415-300-8.
- Dodson, Aidan (2016). The Kaiser's Battlefleet: German Capital Ships 1871–1918. Barnsley: Seaforth Publishing. ISBN 978-1-84832-229-5.
- Gröner, Erich (1990). German Warships: 1815–1945. Vol. I: Major Surface Vessels. Annapolis: Naval Institute Press. ISBN 978-0-87021-790-6.
- Herwig, Holger (1998) [1980]. "Luxury" Fleet: The Imperial German Navy 1888–1918. Amherst: Humanity Books. ISBN 978-1-57392-286-9.
- Hildebrand, Hans H.; Röhr, Albert & Steinmetz, Hans-Otto (1993). Die Deutschen Kriegsschiffe: Biographien – ein Spiegel der Marinegeschichte von 1815 bis zur Gegenwart [The German Warships: Biographies − A Reflection of Naval History from 1815 to the Present] (in German). Vol. 2. Ratingen: Mundus Verlag. ISBN 978-3-7822-0210-7.
- Massie, Robert K. (2003). Castles of Steel: Britain, Germany, and the Winning of the Great War at Sea. New York: Ballantine Books. ISBN 978-0-345-40878-5.
- Scheer, Reinhard (1920). Germany's High Seas Fleet in the World War. London and New York: Cassell and Company. OCLC 2765294.
- Staff, Gary (2006). German Battlecruisers: 1914–1918. Oxford: Osprey Books. ISBN 978-1-84603-009-3.
- Staff, Gary (2014). German Battlecruisers of World War One: Their Design, Construction and Operations. Barnsley: Seaforth Publishing. ISBN 978-1-84832-213-4.
- Tarrant, V. E. (2001) [1995]. Jutland: The German Perspective. London: Cassell Military Paperbacks. ISBN 978-0-304-35848-9.
Further reading
[edit]- Breyer, Siegfried (1997). Die Kaiserliche Marine und ihre Großen Kreuzer [The Imperial Navy and its Large Cruisers] (in German). Wölfersheim: Podzun-Pallas Verlag. ISBN 978-3-7909-0603-5.
- Campbell, N. J. M. (1978). Battle Cruisers. Warship Special. Vol. 1. Greenwich: Conway Maritime Press. ISBN 978-0-85177-130-4.
- Dodson, Aidan; Cant, Serena (2020). Spoils of War: The Fate of Enemy Fleets after the Two World Wars. Barnsley: Seaforth Publishing. ISBN 978-1-5267-4198-1.
- Hase, Georg von (1921). Kiel and Jutland [Kiel und Skagerrak]. Chambers, Arthur and Holt, Frederic Appleby (trans.). London: Skeffington & Son. OCLC 1523613.
- Koop, Gerhard; Schmolke, Klaus-Peter (1998). Die Grossen Kreuzer Von der Tann bis Hindenburg [The Battlecruisers Von der Tann to Hindenburg] (in German). Bonn: Bernard & Graefe. ISBN 978-3-7637-5972-9.