Hubbry Logo
Seam (sewing)Seam (sewing)Main
Open search
Seam (sewing)
Community hub
Seam (sewing)
logo
8 pages, 0 posts
0 subscribers
Be the first to start a discussion here.
Seam (sewing)
Seam (sewing)
from Wikipedia
Seams join fabric pieces in this quilt.
A curved seam

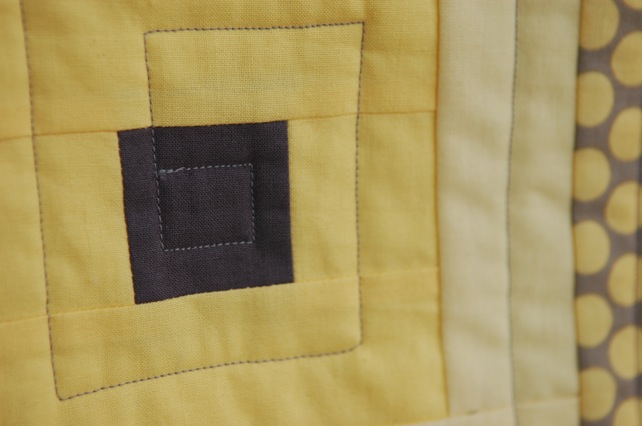
In sewing, a seam is the join where two or more layers of fabric, leather, or other materials are held together with stitches. Prior to the invention of the sewing machine, all sewing was done by hand. Seams in modern mass-produced household textiles, sporting goods, and ready-to-wear clothing are sewn by computerized machines, while home shoemaking, dressmaking, quilting, crafts, haute couture and tailoring may use a combination of hand and machine sewing.[1]

In clothing construction, seams are classified by their type (plain, lapped, abutted, or French seams[1]) and position in the finished garment (center back seam, inseam, side seam). Seams are finished with a variety of techniques to prevent raveling of raw fabric edges and to neaten the inside of garments.[2]

The most common standard for seams is ASTM International ASTM D6193-16(2020)[3] This standard also covers various types of stitches

Types

[edit]
A flat fell seam

All basics seams used in clothing construction are variants on four basic types of seams:[1]

  • Plain seams
  • French seams
  • Flat or abutted seams
  • Flat Felled or Faux Flat Felled
Seams on a pant leg

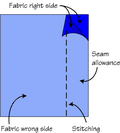
A plain seam is the most common type of machine-sewn seam. It joins two pieces of fabric together face-to-face by sewing through both pieces, leaving a seam allowance with raw edges inside the work. The seam allowance usually requires some sort of seam finish, usually an overlock in ready to wear or bias tape in couture sewing, to prevent raveling.[4]

Either piping or cording may be inserted into a plain seam.

In a French seam, the raw edges of the fabric are fully enclosed for a neat finish. The seam is first sewn with wrong sides together at 14-inch (0.6 cm) seam allowance, then the seam allowances are trimmed to 18 inch (0.3 cm) and pressed. The project is then flipped over, and a second seam is sewn with 14-inch seam allowance with right sides together, enclosing the raw edges of the original seam.[5]

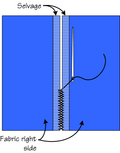
In a flat or abutted seam, two pieces of fabric are joined edge-to edge with no overlap and sewn with hand or machine stitching that encloses the raw edges. Antique or old German seam is the 19th century name for a hand-sewn flat seam that joins two pieces of fabric at their selvages. This type of construction is found in traditional linen garments such as shirts and chemises, and in hand-made sheets pieced from narrow loom widths of linen.[6]

In a faux flat felled seam, two pieces of fabric are sewn with wrong sides together, usually at 12 inch (1.3 cm). One side of the seam allowance is trimmed to 18 inch (0.3 cm), followed by folding the 12-inch side in half and pressing down, then edge stitching. These seams have historically been used in shirts for men. A true flat felled seam is produced on a double needle flat felled machine, and they are most often used for the inseam, yoke, and crotch seam of jeans.

Finishes

[edit]

A seam finish is a treatment that secures and neatens the raw edges of a plain seam to prevent raveling,[7] by sewing over the raw edges or enclosing them in some sort of binding.

On mass-produced clothing, the seam allowances of plain seams are usually finished with an overlock stitch using a serger, which trims the seam allowance as it stitches. Plain seams may also be pressed open, with each seam allowance separately secured with an overlock stitch. Traditional home sewing techniques for finishing plain seams include trimming with pinking shears, oversewing with a zig-zag stitch, and hand or machine overcasting.

A bound seam has each of the raw edges of its seam allowances enclosed in a strip of fabric, lace or net 'binding' that has been folded in half lengthwise. An example of binding is double-fold bias tape. The binding's fold is wrapped around the raw edge of the seam allowance and is stitched, through all layers, catching underside of the binding in stitching.[7] Bound seams are often used on lightweight fabrics including silk and chiffon and on unlined garments to produce a neat finish.

A Hong Kong seam or Hong Kong finish is a home sewing term[8] for a type of bound seam in which each raw edge of the seam allowance is separately encased in a fabric binding.[9] In couture sewing or tailoring, the binding is usually a bias-cut strip of lightweight lining fabric; in home sewing, commercial bias tape is often used.

In a Hong Kong finish, a bias strip of fabric is cut to the width of the seam allowance plus 14 inch (0.6 cm). The bias strip is placed on top of the seam allowance, right sides together, and stitched 18 inch (0.3 cm) from raw edges. The bias strip is then folded over the raw edge and around to the underside and stitched in place.

Position

[edit]

In clothing construction, seams are identified by their position in the finished garment.

A center front seam runs vertically down the front of a garment.

A center back seam or back seam runs vertically down the center-back of a garment. It can be used to create anatomical shaping to the back portion of a garment particularly through the waist area and hips. It can also be used for styling and functional purposes involving pleats, vents, flare toward the hem or for back closures such as buttoned plackets or zippers.

A side seam runs vertically down the side of a garment.

A side-back seam runs from the armscye to the waist, and fits the garment to the curve below the shoulder blades. Side-back seams may be used instead of, or in combination with, side and center back seams.

A shoulder seam runs from the neckline to the armscye, usually at the highest point of the shoulder. A shoulder seam which extends beyond the shoulder point is called a drop shoulder.[10]

Princess seams in the front or back run from the shoulder or armscye to the hem at the side-back or side-front. Princess seams shape the garment to the body's curves and eliminate the need for darting at the bust, waist, and shoulder.[11]

An inseam is the seam from the bottom crotch to the lower ankle that binds the length of the inner trouser leg.[12] The inseam length determines the length of the inner pant leg. In the UK this is usually known as the inside-leg measurement (for trousers fit).

Notching or clipping a curved seam

[edit]

When making an outward-curved seam, the material will have reduced bulk and lie flat if notches are cut into the seam allowance. Alternatively, when making an inward-curved seam, clips are cut into the seam allowance to help the seam lie flat with reduced bulk in the fabric.[13]

Once seam allowances are pinned or basted, they are often pressed flat with an iron before sewing the final seam. Pressing the seam allowances makes it easier to sew a consistent finished seam.

See also

[edit]

Notes

[edit]

References

[edit]
[edit]
Revisions and contributorsEdit on WikipediaRead on Wikipedia
from Grokipedia
In , a seam is the join where two or more layers of fabric, , or other are held together with stitches, commonly created through industrial or a combination of hand and machine methods. These stitched connections form the structural foundation of garments, accessories, and products, enabling the assembly of flat patterns into three-dimensional shapes while distributing stress and preventing separation during . Seams also contribute to aesthetic and functional qualities, such as edge finishing to inhibit fraying, for durability in high-stress areas, and decorative elements that enhance design. Seam construction varies based on fabric properties, garment purpose, and production context, with choices influencing strength, flexibility, and appearance. For instance, lightweight or sheer fabrics often require enclosed seams to hide raw edges, while durable materials like benefit from reinforced, flat-lying joins. Internationally, seams are standardized under ISO 4916:1991, which classifies them into eight categories according to the number of components (e.g., single-ply or multi-ply) and their arrangement: superimposed (Class 1, for basic joins like shirt sides), lapped (Class 2, for overlapping edges in ), bound (Class 3, for enclosing raw edges on hems), flat (Class 4, for butted edges in activewear), decorative (Class 5, for ornamental stitching), edge neatening (Class 6, to prevent unraveling), attachment (Class 7, for adding trims), and single-ply (Class 8, for folded edges like loops). This classification ensures consistency in manufacturing, aiding designers, producers, and quality control across industries. Beyond basic assembly, seams play a critical role in garment fit and performance, often incorporating techniques like seam allowances (the excess fabric beyond the stitch line) for adjustments or finishing. In modern apparel production, seam engineering considers thread tension, stitch density, and material compatibility to optimize load-bearing capacity, with specialized seams like French or flat-felled providing neatness and robustness for specific uses, from to outerwear.

Fundamentals

Definition and Purpose

A seam in sewing is defined as the line where two or more pieces of fabric are joined by stitches, creating a permanent connection that forms the foundational structure of sewn items. This join integrates disparate fabric layers into a unified whole, essential for constructing apparel, accessories, and textiles. The ASTM D6193-16(2020) standard provides a framework for classifying seams by their formation, category, and general purpose, ensuring consistency in fabrication practices across industries. The primary purposes of seams extend beyond mere assembly; they impart shape and structure to garments by defining contours, such as curves in collars or straight lines in hems, which contribute to the overall fit and . Seams also reinforce edges to enhance , allowing the item to endure repeated use and laundering without structural failure. Furthermore, by enclosing raw fabric edges, seams help prevent fraying, preserving the integrity of the material over time. In addition to these functional roles, seams can incorporate decorative elements, such as topstitching or contrasting threads, to elevate the aesthetic appeal of the finished product. At their core, effective seams adhere to basic principles that ensure performance: they must withstand wear through sufficient strength and elasticity to resist breaking or puckering under stress, maintain precise alignment of fabric pieces for accurate fit and visual harmony, and secure edges against unraveling. These attributes, as outlined in standards like ASTM D6193-16(2020), underpin the reliability of seams in practical applications. Variations in seam types build upon this foundational join to address specific needs in and .

Basic Components

A seam consists of several fundamental elements that form its structure. The is the portion of fabric extending from the stitching line to the raw edge, providing space for joining fabric pieces while allowing for finishing techniques to secure the edges. Typically, this allowance measures between 1/4 inch and 5/8 inch, with the standard in most commercial patterns being 5/8 inch (1.5 cm) to accommodate variations in construction and alterations. The stitching line, also known as the seam line, marks the precise path where the needle and thread pass to unite the fabric layers, ensuring alignment and strength at the join. Raw edges refer to the uncut or trimmed boundaries of the fabric that lie within the , which must be managed to maintain durability. Thread selection plays a critical role in seam integrity, as it interacts directly with the fabric's properties. Cotton threads produce soft, flexible stitches with minimal stretch, making them suitable for lightweight to medium-weight fabrics like or silks where a natural drape is desired. Polyester threads, by contrast, offer greater strength and slight elasticity, ideal for heavier fabrics or those requiring resilience, such as or synthetics, as they resist breakage under tension. Matching thread weight to fabric weight—using finer threads (lower Tex numbers, e.g., Tex 24 or finer) for sheers and heavier ones (higher Tex numbers, e.g., Tex 40 or coarser) for robust materials—prevents puckering or weak seams, ensuring the thread integrates seamlessly without distorting the fabric. Standard seam allowances vary by fabric type, influencing the garment's final fit. Woven fabrics, which lack inherent stretch, commonly use a 5/8-inch allowance to provide sufficient material for pressing open or enclosing edges, allowing for ease adjustments and preventing tightness around curves like armholes. Knit fabrics, with their elasticity, typically employ narrower 1/4-inch to 3/8-inch allowances to minimize bulk and maintain stretch, which supports a closer, more forgiving fit without restricting movement. These measurements affect overall fit by enabling alterations for or wear, where wider allowances offer more leeway for letting out seams, while narrower ones promote a streamlined but demand precise to avoid fit discrepancies. The also aids in preventing raveling by enclosing raw edges.

History

Pre-Industrial Techniques

Pre-industrial seam techniques relied on manual hand-sewing methods using rudimentary tools and natural materials, originating in ancient civilizations where clothing was essential for protection and status. In around 3000 BCE, hand-sewing was practiced with bone needles discovered at sites like Abydos and Omari during the Predynastic period, allowing for the joining of fabrics into garments such as triangular loincloths cut from rectangular pieces and secured with lap-over seams. These seams were often finished with rolled and whipped hems to prevent fraying, using threads made from plant fibers like , which was domesticated in the Predynastic Badari culture and processed through spinning or splicing into durable strands. Similarly, in during the BCE, bone needles facilitated sewing and , with plant fibers such as prepared using combs and sickles for threads that enabled basic stitching actions like piercing and attaching fabrics. By the medieval period in , seam construction evolved to include more structured stitches for enhanced durability in textiles like woolen garments and linens. The running stitch served as a foundational technique for quick, temporary seams along straight edges, while the provided stronger, more permanent joins by overlapping stitches to create a solid line resistant to pulling. Non-Western traditions further diversified pre-industrial seam methods, emphasizing functionality and aesthetics in resource-scarce environments. In , stitching emerged during the (1603–1868) as a running stitch technique to reinforce and mend fabrics, particularly indigo-dyed used in working-class like jackets, creating durable, layered seams that extended garment life through visible, geometric patterns. These hand-sewn approaches laid the groundwork for later mechanized innovations in the .

Modern Developments

The advent of the during the marked a pivotal shift in seam production, transitioning from labor-intensive hand-sewing to mechanized processes that dramatically accelerated garment manufacturing. In 1846, patented the first lockstitch , which produced strong, uniform seams by interlocking two threads, enabling the rapid creation of plain seams that were previously time-consuming by hand. Building on this, Isaac Singer introduced an improved model in 1851, incorporating features like a straight needle and foot , which further boosted efficiency and allowed for of clothing with consistent seam quality. These innovations revolutionized the by increasing output from a few seams per hour to hundreds, facilitating the growth of apparel and reducing costs for consumers. In the , advancements in seam finishing and materials enhanced durability and scalability in industrial sewing. machines, invented by the Merrow Machine Company in 1881, introduced a specialized stitch that trims and sews fabric edges simultaneously, preventing fraying and producing clean, professional finishes on seams for high-volume knitwear and garment production. Following , the widespread adoption of synthetic threads, such as and , provided greater strength and resistance to wear compared to natural fibers, allowing seams to withstand repeated laundering and mechanical stress in everyday . These developments, emerging from wartime textile innovations, supported the post-war boom in affordable, long-lasting apparel. Contemporary trends in seam technology emphasize precision, , and to meet demands for efficient and environmental responsibility. Computerized sewing machines, integrated with programmable controls and robotic arms since the late , enable precise seam alignment and complex patterning in garment factories, reducing errors and labor costs while achieving speeds up to 1,200 stitches per minute for uniform output. Additionally, sustainable practices like zero-waste seaming, which involves pattern cutting techniques that minimize fabric scraps during seam assembly, have gained traction in ethical , promoting principles by maximizing material use without compromising seam integrity. These methods reflect ongoing efforts to balance industrial scale with reduced ecological impact in modern .

Types of Seams

Plain Seams

A plain seam is the most fundamental type of seam in , formed by joining two layers of fabric with a along their edges, typically at a 5/8-inch (1.6 cm) , with the right sides of the fabric facing together and the raw edges left exposed inside the garment. After stitching, the seam allowances are usually pressed open or to one side to lie flat, creating a clean, unobtrusive join that maintains the fabric's drape. This construction ensures the seam is straightforward to execute, requiring only basic pinning and straight-line sewing, which makes it accessible for beginners and efficient for production. Plain seams are widely applied in everyday garment construction due to their versatility, simplicity, and inherent strength from the locked straight stitches that distribute stress evenly across woven and stable knit fabrics. They form the structural backbone of items like , skirts, pants, and dresses, where durability is needed without decorative emphasis, and account for the majority of seams in mass-produced for their cost-effective reliability. The seam's strength allows it to withstand regular wear and laundering, particularly when the allowances are secured properly, though it may require additional finishing on fray-prone fabrics to enhance longevity. Variations in plain seam construction adapt to fabric properties, such as using a single-needle for non-stretch wovens to achieve a precise, strong join, while for moderate-stretch knits, a narrow variation of the plain seam provides necessary elasticity without puckering. On stretch fabrics, topstitching the plain seam with a double (twin) needle creates parallel lines on the right side for a , flexible finish that mimics commercial knitwear. To reduce bulk in thicker or layered areas, one seam allowance can be trimmed narrower—often to 1/4 inch (0.6 cm)—before pressing, preventing ridges and improving comfort inside the garment. Plain seams may be further enhanced with basic finishing techniques, such as pinking or zigzagging the edges, to inhibit fraying on unlined garments.

French Seams

A French seam is a self-enclosed sewing technique that fully encases the raw edges of the fabric within the seam itself, resulting in a clean and durable finish without the need for additional edge treatments. This method is particularly suited for lightweight or sheer fabrics prone to fraying, such as chiffon, , or , where visible raw edges would detract from the garment's appearance. Unlike plain seams, which expose the raw edges and require separate finishing, French seams provide inherent protection against raveling, making them ideal for unlined garments like blouses, , or dresses. The construction of a French seam involves two stages of stitching to enclose the edges completely. First, place the fabric pieces with wrong sides together and stitch a narrow seam, typically 1/4 inch (6 mm) from the edge, then press the to one side. Next, trim the close to the stitching line, usually to 1/8 inch (3 mm), to reduce bulk. Fold the fabric along the seam line with right sides together, enclosing the trimmed raw edges inside, and press to set the fold. Finally, stitch the second seam parallel to the fold, commonly at 3/8 inch (1 cm) from the edge for a total of 5/8 inch (1.5 cm), ensuring the raw edges are fully captured within the seam. Press the completed seam to one side or as desired for the garment's design. This technique offers several advantages, including a professional, narrow finish that enhances the drape and longevity of delicate fabrics by preventing fraying and adding strength through double stitching. It requires no specialized equipment beyond a standard , making it accessible for home sewers, though it demands precise trimming and folding to avoid puckering on curves. French seams are commonly applied in side seams of blouses or the construction of pillowcases, where a refined edge is visible from both sides.

Flat-Felled Seams

A flat-felled seam is a strong, self-finished in which the raw edges of the seam allowances are enclosed by folding one allowance over the other and securing it flat with topstitching, resulting in a clean appearance on both the right and wrong sides of the fabric. This technique encases the edges completely, preventing fraying and providing enhanced compared to basic seams. It typically features one or two parallel rows of visible topstitching, which contributes to both the structural integrity and aesthetic appeal of the seam. The process begins with sewing the fabric pieces together, often with wrong sides facing for an inside-felled approach, using a standard 5/8-inch to allow sufficient material for folding. After stitching, press the seam allowances to one side, trim the underlying allowance to about 1/8 inch to reduce bulk, and then fold the untrimmed allowance over the trimmed edge, encasing it fully. Press the fold flat, and edgestitch close to the folded edge from the right side to secure it; a second row of topstitching, parallel and approximately 1/4 inch away, is commonly added for reinforcement, especially on heavier fabrics. Pressing at each stage ensures the seam lies flat without puckering, and for applications, a heavy-duty thread is recommended to handle the thickness and wear. This method builds upon a plain seam as the initial base before the folding and topstitching steps. Faux or mock flat-felled seams offer a similar visual effect with less labor, particularly suited for production or bulky materials. In this variation, the pieces are sewn right sides together at 5/8 inch, the seam allowances are pressed to one side, and the raw edges are finished with a serger, , or to prevent raveling. The allowances are then topstitched flat with one or two rows from the right side, using a twin needle for if desired, without fully enclosing the edges. This approach mimics the traditional look while reducing time and bulk. Flat-felled seams are widely applied in garments requiring high strength and reversibility, such as , , tailored shirts, and , where the seam withstands repeated stress and washing. In , the technique's double stitching and heavy thread use enhance longevity, making it ideal for inseams and side seams. For and shirts, it provides a professional, polished finish on medium to heavyweight wovens like or , ensuring the seam remains flat and unobtrusive during movement.

Seam Finishes

Overlock Finishes

Overlock finishes, also known as serging, involve the use of a specialized machine that simultaneously trims the fabric edge and applies a series of interlocking stitches using looped threads to secure the . This process creates a flexible chainstitch formation, where one or more needles carry threads through the fabric while form loops that interlock on the edge, encasing the raw edge in a single operation. The machine's built-in cutter removes excess fabric as it sews, allowing for precise control over the seam width, typically adjustable from 1 to 5 mm depending on the fabric type. The technique originated in 1868, when Joseph Millard invented the first machine for finishing edges like tops. A in 1886 destroyed the company's mill, prompting a reorganization and focus on sewing machines, with further developments and patents in the late 1880s, such as a key patent in 1889. These innovations revolutionized seam finishing by combining trimming and stitching, reducing production time in . Key advantages of overlock finishes include effective prevention of fabric fraying on both knits and wovens by fully enclosing the edge, resulting in durable, professional-looking seams that withstand wear and repeated laundering. The flexibility of the chainstitch makes it particularly suitable for stretchy knits, while its enclosed structure adds security to woven fabrics without adding bulk. Configurations vary by thread count: a 3-thread overlock, using one needle and two loopers, provides a lightweight, decorative finish ideal for edge finishing on lightweight fabrics or non-stress areas, offering sufficient anti-fraying protection with minimal thread consumption. In contrast, a 4-thread overlock employs two needles and two loopers to create a double-stitched safety seam, enhancing security for construction seams in high-stress areas like garment shoulders or inseams, making it more robust for both knits and wovens. Overlock finishes are widely applied in garment production, where speed and consistency are essential, such as in t-shirts, activewear, and , enabling high-volume manufacturing with clean, factory-like edges. They are commonly used on the seam allowances of or French seams to provide a neat, fray-resistant treatment post-construction.

Bound Finishes

Bound seam finishes involve encasing the raw edges of a seam allowance with a strip of fabric, typically , to provide a clean, durable edge treatment that protects against fraying and enhances the garment's interior . This technique is particularly suited for woven, non-stretch fabrics where a professional, visible finish is desired, serving as an alternative to methods on such materials. The primary method uses double-fold , which is folded in half lengthwise with the raw edges enclosed, then applied over the . To execute this, the seam is first sewn with right sides together, pressed open, and the bias tape is aligned with one raw edge, stitched in place, folded over to encase both edges, and secured with a second line of stitching, often "in the ditch" along the seam line for invisibility. Straight-grain binding can substitute for bias tape on straight seams, though bias is preferred for its flexibility on curves. For mitred corners, the binding is mitered at intersections by folding the tape at a 45-degree before stitching, ensuring crisp, aligned lines without excess bulk. A specialized variant, the Hong Kong bound finish, employs lightweight bias strips—often in a contrasting fabric—to wrap the raw edges of seam allowances in unlined or partially lined garments, such as jackets. In this approach, the bias tape is pinned to one raw edge with right sides together, stitched, trimmed, then folded over the opposite edge without turning under the binding's raw edge on the underside, and topstitched close to the fold for a flat result. This method reduces bulk compared to fully turned bindings while maintaining a polished appearance on the interior. These finishes offer enhanced durability by fully enclosing fray-prone edges, preventing wear over time, and allow for decorative color contrast that can coordinate with or trim elements. They are especially advantageous for unlined jackets or coats, where the seam treatment remains visible and contributes to the overall structure without adding unnecessary weight.

Sewing Techniques

Straight Seam Construction

Straight seam construction involves joining two pieces of fabric along a linear edge using a , forming a fundamental in garment assembly. The process begins with preparing the fabric layers by aligning them precisely and securing them to prevent shifting during stitching. This technique ensures durability and a clean appearance, serving as the foundation for more complex seam types. To construct a straight seam, first place the right sides of the fabric pieces together, matching raw edges along the seam line, and pin to the seam line at intervals of about 4-6 inches to hold the layers in place. Next, stitch along the marked seam line using a , typically with a 5/8-inch unless specified otherwise. Secure the ends by backtacking: at the start, stitch forward for about 1/4 inch, then reverse for 1/4 inch before proceeding; repeat at the finish to the thread without sewing off the . Standard sewing machine settings for straight seams include a stitch length of 2 to 2.5 mm for most woven fabrics, providing balanced stitches that neither pucker nor pull apart easily. Thread tension should be balanced to avoid loose or tight stitches, with adjustments made according to the fabric weight—finer settings for lightweight materials. Common errors include uneven feeding, where one layer advances faster than the other, often due to improper pinning or fabric slippage; this can be mitigated by using a straight stitch foot for better control. Best practices emphasize testing on fabric swatches to verify thread tension and stitch quality before committing to the main pieces, ensuring consistent results across the project. For synthetic fabrics prone to puckering, use a shorter stitch length under 2 mm and hold the fabric taut in front of and behind the presser foot to maintain even tension during feeding. This method applies directly to plain seams, where the raw edges are simply trimmed and pressed open after stitching.

Curved Seam Handling

Curved seams in require specific modifications to the s to allow the fabric to lie flat without puckering or excess bulk after stitching and turning. These techniques prevent in areas where the seam follows a non-linear path, ensuring a smooth finish. involves cutting small V-shaped triangles into the seam allowance of outward (convex) curves, such as armholes, to ease the fabric and reduce bulk when the seam is pressed open or turned right side out. The notches are spaced approximately 1/2 inch apart along the curve, with the deepest point of each V reaching no closer than 1/8 inch to the stitching line to maintain seam strength. For tighter curves, notches may be placed more frequently, but they should always be cut to the seam edge. Clipping consists of making straight incisions into the of inward (concave) curves, like necklines, to enable the fabric to spread evenly and conform to the curve without pulling. These clips should extend to within 1/16 inch of the stitching but no deeper than 3/8 inch to avoid weakening the seam; they are spaced evenly, typically every 1/4 to 1/2 inch, depending on the curve's severity. Over-clipping can compromise durability, so testing on scrap fabric is recommended. Grading seam allowances is essential for multi-layer curved seams to minimize bulk, achieved by trimming the layers to different widths—such as 1/2 inch for the outermost layer and 1/4 inch for inner ones—before clipping or . This layered approach allows the seam to press flat without bunching. Understitching follows these steps on curved edges, where a line of stitching 1/8 to 1/4 inch from the seam attaches the allowance to the facing or lining, preventing it from rolling to the exterior. After handling, pressing the seam over a tailor's ham helps set the curve.

Positions and Applications

Garment Positions

In garment construction, seams are strategically placed to achieve symmetry, fit, and structural integrity. The center front seam runs vertically down the front of a garment, providing a balanced axis for elements and allowing adjustments for closure types like zippers or buttons. Similarly, the center back seam follows a vertical line down the rear, ensuring symmetrical shaping and facilitating alterations for posture or body variations. These central seams are essential for maintaining proportional alignment in bodices, skirts, and dresses. Side seams extend vertically from the underarm to the hem, enabling contouring to the body's natural curves for improved fit and silhouette definition. In pants, the inseam connects the inner leg from the crotch to the hem, supporting mobility and precise leg shaping without visible bulk on the outer profile. These placements contribute to the overall form by distributing tension evenly across the garment. Princess seams originate from the shoulder or armhole and curve to the waistline, incorporating to contour the bust and for a fitted in tops and dresses. seams join the front and back at the top, serving as the primary attachment point for set-in sleeves and influencing upper body mobility. Such functional roles enhance the garment's ability to follow anatomical contours. Proper grainline alignment is crucial when positioning seams, as patterns must be oriented parallel to the fabric's lengthwise to avoid twisting or during . Misaligned seams can cause the garment to pull unevenly, leading to discomfort or poor . Additionally, seam placement directly affects drape, with vertical seams often preserving fluid fabric fall while horizontal or curved ones may increase and alter how the material conforms to the body. Garment positions can influence the choice of seam type, such as opting for more flexible finishes on curved lines to maintain smooth contours.

Functional Variations

Functional variations of seams in refer to the diverse roles seams play in garment , extending beyond basic joining to include structural , aesthetic enhancement, and edge stabilization. These variations are selected based on the garment's intended use, fabric properties, and design requirements, ensuring durability, comfort, and visual appeal. According to industry standards, seams are broadly categorized by their primary function, influencing the choice of seam type and stitching method. Structural seams, also known as construction seams, primarily join two or more layers of fabric to form the garment's framework, bearing loads and maintaining under stress. These seams are essential in high-wear areas such as side seams, inseams, and joins, where they must resist pulling and abrasion. Examples include superimposed seams (Class 1 per ISO 4916:1991), commonly used in shirts and dresses with lockstitch (stitch type 301) for strength, and lapped seams (Class 2), favored in for their durability without bulk. In performance garments, reinforced structural seams may incorporate double-needle topstitching to distribute tension evenly. Decorative seams emphasize visual interest and can also provide subtle shaping or volume. They often feature topstitching, , or tucks visible on the garment's exterior, enhancing style while contributing to fit. For instance, pintuck seams (Class 5) add texture to blouses, and piped seams (also Class 5) accent edges in formalwear, using contrast threads or fabrics for emphasis. These variations are coded as "D" details in seam classification systems, distinguishing them from purely functional joins. Finishing seams focus on edge treatment to prevent fabric fraying, raveling, or exposure of raw edges, particularly important for unlined garments or delicate materials. Coded as "H" for hems and finishes, these include overlocked edges (Class 6) with serging stitches to trim and enclose seams in , and bound seams (Class 3) using for a clean finish on jacket hems or armholes. In activewear, finishing seams often combine with elastic binding for stretch and recovery. The choice of finishing method varies with fabric type; woven fabrics may use or zigzag stitching, while knits benefit from coverstitching to maintain elasticity. Additional functional variations include reinforcement seams for high-stress zones, such as bar tacks or backstitching in corners, which enhance seam strength without altering appearance. Overall, functional seam selection aligns with ISO 4916:1991's eight classes, prioritizing performance metrics like seam strength (measured in Newtons per ISO 13935-2) to ensure garment longevity.

References

Add your contribution
Related Hubs
User Avatar
No comments yet.