
Community hub
Recent from talks
Contribute something
Nothing was collected or created yet.
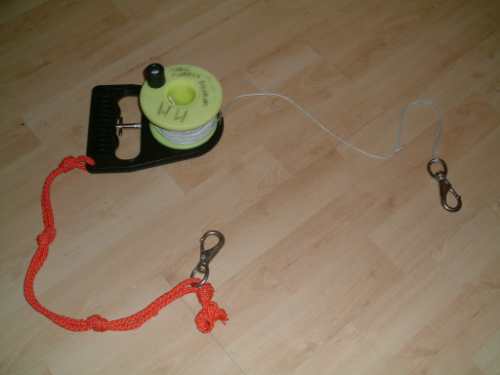
Distance line
View on Wikipedia 50 metres of line on a reel | |
| Other names | guide line, cave line, wreck line, penetration line |
|---|---|
| Uses | Used to guide divers back to a specific point |
| Related items | Jackstay, jump line, search line, down-line, upline, messenger line |

A distance line, penetration line, cave line, wreck line or guide line is an item of diving equipment used by scuba divers as a means of returning to a safe starting point in conditions of low visibility, water currents or where pilotage is difficult. They are often used in cave diving and wreck diving where the diver must return to open water after a penetration when it may be difficult to discern the return route.[1][2] Guide lines are also useful in the event of silt out.[3]

Distance lines are wound on to a spool or a reel for storage, and are laid in situ by unrolling.[4] The length of the distance line used is dependent on the plan for the dive. An open water diver using the distance line only for a surface marker buoy may only need 50 metres (160 feet), whereas a cave diver may use multiple reels of lengths from 25 ft (7.6 m) to 1000+ ft (300 m).
Reels for distance lines may have a locking mechanism, ratchet or adjustable drag to control deployment of the line and a winding handle to help keep slack line under control and rewind line. Lines are used in open water to deploy surface marker buoys and decompression buoys and link the buoy on the surface to the submerged diver, or may be used to allow easy return navigation to a point such as a shotline or boat anchor.
The material used for any given distance line will vary based on intended use, nylon being the material of choice for cave diving.[4] A common line used is 2 mm (0.079 in) polypropylene line when it does not matter if the line is buoyant.
The use of guide line for navigation requires careful attention to laying and securing the line, line following, marking, referencing, positioning, teamwork, and communication.[3]
Applications
[edit]Cave diving: Guide lines are used in cave diving as standard procedure whenever it is possible that the divers may be confused about the way out. In effect, this is in any dive where there is no free surface overhead and where daylight is not visible at all points of the dive. By the most common definition of cave diving, this would mean guide lines should be used for all cave dives.
Wreck diving: The use of guide lines in wreck diving is very similar to their use in cave diving.
Diving in low visibility: A guide line may be used for dives where poor visibility may make it difficult to return to the starting point, and there is a safety or operational requirement to return to that point.
Other dives where it is necessary or highly desirable to return to a starting point: This may include dives where a shot line or anchor line is to be used for ascent, and other dives where a specific exit point is chosen for safety or convenience. Working divers may use a guide line to allow confident and efficient movement to, from and around the workplace. This may also be referred to as a jackstay. In these applications the guide line is generally more for efficiency than for safety, but it may also help the divers stay away from potentially hazardous areas.
Guidelines may be used to direct divers on underwater search patterns.
Guide lines may also be used as a means of directing tourists around a dive site, between points of interest which may be difficult to find without the line. This form of guide line may be permanently placed.
Equipment
[edit]Cave line and wreck line
[edit]Cave line, strictly speaking, is line used for navigation in caves, but the term is used generically for the type of line carried by divers on reels and spools for use as guide lines and surface marker buoy lines. It is made using the same machines and materials to the same specifications as the equivalent line used for other purposes. When used in wreck diving, the same material is called wreck line, though a thicker line may be used for better abrasion and cut resistance in an environment of rusty metal edges.
- Material
- Nylon is strong, with a tenacity of 6.5 to 9 g/D (gram per denier), durable and sinks. The specific gravity (SG) is 1.14. Negative buoyancy is considered a desirable feature for some applications, where a line that sinks to the bottom is easier to find than one which may float up to the overhead if dislodged from tie-offs.[4] Abrasion resistance is poor when wet.[5][6]
- Polypropylene is also strong and durable, with tenacity of 6.5 g/D, and fair abrasion resistance, but it floats, with SG of 0.91, and is preferred where the risk of floating up to the overhead and being difficult to find is offset by the line not being easily buried in silt on the bottom.[4][5][6]
- Ultra-high-molecular-weight polyethylene (Spectra and Dyneema) is very strong and durable. Tenacity is between 35 and 48 g/D, more than 4 times the strength of nylon. It is also relatively expensive. More line can be carried on the reel with equivalent or greater strength and durability than other fibres. UHMWPE is slightly buoyant in fresh water with SG of 0.98. Abrasion resistance is excellent. It is slippery and knots must be tied with care.[5][6]
- Natural fibres such as cotton and sisal are not usually used for guide line as they rot and lose strength relatively quickly, and are more bulky for equivalent strength. They may be used for temporary lines on wrecks where it may not be possible to recover the line before ascent, and biodegradation is desirable.[4]
- Structure
- Twisted line may have greater strength for the same bulk, but it is more easily broken by abrasion, and has a greater tendency to twist on itself when not under tension, and unlay when cut or broken, making it more difficult to handle.[4]
- Single braid is more resistant to abrasion and twisting than twisted line, and is easily available in suitably small diameters. It is usually the preferred structure for temporary guide line and permanent line in places where conditions are not rough on the line.[4]
- Double braid (Kernmantle) line consists of a core strength member and a sheathing for abrasion resistance. This is more expensive, larger and heavier than the thinner lines, but may be better for permanent guide lines, particularly in places where water movement reduces the expected lifespan of the line due to abrasion.[4]
- Thickness
- American measure: usually 18 to 36 gauge, with 24 gauge (about 1.86 mm diameter) single braid as a good general purpose size.[4]
| Code | Diameter in mm | Diameter in inches | approximate breaking strength [kg] | approximate breaking strength [lbs] |
|---|---|---|---|---|
| #18 | 1.58 | 1/16" (0.0625) | 65.4 | 144 |
| #24 | 1.86 | 0.073 | 104 | 230-250 |
| #36 | 2.11 | 0.083 | 150 | 330-360 |
| #48 | 2.48 | 0.098 | 182 | 405-550 |
| 1/8" | 3.18 | 0.125 | 331 | 728 |
- Colour
- White is generally the preferred choice as it shows up best in low light.[4]
- Other high visibility colours may be used to allow the specific line to be easily identified, such as the main route, or a personal line.[4] Yellow is a popular colour for main route guide line, particularly for kernmantle line. In this application it is known as "gold line".[8]
- Marking (knots)
- Personal line may be marked at regular intervals by knots, allowing the diver to make an easy estimation of distance travelled by counting the knots as the line is deployed. 10 feet (3 m) is a popular spacing.[4]
Reels
[edit]
A dive reel comprises a spool with a winding knob, which rotates on an axle, attached to a frame, with a handle to hold the assembly in position while in use.[4] A line guide is almost always present, and there is usually a method of clipping the reel to the diver's harness when not in use.
- The handle may be positioned on top, behind, or at the side of the spool.[4]
- The spool is the storage area for the line. It has a hub and two flanges, which prevent the line from falling off the sides of the hub. The size of the spool and the thickness of the line together determine the length of line the reel can hold, though this is also affected by how neatly the line is wound onto the spool.[4]
- The winding knob is on the side of the spool. Most reels are laid out for holding in the left hand and winding with the right. The knob is usually attached by a bolt which allows it to rotate, giving a more secure grip to the winding hand.[4]
- The line guide is a slotted attachment which guides the line onto the spool. This helps to control the stacking of the line on the spool when it is reeled in.
Other accessories which may be present (usually not all on the same reel) include:
- Ratchet mechanism, which prevents the spool from rotating when there is tension on the line. this prevents inadvertent unreeling of line, as the ratchet lever must be held in the open position to allow unwinding. The ratchet mechanism is usually a ratchet wheel on the spool which engages with a spring-loaded pawl which can either be held open by a trigger lever, or clipped open by a knob or lever on the handle. The ratchet allows the spool to be manually rotated to wind in line when engaged.
- A lock down screw or latch is an alternative way of preventing spool rotation if there is no ratchet. This will prevent rotation in both directions.[4]
- An adjustable brake may be fitted to control the friction of the spool on the handle, so that some tension is required to unwind the line, and the spool can not spin freely, causing overruns and tangled line. The brake may be released when reeling in.[4]
- The line may have a snap hook or an end loop to tie off the free end.[4]
- A clip may be attached to the handle to clip the reel off to the diver's harness.
- A lanyard may be connected to the handle to connect the reel to the diver while in use.
- A wrist loop may be fitted to the handle to attach the reel to the diver while in use.
Reels may be made from a wide variety of materials, but near neutral buoyancy and resistance to impact damage are desirable features, which are easiest to achieve in engineering polymers such as nylon, acetal (delrin) and polyethylene.
Reels may also be open or closed. This refers to the presence of a cover around the spool, which is intended to reduce the risk of line tangles on the spool, or line flipping over the side and causing a jam. To some extent this works, but if there is a jam the cover effectively prevents the diver from correcting it. Open reels allow easy access to free jams caused by overwinds or line getting caught between spool and handle.
Spools
[edit]

Finger spools, dive spools, line spools, or cave spools, are a simple, compact low tech alternative to reels best suited to relatively short lengths of line. They are simply a pair of circular flanges with a hole in the middle, connected by a tubular hub, which is suitably sized to use a finger as an axle when unrolling the line. Line is secured by clipping a bolt snap through a hole on one of the flanges and over the line as it leaves the reel. Line is reeled in by holding the spool with one hand and simply winding the line onto the spool by hand. Spools are most suitable for reasonably short lines, up to about 50m, as it becomes tedious to roll up longer lengths. The small, compact size, and low cost make them useful for various purposes where long line is not required.[4] Spools may be made from any material that is strong enough and suitable for underwater service, but engineering thermoplastics are most common.
Line holders
[edit]
A line holder is a simple device for storing and deploying line underwater. A simple type is an H-shaped piece of wood, plastic or stainless steel used to manually wrap a moderate length line.
It may be used in conjunction with a surface marker buoy or a delayed surface marker buoy by divers, or for a short guide line. When used to deploy a DSMB, negative buoyancy is helpful in to safely unwind the line underwater as the buoy floats to the surface, as it may not be possible to manually unwind the line fast enough to avoid being pulled upwards. For this method of deployment the line holder is dropped and left to unwind by gravity. This may not work as intended, and the line holder may unwind more line than is useful if deployed in midwater. This problem falls away when used with a regular SMB, or for a short guide line.
Types of reel or spool
[edit]Cave reels
[edit]Cave reels are reels used in cave diving. They are often specifically designed for laying and recovering line at swimming speeds, and may differ from reels used for other purposes such as deploying a DSMB. They usually have an adjustable drag facility to prevent overrun, and a lock, but may not have a ratchet.
Exploration reels are large cave reels that can hold a lot of line, in some cases as much as 2,000 ft (610 m), and are used during major exploration dives where this length is needed. They tend to be bulky and impractical for most other purposes. They are often used to lay permanent line.[4]
Penetration reels (also known as primary or lead reels) are used to run line from a point with direct access to the surface to the start of a permanent line. This may be as much as a few hundred feet into the overhead. These reels will usually carry 300 to 500 ft (91 to 152 m) of line. These reels are also used for short penetrations where there is no permanent line.[4]
Spool types
[edit]Jump and gap spools are used to bridge gaps between two permanent guide lines. Line length is generally about 50 to 100 ft (15 to 30 m)[4]
Safety spools are used in emergencies such as line breaks, searches for a lost guide line or lost diver. They generally carry about 150 ft (46 m) of line, and one should be carried by each diver. They are not intended for use under an overhead except in an emergency.[4]
DSMB spools are used to deploy inflatable surface marker buoys from depth. They have negative buoyancy and enough line to reach the surface from the planned deployment depth, and are often made of injection moulded plastic and sold as a set with the DSMB. Larger versions which can carry more line and are suitable for use from deeper depths are more likely to be machined from aluminium and are both more ergonomically shaped and more expensive.
Ratchet reels
[edit]General purpose reels used by open water divers usually feature a ratchet mechanism which allows rapid deployment of DSMBs, and secure recovery of line, using the spring-loaded ratchet to prevent unintended unrolling during ascent, but allowing deployed length to be increased rapidly under tension by disengaging the pawl, which is usually operated by a thumb lever or finger trigger. Ratchet reels are occasionally fitted with a drag mechanism to allow controlled line tension when laying guide line, and a ratchet release retainer, but these features add complexity and cost and potential failure points, and are not needed for open water use.
Line markers
[edit]Line markers are used for orientation as a visual and tactile reference on a permanent guide line. Directional markers (commonly arrows), are also known as line arrows or Dorff arrows, and point the way to an exit. Line arrows may mark the location of a "jump" location in a cave when two are placed adjacent to each other. Two adjacent arrows facing away from each other, mark a point on the line where the diver is equidistant from two exits.
Non-directional markers ("cookies") are purely personal markers that mark specific spots, or the direction of one's chosen exit at line intersections where there are options. One important reason to be adequately trained before cave diving is that incorrect marking can confuse and fatally endanger not only oneself, but also other divers.
Silt screws
[edit]Silt screws are pegs which are inserted into soft bottom sediments to tie off the guide line when there are no suitable natural formations. A common style of silt screw is a length of rigid PVC tube cut to a point at one end, with a notch at the other to secure a wrap. These are lightweight and durable, and are easily transported by attaching them to a cylinder with bungees.
Procedures
[edit]The principle of a continuous guide line between the penetration diver and open water is central to cave and wreck diving safety.[1] Procedures associated with the use of guide lines include primary and secondary tie-off, laying line, positioning line, following line, marking and identifying line, identifying jumps and exit directions, searching for a lost line, repairing a break, and recovering line.
Laying line
[edit]Most reels are designed to be held in the left hand, particularly for recovering line. Line should be kept under tension at all times to avoid slack which is more likely to snag on divers' equipment. An adjustable brake may be used to provide resistance to rotation, or this can be done by pressing a thumb or finger against the spool as it rotates, which is quick and controllable, but requires some attention, and fails if the reel is dropped. The line should be kept clear of the divers body during the laying to reduce risk of snagging on the diver's equipment. This can be achieved by holding the reel away from the body in clear water.[2]
The line should be laid so that it can be followed in the worst possible visibility, and allow for other emergency procedures such as gas sharing at the time. This generally means that the divers must be able to follow it by feel.[2]
Line traps are places that a line can pass through but are too tight for a diver, making it impossible to follow the line by feel. Avoiding line traps is a large part of the skill of laying line, and generally require the line to be tied off in such a way that it does not enter line trap areas when under the necessary tension to prevent slack. As a general principle, this requires the line to be secured at any change of direction, by a placement or a tie-off.[2]
A placement is made by running the line past a contact surface in such a way that friction or geometry of the line position prevents the line from moving. This may be adequate, for example, when going past a boulder which has a notch which holds the line in place.
A tie-off generally involves wrapping the line round a fixed object once or twice, and may be made more secure by adding a lock, which is made by looping the reel around the incoming line and taking up the slack, before continuing the lay. A lock also puts the incoming and continuing parts of the line in contact, which makes it much easier to follow by feel.[2]
The security of both placements and tie-offs depends on the detail of the place where they are made, and some may be disrupted by a pull on the line in the wrong direction. This makes the skill of following a line without dislodging it an important safety issue.
Placements and tie-offs take time to set up, and time to negotiate when following the line by feel, so they should be limited to those which are actually useful.[2] To be useful, a tie-off would limit the distance to the next tie-off to a reasonable distance which could be negotiated with a safety spool in case of a break, or which prevents a line trap. More frequent placements and tie-offs are likely to be used on a permanent line which does not have to be retrieved on the way back, and which must withstand use by many divers over a long period.
Line routing
[edit]The position of the line can make a large difference to the ease with which divers may follow it.[2] The line would ideally allow divers to see or feel it while swimming comfortably without coming into contact with or being obstructed by, the bottom, sides or ceiling. This is not always possible.[9]
The bottom is often easy to follow by eye and often has suitable tie-off points, but sometimes swimming close to it may cause silting, and it may result in a higher inert gas loading and higher gas consumption than an alternative route.[9]
The sides have a problem in that they constrain divers to swim on one side of the line only.[2][9]
The ceiling may be difficult to tie-off to, and is difficult to follow, as the divers will generally have to look upwards. Following a ceiling guide line by feel can be even more awkward and tiring, and an overhead line is both more likely to get snagged by a diver's equipment, and be more difficult to unsnag, as the snag is likely to be behind the diver where it cannot be seen or easily reached.[9]
Entering the overhead
[edit]If the lead diver is the one to lay line on entering the overhead environment, it is possible for other divers in the team to follow the guide line for their safety, and they can check the security of tie-offs and that the line is not moving into traps unnoticed. This order also reduces the risk that a diver will become separated from the team if the line-layer has to stop for any reason.[2]
Primary tie-off
[edit]The primary tie off is made in a place with direct vertical access to the surface, if possible, in a place where it is unlikely to be interfered with by outsiders. This tie-off should be secure.[2]
Secondary tie-off
[edit]The secondary tie-off is made just inside the overhead, where the route to the exit is obvious even if visibility is lost. This is a backup in case the primary tie-off is compromised.[2]
Connection to a permanent guide line
[edit]The temporary entry guide line should be tied off to the permanent line and the reel locked.[2] A recommended method is to make two wraps around the permanent line and then clip the line end back to the line. Another method is to pass the reel or spool through a loop at the and of the line made for that purpose, the loop may be of stiffer and thicker line and may have a short extension to make it easier to undo on the return. This method cannot be accidentally released.
Recovering a temporary guide line
[edit]If the last diver out is the one to reel in the line, the lead divers can prepare the way by loosening tie-offs just ahead of the reel, and there is less risk of them becoming separated from the group without the reel operator noticing.[2] This can significantly reduce the risk of anyone getting lost. This order is even more safety critical if the exit is in poor visibility. In an emergency, the reel would be left at a tie-off and the divers would exit without recovering the line, as this would save time.
Navigation
[edit]There is more to navigating by guide line than merely following the line.
Survey of line condition: A permanent guide line may have deteriorated since the latest reliable report on its condition. A complete check of line condition during the penetration will ensure that there are no unpleasant surprises like line breaks or line traps during the exit[3][9]
Distance from the guide line: Good visibility may be compromised very quickly in some environments. If a diver is more than arm's reach from the line when visibility is lost, it will be necessary to find the line in possibly adverse circumstances. This can be avoided by remaining within reach of the line.[2][9]
Guide lines are frequently used in areas with heavy silt, and the line may lie on the silt or be close above it. If silt is kicked up everyone following will have poor visibility, and the return along the line may be in low or zero visibility, which is at the very least inconvenient. The ability to fin without kicking up the silt relies on good level trim and appropriate finning techniques.[2][9]
Orientation
[edit]It can be useful to build up a mental model of the route, even to make notes and sketches indicating major landmarks and changes of direction. This helps to reduce disorientation on return along the line, when the surroundings may look very unfamiliar because they are observed from a different direction. For the same reason, occasional checks in the exit direction will make the route look more familiar on return.[9]
Compass checks
[edit]Use of a compass for occasional checks of direction has the advantage of providing a secondary input for sense of direction. This can be of great value when disorientated for any reason.[9]
Pace and order of activity
[edit]It is important for safety to ensure that the gas supply for the return is sufficient for reasonable contingencies. It is more conservative gas management to do any work on the outward leg, and return directly, unless specifically planned otherwise. As the exit is approached, the gas stock and decompression obligations can be re-assessed, and plans adjusted accordingly.[9]
Safety
[edit]Although distance lines are considered to be safety equipment, there are hazards associated with their use.
- Entanglement: Loose line in the water is generally a greater entanglement risk than relatively taut line. The chances of snagging the diver's equipment on line depends on awareness of the line's position relative to the diver, and the number of possible snag points on the diver's equipment. The ability to release a line snag depends on the ability to identify and reach the snag. Keeping the line in view or in hand at arm's length, and keeping the number of possible snag points on equipment to a minimum will reduce the entanglement risk. Passing under a line increases the risk of snagging on a point that cannot be seen or reached, requiring assistance or the need to cut the guide line to get free. If the line is cut, it no longer serves the purpose of providing an unbroken guide to the exit, and this is another emergency. Thin line may snag more easily and can be more difficult to free by feel.
- Line breaks: A line break during entry is an inconvenience. It may ruin the dive but should not endanger the divers. in many cases it can be repaired and the dive continued. On the way out, it can be an emergency, as the route may become uncertain, and remains uncertain until the other end has been found. The emergency spool is carried to allow a search for the lost end without losing the end in hand, which may have moved apart some distance due to sinking, floating, or drifting with a current.
- Line traps:
- Losing the line:
History
[edit]In 1977, Sheck Exley published Basic Cave Diving: A Blueprint for Survival which pointed out that the lack of a continuous guide line was one of five main contributing factors in cave diving accidents.[1]
See also
[edit]- Cave diving – Diving in water-filled caves
- Decompression buoy – Inflatable surface marker buoy deployed from underwater
- Penetration diving – Diving under a physical barrier to a direct vertical ascent to the surface
- Wreck diving – Recreational diving on wrecks
References
[edit]- ^ a b c Sheck Exley (1977). Basic Cave Diving: A Blueprint for Survival. National Speleological Society Cave Diving Section. ISBN 99946-633-7-2.
- ^ a b c d e f g h i j k l m n o Devos, Fred; Le Maillot, Chris; Riordan, Daniel (2004). "Introduction to Guideline Procedures - Part 2: Methods" (PDF). DIRquest. 5 (4). Global Underwater Explorers. Retrieved 2009-04-05.
- ^ a b c Devos, Fred; Le Maillot, Chris; Riordan, Daniel (2005). "Introduction to Guideline Procedures – Part 3: Navigation" (PDF). DIRquest. 6 (1). Global Underwater Explorers. Archived from the original (PDF) on 2011-06-11. Retrieved 2009-04-05.
- ^ a b c d e f g h i j k l m n o p q r s t u v w x Devos, Fred; Le Maillot, Chris; Riordan, Daniel (2004). "Introduction to Guideline Procedures Part 1: Equipment" (PDF). DIRquest. 5 (3). Global Underwater Explorers. Retrieved 2009-04-05.
- ^ a b c "Rope info". Southern Ropes. Retrieved 4 August 2020.
- ^ a b c "Material Properties". Marlow Ropes. Retrieved 4 August 2020.
- ^ Technical committee (2010). Cave diving standards and training system (Version 2010/01 ed.). CMAS.
- ^ "Gold Line Fund". National Speleological Society Cave Diving Section. Retrieved 28 September 2024.
- ^ a b c d e f g h i j Davis, Andy (7 August 2019). "Advanced Wreck Diving Techniques". scubatechphilippines.com. Retrieved 16 October 2021.
External links
[edit]- Lewis, Steve (7 April 2009). "Options for choosing a wreck diving reel". Doppler’s Tech Diving Blog: Lectures and Essays about Technical Diving. Retrieved 2009-05-29.