Respect all members: no insults, harassment, or hate speech.
Be tolerant of different viewpoints, cultures, and beliefs. If you do not agree with others, just create separate note, article or collection.
Clearly distinguish between personal opinion and fact.
Verify facts before posting, especially when writing about history, science, or statistics.
Promotional content must be published on the “Related Services and Products” page—no more than one paragraph per service. You can also create subpages under the “Related Services and Products” page and publish longer promotional text there.
Do not post materials that infringe on copyright without permission.
Always credit sources when sharing information, quotes, or media.
Be respectful of the work of others when making changes.
Discuss major edits instead of removing others' contributions without reason.
If you notice rule-breaking, notify community about it in talks.
Do not share personal data of others without their consent.
An image of Orion's Belt composited from digitized black-and-white photographic plates recorded through red and blue astronomical filters, with a computer synthesized green channel. The plates were taken using the Samuel Oschin Telescope between 1987 and 1991.
Astrophotography, also known as astronomical imaging, is the photography or imaging of astronomical objects, celestial events, or areas of the night sky. The first photograph of an astronomical object (the Moon) was taken in 1839,[1] but it was not until the late 19th century that advances in technology allowed for detailed stellar photography. Besides being able to record the details of extended objects such as the Moon, Sun, and planets, modern astrophotography has the ability to image objects outside of the visible spectrum of the human eye such as dim stars, nebulae, and galaxies. This is accomplished through long time exposure as both film and digital cameras can accumulate and sum photons over long periods of time or using specialized optical filters which limit the photons to a certain wavelength.
Photography using extended exposure-times revolutionized the field of professional astronomical research, recording hundreds of thousands of new stars, and nebulae invisible to the human eye. Specialized and ever-larger optical telescopes were constructed as essentially big cameras to record images on photographic plates. Astrophotography had an early role in sky surveys and star classification but over time it has used ever more sophisticated image sensors and other equipment and techniques designed for specific fields.
Since almost all observational astronomy today uses photography, the term "astrophotography" usually refers to its use in amateur astronomy, seeking aesthetically pleasing images rather than scientific data. Amateurs use a wide range of special equipment and techniques.
With a few exceptions, astronomical photography employs long exposures since both film and digital imaging devices can accumulate light photons over long periods of time. The amount of light hitting the film or detector is also increased by increasing the diameter of the primary optics (the objective) being used. Urban areas produce light pollution so equipment and observatories doing astronomical imaging are often located in remote locations to allow long exposures without the film or detectors being swamped with stray light.
Since the Earth is constantly rotating, telescopes and equipment are rotated in the opposite direction to follow the apparent motion of the stars overhead (called diurnal motion). This is accomplished by using either equatorial or computer-controlled altazimuth telescope mounts to keep celestial objects centered while Earth rotates. All telescope mount systems suffer from induced tracking errors due to imperfect motor drives, the mechanical sag of the telescope, and atmospheric refraction. Tracking errors are corrected by keeping a selected aiming point, usually a guide star, centered during the entire exposure. Sometimes (as in the case of comets) the object to be imaged is moving, so the telescope has to be kept constantly centered on that object. This guiding is done through a second co-mounted telescope called a "guide scope" or via some type of "off-axis guider", a device with a prism or optical beam splitter that allows the observer to view the same image in the telescope that is taking the picture. Guiding was formerly done manually throughout the exposure with an observer standing at (or riding inside) the telescope making corrections to keep a cross hair on the guide star. Since the advent of computer-controlled systems, this is accomplished by an automated system in professional and even amateur equipment.
Henry Draper with a refractor telescope set up for photography (photo probably taken in the 1860s or early 1870).[3]
The development of astrophotography as a scientific tool was pioneered in the mid-19th century for the most part by experimenters and amateur astronomers, or so-called "gentleman scientists" (although, as in other scientific fields, these were not always men). Because of the very long exposures needed to capture relatively faint astronomical objects, many technological problems had to be overcome. These included making telescopes rigid enough so they would not sag out of focus during the exposure, building clock drives that could rotate the telescope mount at a constant rate, and developing ways to accurately keep a telescope aimed at a fixed point over a long period of time. Early photographic processes also had limitations. The daguerreotype process was far too slow to record anything but the brightest objects, and the wet plate collodion process limited exposures to the time the plate could stay wet.[4]
The earliest surviving dagerrotype of the Moon by Draper (1840)
The first known attempt at astronomical photography was by Louis Jacques Mandé Daguerre, inventor of the daguerreotype process which bears his name, who attempted in 1839 to photograph the Moon. Tracking errors in guiding the telescope during the long exposure meant the photograph came out as an indistinct fuzzy spot. John William Draper, New York University Professor of Chemistry, physician and scientific experimenter managed to make the first successful photograph of the Moon a year later on March 23, 1840, taking a 20-minute-long daguerreotype image using a 5-inch (13 cm) reflecting telescope.[5]
The Sun may have been first photographed in an 1845 daguerreotype by the French physicists Léon Foucault and Hippolyte Fizeau. A failed attempt to obtain a photograph of a Total Eclipse of the Sun was made by the Italian physicist, Gian Alessandro Majocchi during an eclipse of the Sun that took place in his home city of Milan, on July 8, 1842. He later gave an account of his attempt and the Daguerreotype photographs he obtained, in which he wrote:
A few minutes before and after totality an iodized plate was exposed in a camera to the light of the thin crescent, and a distinct image was obtained, but another plate exposed to the light of the corona for two minutes during totality did not show the slightest trace of photographic action. No photographic alteration was caused by the light of the corona condensed by a lens for two minutes, during totality, on a sheet of paper prepared with bromide of silver.[6]
The first solar eclipse photograph was taken on July 28, 1851, by a daguerrotypist named Berkowski.
The Sun's solar corona was first successfully imaged during the Solar eclipse of July 28, 1851. Dr. August Ludwig Busch, the Director of the Königsberg Observatory gave instructions for a local daguerreotypist named Johann Julius Friedrich Berkowski to image the eclipse. Busch himself was not present at Königsberg (now Kaliningrad, Russia), but preferred to observe the eclipse from nearby Rixhoft. The telescope used by Berkowski was attached to 6+1⁄2-inch (17 cm) Königsberg heliometer and had an aperture of only 2.4 in (6.1 cm), and a focal length of 32 in (81 cm). Commencing immediately after the beginning of totality, Berkowski exposed a daguerreotype plate for 84 seconds in the focus of the telescope, and on developing an image of the corona was obtained. He also exposed a second plate for about 40 to 45 seconds but was spoiled when the Sun broke out from behind the Moon.[7] More detailed photographic studies of the Sun were made by the British astronomer Warren De la Rue starting in 1861.[8]
Henry Draper's 1880 photograph of the Orion Nebula, the first ever taken.One of Andrew Ainslie Common's 1883 photographs of the same nebula, the first to show that a long exposure could record stars and nebulae invisible to the human eye.
Astronomical photography did not become a serious research tool until the late 19th century, with the introduction of dry plate photography.[11] It was first used by Sir William Huggins and his wife Margaret Lindsay Huggins, in 1876, in their work to record the spectra of astronomical objects. In 1880, Henry Draper used the new dry plate process with photographically corrected 11 in (28 cm) refracting telescope made by Alvan Clark[12] to make a 51-minute exposure of the Orion Nebula, the first photograph of a nebula ever made. A breakthrough in astronomical photography came in 1883, when amateur astronomer Andrew Ainslie Common used the dry plate process to record several images of the same nebula in exposures up to 60 minutes with a 36 in (91 cm) reflecting telescope that he constructed in the backyard of his home in Ealing, outside London. These images for the first time showed stars too faint to be seen by the human eye.[13][14]
The first all-sky photographic astrometry project, Astrographic Catalogue and Carte du Ciel, was started in 1887. It was conducted by 20 observatories all using special photographic telescopes with a uniform design called normal astrographs, all with an aperture of around 13 in (330 mm) and a focal length of 11 ft (3.4 m), designed to create images with a uniform scale on the photographic plate of approximately 60 arcsecs/mm while covering a 2° × 2° field of view. The attempt was to accurately map the sky down to the 14th magnitude but it was never completed.
The beginning of the 20th century saw the worldwide construction of refracting telescopes and sophisticated large reflecting telescopes specifically designed for photographic imaging. Towards the middle of the century, giant telescopes such as the 200 in (5.1 m) Hale Telescope and the 48 in (120 cm) Samuel Oschin telescope at Palomar Observatory were pushing the limits of film photography.
Some progress was made in the field of photographic emulsions and in the techniques of forming gas hypersensitization, cryogenic cooling,[15] and light amplification, but starting in the 1970s after the invention of the CCD, photographic plates were gradually replaced by electronic imaging in professional and amateur observatories. CCD's are far more light sensitive, do not drop off in sensitivity over long exposures the way film does ("reciprocity failure"), have the ability to record in a much wider spectral range, and simplify storage of information. Telescopes now use many configurations of CCD sensors including linear arrays and large mosaics of CCD elements equivalent to 100 million pixels, designed to cover the focal plane of telescopes that formerly used 10–14-inch (25–36 cm) photographic plates.[citation needed]
The late 20th century saw advances in astronomical imaging take place in the form of new hardware, with the construction of giant multi-mirror and segmented mirror telescopes. It would also see the introduction of space-based telescopes, such as the Hubble Space Telescope. Operating outside the atmosphere's turbulence, scattered ambient light and the vagaries of weather allows the Hubble Space Telescope, with a mirror diameter of 2.4 metres (94 in), to record stars down to the 30th magnitude, some 100 times dimmer than what the 5-meter Mount Palomar Hale Telescope could record in 1949.
2 minute time exposure of the comet Hale-Bopp imaged using a camera on a fixed tripod. The tree in the foreground was illuminated using a small flashlight.
Astrophotography is a popular hobby among photographers and amateur astronomers. Techniques ranges from basic film and digital cameras on tripods up to methods and equipment geared toward advanced imaging. Amateur astronomers and amateur telescope makers also use homemade equipment and modified devices.
The conventional over-the-counter film has long been used for astrophotography. Film exposures range from seconds to over an hour. Commercially available color film stock is subject to reciprocity failure over long exposures, in which sensitivity to light of different wavelengths appears to drop off at different rates as the exposure time increases, leading to a color shift in the image and reduced sensitivity over all as a function of time. This is compensated for, or at least reduced, by cooling the film (see Cold camera photography). This can also be compensated for by using the same technique used in professional astronomy of taking photographs at different wavelengths that are then combined to create a correct color image. Since the film is much slower than digital sensors, tiny errors in tracking can be corrected without much noticeable effect on the final image. Film astrophotography is becoming less popular due to the lower ongoing costs, greater sensitivity, and the convenience of digital photography.
Video of night sky made with DSLR camera'stime-lapse feature. The camera itself is moving in these shots on a motorized mount.
Since the late 1990s amateurs have been following the professional observatories in the switch from film to digital CCDs for astronomical imaging. CCDs are more sensitive than film, allowing much shorter exposure times, and have a linear response to light. Images can be captured in many short exposures to create a synthetic long exposure. Digital cameras also have minimal or no moving parts and the ability to be operated remotely via an infrared remote or computer tethering, limiting vibration. Simple digital devices such as webcams can be modified to allow access to the focal plane and even (after the cutting of a few wires), for long exposure photography. Digital video cameras are also used. There are many techniques and pieces of commercially manufactured equipment for attaching digital single-lens reflex (DSLR) cameras and even basic point and shoot cameras to telescopes. Consumer-level digital cameras suffer from image noise over long exposures, so there are many techniques for cooling the camera, including cryogenic cooling. Astronomical equipment companies also now offer a wide range of purpose-built astronomical CCD cameras complete with hardware and processing software. Many commercially available DSLR cameras have the ability to take long time exposures combined with sequential (time-lapse) images allowing the photographer to create a motion picture of the night sky. CMOS cameras are increasingly replacing CCD cameras in the amateur sector.[16] Modern CMOS sensors offer higher quantum efficiency, lower thermal and read noise and faster readout speeds than commercially available CCD sensors.[17]
The Rosette nebula, photographed through hydrogen and oxygen narrowband filters. Post processing included star alignment, averaging (stacking), curves to enhance details and adjust contrast, minor saturation and noise reduction, all done in Pixinsight. No calibration frames used
Both digital camera images and scanned film images are usually adjusted in image processing software to improve the image in some way. Images can be brightened and manipulated in a computer to adjust color and increase the contrast. More sophisticated techniques involve capturing multiple images (sometimes thousands) to composite together in an additive process to sharpen images to overcome atmospheric seeing, negating tracking issues, bringing out faint objects with a poor signal-to-noise ratio, and filtering out light pollution.
Digital camera images may also need further processing to reduce the image noise from long exposures, including subtracting a “dark frame” and a processing called image stacking or "Shift-and-add". Commercial, freeware and free software packages are available specifically for astronomical photographic image manipulation.[18]
"Lucky imaging" is a secondary technique that involves taking a video of an object rather than standard long exposure photos. Software can then select the highest quality images which can then be stacked.[19] This is typically used when observing planetary objects and helps to overcome atmospheric conditions.
Astronomical pictures, like observational astronomy and photography from space exploration, show astronomical objects and phenomena in different colors and brightness, and often as composite images. This is done to highlight different features or reflect different conditions, and makes the note of these conditions necessary.
Images attempting to reproduce the true color and appearance of an astronomical object or phenomenon need to consider many factors, including how the human eye works. Particularly under different atmospheric conditions images need to evaluate several factors to produce analyzable or representative images, like images of space missions from the surface of Mars,[20]Venus[21][22][23] or Titan.
Astrophotographic hardware among non-professional astronomers varies widely since the photographers themselves range from general photographers shooting some form of aesthetically pleasing images to very serious amateur astronomers collecting data for scientific research. As a hobby, astrophotography has many challenges that have to be overcome that differ from conventional photography and from what is normally encountered in professional astronomy.
NGC281, popularly the 'Pacman Nebula', imaged from a suburban location using a 130mm amateur telescope and a DSLR camera.
Since most people live in urban areas, equipment often needs to be portable so that it can be taken far away from the lights of major cities or towns to avoid urban light pollution. Urban astrophotographers may use special light-pollution or narrow-band filters and advanced computer processing techniques to reduce ambient urban light in the background of their images. They may also stick to imaging bright targets like the Sun, Moon and planets. Another method used by amateurs to avoid light pollution is to set up, or rent time, on a remotely operated telescope at a dark sky location. Other challenges include setup and alignment of portable telescopes for accurate tracking, working within the limitations of “off the shelf” equipment, the endurance of monitoring equipment, and sometimes manually tracking astronomical objects over long exposures in a wide range of weather conditions.
Some camera manufacturers modify their products to be used as astrophotography cameras, such as Canon's EOS 60Da, based on the EOS 60D but with a modified infrared filter and a low-noise sensor with heightened hydrogen-alpha sensitivity for improved capture of red hydrogen emission nebulae.[24]
There are also cameras specifically designed for amateur astrophotography based on commercially available imaging sensors. They may also allow the sensor to be cooled to reduce thermal noise in long exposures, provide raw image readout, and to be controlled from a computer for automated imaging. Raw image readout allows later better image processing by retaining all the original image data which along with stacking can assist in imaging faint deep sky objects.
With very low light capability, a few specific models of webcams are popular for solar, lunar, and planetary imaging. Mostly, these are manually focused cameras containing a CCD sensor instead of the more common CMOS. The lenses of these cameras are removed and then these are attached to telescopes to record images, videos, or both. In newer techniques, videos of very faint objects are taken and the sharpest frames of the video are 'stacked' together to obtain a still image of respectable contrast. The Philips PCVC 740K and SPC 900 are among the few webcams liked by astrophotographers. Any smartphone that allows long exposures can be used for this purpose, but some phones have a specific mode for astrophotography that will stitch together multiple exposures.
The most basic types of astronomical photographs are made with standard cameras and photographic lenses mounted in a fixed position or on a tripod. Foreground objects or landscapes are sometimes composed in the shot. Objects imaged are constellations, interesting planetary configurations, meteors, and bright comets. Exposure times must be short (under a minute) to avoid having the stars point image become an elongated line due to the Earth's rotation. Camera lens focal lengths are usually short, as longer lenses will show image trailing in a matter of seconds. A rule of thumb called the 500 rule states that, to keep stars point-like,
regardless of aperture or ISO setting.[25] For example, with a 35 mm lens on an APS-C sensor, the maximum time is 500/35 × 1.5 ≈ 9.5 s. A more accurate calculation takes into account pixel pitch and declination.[26]
Allowing the stars to intentionally become elongated lines in exposures lasting several minutes or even hours, called "star trails", is an artistic technique sometimes used.
Tracking mounts
An astrophotography set up with an automated guide system connected to a laptop.
Telescope mounts that compensate for the Earth's rotation are used for longer exposures without objects being blurred. They include commercial equatorial mounts and homemade equatorial devices such as barn door trackers and equatorial platforms. Mounts can suffer from inaccuracies due to backlash in the gears, wind, and imperfect balance, and so a technique called auto guiding is used as a closed feedback system to correct for these inaccuracies.[27]
Tracking mounts can come in two forms; single axis and dual axis. Single axis mounts are often known as star trackers. Star trackers have a single motor which drives the right ascension axis. This allows the mount to compensate for the Earth's rotation. Star trackers rely on the user ensuring the mount is polar aligned with high accuracy, as it is unable correct in the secondary declination axis, limiting exposure times.
Dual axis mounts use two motors to drive both the right ascension and the declination axis together. This mount will compensate for the Earth's rotation by driving the right ascension axis, similar to a star tracker. However using an auto-guiding system, the secondary declination axis can also be driven, compensating for errors in polar alignment, allowing for significantly longer exposure times.[28]
"Piggyback" photography
Piggyback astronomical photography is a method where a camera/lens is mounted on an equatorially mounted astronomical telescope. The telescope is used as a guide scope to keep the field of view centered during the exposure. This allows the camera to use a longer exposure and/or a longer focal length lens or even be attached to some form of photographic telescope co-axial with the main telescope.
Telescope focal plane photography
In this type of photography, the telescope itself is used as the "lens" collecting light for the film or CCD of the camera. Although this allows for the magnification and light-gathering power of the telescope to be used, it is one of the most difficult astrophotography methods.[29] This is because of the difficulties in centering and focusing sometimes very dim objects in the narrow field of view, contending with magnified vibration and tracking errors, and the added expense of equipment (such as sufficiently sturdy telescope mounts, camera mounts, camera couplers, off-axis guiders, guide scopes, illuminated cross-hairs, or auto-guiders mounted on primary telescope or the guide-scope.) There are several different ways cameras (with removable lenses) are attached to amateur astronomical telescopes including:[30][31]
Prime focus – In this method the image produced by the telescope falls directly on the film or CCD with no intervening optics or telescope eyepiece.
Positive projection – A method in which the telescope eyepiece (eyepiece projection) or a positive lens (placed after the focal plane of the telescope objective) is used to project a much more magnified image directly onto the film or CCD. Since the image is magnified with a narrow field of view this method is generally used for lunar and planetary photography.
Negative projection – This method, like positive projection, produces a magnified image. A negative lens, usually a Barlow or a photographic teleconverter, is placed in the light cone before the focal plane of the telescope objective.
Compression – Compression uses a positive lens (also called a focal reducer), placed in the converging cone of light before the focal plane of the telescope objective, to reduce overall image magnification. It is used on very long focal length telescopes, such as Maksutovs and Schmidt–Cassegrains, to obtain a wider field of view, or to reduce the focal ratio of the setup thereby increasing the speed of the system.[32]
When the camera lens is not removed (or cannot be removed) a common method used is afocal photography, also called afocal projection. In this method, both the camera lens and the telescope eyepiece are attached. When both are focused at infinity the light path between them is parallel (afocal), allowing the camera to basically photograph anything the observer can see. This method works well for capturing images of the moon and brighter planets, as well as narrow field images of stars and nebulae. Afocal photography was common with early 20th-century consumer-level cameras since many models had non-removable lenses. It has grown in popularity with the introduction of point and shoot digital cameras since most models also have non-removable lenses.
Bandpasses of the popular Optolong l-extreme narrowband filter, allowing only narrow bandpasses around hydrogen-alpha (656nm) and oxygen-III (500nm) to pass through while blocking most light pollutionFilters can be categorised into two classes; broadband and narrowband. Broadband filters allow a wide range of wavelengths to pass through, removing small amounts of light pollution. Narrowband filters only allow light from very specific wavelengths to pass through, blocking out the vast majority of the spectrum.
Astronomical filters usually come as sets and are manufactured to specific standards, in order to allow different observatories to make observations at the same standard. A common filter standard in the astronomy community is the Johnson Morgan UVB, designed to match a CCD’s color response to that of photographic film. However there are over 200 standards available.[33]
Fast Internet access in the last part of the 20th century, and advances in computer-controlled telescope mounts and CCD cameras, allows use of 'Remote Telescopes' for amateur astronomers not aligned with major telescope facilities to partake in research and deep-sky imaging. This enables the imager to control a telescope far away in a dark location. The observers can image through the telescopes using CCD cameras.
Imaging can be done regardless of the location of the user or the telescopes they wish to use. The digital data collected by the telescope is then transmitted and displayed to the user by means of the Internet. An example of a digital remote telescope operation for public use via the Internet is The Bareket Observatory.
The Moon photographed using the Afocal technique, using 10 seconds of video stacked to create a final image.
A composite of several Digital-SLR photos compiled in Photoshop taken via eyepiece projection from an 8-inch Schmidt Cassegrain telescope.
Saturn image using negative projection (Barlow lens) with a webcam attached to a 250mm Newtonian telescope. It is a Composite image made from 10% of the best exposures out of 1200 images.
Jupiter photographed using the Afocal technique, using 10 seconds of video stacked to create a final image.
^Common, Andrew Ainslie & Taylor, Albert (1890). "Eclipse Photography". American Journal of Photography: 203–209.
^Schielicke, Reinhard E.; Wittmann, Axel D. (2005). "On the Berkowski daguerreotype (Königsberg, 1851 July 28): the first correctly-exposed photograph of the solar corona". In Wittmann, A. D.; Wolfschmidt, G.; Duerbeck, H. W. (eds.). Development of Solar Research / Entwicklung der Sonnenforschung. Deutsch. pp. 128–147. ISBN3-8171-1755-8.
^"The Great Refractor". Harvard College Observatory. Retrieved 18 May 2021. In 1850 [...] the first daguerreotype ever made of a star, the bright Vega, was taken by J.A. Whipple working under W.C. Bond
Astrophotography is the photography of astronomical objects and areas of the night sky, including stars, planets, nebulae, and celestial events, often requiring long exposure times to capture faint light from distant cosmic phenomena.[1]The practice originated in the early 19th century with the advent of photography, when pioneers like John William Draper captured the first clear image of the Moon using a daguerreotype process on March 26, 1840, marking a pivotal shift from visual observation to recorded astronomical imaging.[2] Subsequent milestones included the first photograph of a star, Vega, taken in 1850 at Harvard College Observatory by William Cranch Bond and his son George Phillips Bond, and the first image of the solar corona during the total eclipse of July 28, 1851, by Johann Julius Friedrich Berkowski.[3][4] By the late 19th century, advancements like dry plate photography enabled extensive sky surveys, such as the Harvard Plate Stacks collection, which spans over 500,000 glass plates from 1885 to 1992 and contributed to discoveries including variable stars and supernovae.[5]In the modern era, astrophotography has transitioned from film-based methods to digital technologies, beginning with the introduction of charge-coupled device (CCD) cameras in the 1970s and accelerating in the 1990s, which allowed for higher sensitivity and reduced noise compared to traditional emulsions.[6] Key techniques include long-exposure imaging to accumulate light from faint objects, equatorial mounts for tracking Earth's rotation, and post-processing software to enhance details and reduce artifacts.[7] Essential equipment comprises DSLR or dedicated astronomy cameras, wide-aperture lenses or telescopes for light gathering, sturdy tripods or motorized mounts, and filters to isolate specific wavelengths.[8] Today, astrophotography not only supports scientific research—such as monitoring exoplanets and asteroids—but also engages amateur enthusiasts worldwide, democratized by accessible tools like smartphone attachments and automated software.[9]
Historical Development
Early Innovations
The invention of the daguerreotype process in 1839 by Louis Daguerre quickly found application in astronomy, with American chemist and physician John William Draper adapting it for celestial imaging just a year later.[10] In March 1840, Draper captured one of the earliest successful photographs of the Moon using a small telescope attached to a daguerreotype camera from his rooftop observatory in New York City, revealing surface features like craters in a 20-minute exposure.[11] This image, preserved as a positive on a silvered copper plate, marked a pivotal shift from visual observation to permanent recording of astronomical phenomena, though its low sensitivity limited it to bright objects like the Moon.[12]In the 1850s, British astronomer Warren de la Rue advanced solar astrophotography by developing the photoheliograph, a specialized instrument combining a telescope with a photographic apparatus to produce daily images of the Sun's surface.[13] De la Rue's device, first used at Kew Observatory in 1857, enabled high-resolution captures of sunspots and faculae, with exposures as short as 1/100th of a second, far surpassing earlier methods.[14] He also applied this technology to eclipse photography, documenting the solar corona and prominences during the total eclipse of 1860 from Spain, providing evidence that these features were solar in origin rather than atmospheric.[15]The introduction of the wet-plate collodion process around 1851 by Frederick Scott Archer improved resolution and sensitivity for stellar imaging, allowing astronomers to record fainter objects on glass plates coated with a light-sensitive emulsion just before exposure.[16] American astronomer William Cranch Bond and his son George Phillips Bond utilized this technique at Harvard College Observatory, producing some of the first detailed photographs of stars; notable among these was the 1850 daguerreotype trail image of Vega, the first photograph of a star other than the Sun, followed by resolved images of the double star Mizar and Alcor in 1857, which demonstrated the process's ability to resolve fine details over exposures of several minutes.[17][18] These images, while not true star trails, captured stellar positions and motions, laying groundwork for later trail photography by highlighting the method's potential for tracking celestial paths.A landmark event in early astrophotography occurred during the 1874 transit of Venus, when international expeditions coordinated efforts to photograph the planet's silhouette against the Sun for measuring the Earth-Sun distance.[19] Teams from the United States, Britain, France, and other nations established observatories in remote locations like Hawaii and Japan, using wet collodion plates to capture the event on December 8-9, with over 100 photographs produced worldwide that contributed to refined parallax calculations.[20] This collaboration exemplified photography's role in global science, though challenges like the "black drop" effect—caused by atmospheric distortion—complicated precise timing measurements.[21]Early photographic plates imposed significant limitations on astrophotography, requiring exposures of up to several hours for faint stars due to the low quantum efficiency of silver halide emulsions, which captured only about 1-2% of incident photons.[22] The wet collodion process demanded immediate on-site chemical development in a darkroom with volatile solutions like silver nitrate, often under precarious field conditions, leading to frequent failures from contamination or uneven coating.[23] These constraints restricted imaging to bright, high-contrast subjects and prompted the gradual shift toward more stable dry plates by the late 1870s.[24]
20th-Century Advances
The introduction of dry gelatin plates in the late 1880s revolutionized astrophotography by replacing cumbersome wet collodion processes with stable, light-sensitive emulsions that allowed exposures to drop from hours to minutes, enabling systematic sky surveys at major observatories.[25] At Harvard College Observatory, this innovation facilitated the construction of dedicated astrographs, such as the 8-inch and 13-inch photographic telescopes installed in the 1890s, which captured over 500,000 plates from 1885 to 1992 for stellar analysis.[5] These plates revealed atmospheric distortions like star trailing, underscoring the need for improved mounting and guiding techniques.[5]Astronomers like Annie Jump Cannon leveraged these plates for groundbreaking spectral classification during the 1890s to 1920s, examining thousands of spectra dispersed onto glass negatives to develop the OBAFGKM system in the Henry Draper Catalogue, which classified over 225,000 stars by temperature and composition.[26] A pivotal milestone came in 1919, when Arthur Eddington's expedition to the solar eclipse off the West African coast used photographic plates to measure starlight deflection by the Sun's gravity, confirming Einstein's general relativity theory with deflections matching predictions to within 20%.[27]The 1930s saw the development of Schmidt cameras by Bernhard Schmidt, featuring aspheric corrector plates that provided sharp, distortion-free images over wide fields, ideal for large-scale surveys.[28] This design powered the Palomar Observatory Sky Survey starting in 1949, using the 48-inch Samuel Oschin telescope to map the northern sky down to magnitude 21 across 1,800 plates, cataloging millions of objects.[29] Color astrophotography emerged in the same era through tricolor processes, where separate red, green, and blue filtered exposures were combined into full-color composites; by the 1940s, observatories like Lick experimented with these for brighter objects.[30] The 1950s brought the first true-color images of nebulae, such as William C. Miller's 1959 photograph of the Orion Nebula using the 200-inch Hale telescope with panchromatic emulsions and filters.[29]World War II advancements in optical manufacturing, including multi-layer anti-reflective coatings and precision lens blocking techniques, translated postwar into accessible amateur equipment, exemplified by the Questar Corporation's 3.5-inch Maksutov-Cassegrain telescope introduced in 1954, which offered high-quality imaging in a portable design for backyard astrophotographers.[31]
Digital Revolution
The digital revolution in astrophotography began with the development of charge-coupled devices (CCDs) in the late 1970s, pioneered by James Janesick at NASA's Jet Propulsion Laboratory (JPL), which enabled electronic imaging superior to traditional film by overcoming limitations such as reciprocity failure and lengthy chemical processing.[32][33] CCDs were first applied to astronomical observations in the mid-1970s for planetary imaging, but their widespread adoption in professional observatories occurred during the 1980s, with systems like the Kitt Peak CCD Camera facilitating direct imagery at multiple telescopes.[34][35]Amateur astrophotographers embraced digital tools in the 1990s through modified consumer webcams, particularly for high-frame-rate planetary imaging, which allowed affordable capture of short exposures to mitigate atmospheric distortion.[36] By the 2000s, dedicated complementary metal-oxide-semiconductor (CMOS) sensors supplanted early CCDs for many applications due to lower costs, faster readout speeds, and improved quantum efficiency, enabling broader accessibility for both amateurs and professionals.[37][4]Professional advancements underscored the era's progress, exemplified by the Hubble Space Telescope's Wide Field Camera 3 (WFC3), installed in 2009, which combined UV, visible, and near-infrared capabilities for unprecedented deep-space imaging. Similarly, the James Webb Space Telescope's Near-Infrared Camera (NIRCam), operational since 2022, revolutionized infrared astrophotography by capturing detailed views of distant galaxies and star-forming regions with enhanced sensitivity to wavelengths beyond 2.5 microns.The 2020s marked the democratization of astrophotography via smartphones, with dedicated apps like DeepSkyCamera enabling long-exposure captures and basic processing directly on mobile devices.[38] AI integration further simplified workflows, as seen in features from Samsung and Google Pixel cameras that automate image alignment and noise reduction for low-light scenes.[39] Innovations extended to aerial platforms, where drone integrations allowed elevated perspectives for wide-field night-sky compositions, minimizing ground-based obstructions.[40]Supporting this evolution, the Flexible Image Transport System (FITS) format, standardized in 1981, became foundational for open-source data handling, allowing seamless exchange and analysis of raw astronomical images across software tools.[41][42]By 2025, emerging trends include quantum dot sensors, which enhance low-light sensitivity through tunable bandgap properties, promising sharper captures of faint celestial objects without cryogenic cooling.[43] Edge AI advancements enable real-time onboard processing in cameras, reducing latency for live previews and automated optimizations during extended exposures.[44][45]
Fundamental Principles
Light Capture Basics
In astrophotography, the fundamental process of light capture begins with the collection of photons from celestial sources, which follows the basic principle that the detected signal S is proportional to the incident photonfluxF, the exposure time t, the collecting aperture area A, and the quantum efficiency QE of the sensor, expressed as S=F⋅t⋅A⋅QE.[46] This relationship underscores that longer exposures or larger apertures are essential for gathering sufficient photons from faint objects, as the flux from stars and nebulae diminishes rapidly with distance and intrinsic luminosity. Quantum efficiency, typically ranging from 50% to 90% in modern astronomical sensors, represents the fraction of incident photons converted to detectable electrons, directly impacting the sensitivity of the imaging system.[47]Celestial brightness is quantified using the apparent magnitude system, where a difference of one magnitude corresponds to a factor of approximately 2.512 in flux; thus, exposure times scale nonlinearly with fainter objects. For instance, imaging a star of apparent magnitude 5—the limit of naked-eye visibility—requires about 30 seconds with an f/4 lens under dark skies to achieve adequate signal on a typical DSLR sensor at ISO 1600.[48] This example illustrates how brighter sources (lower magnitudes) demand shorter exposures to avoid saturation, while fainter targets necessitate extended times to build signal without excessive noise.Digital sensors like CCDs and CMOS exhibit highly linear responses without reciprocity failure, unlike film. The signal-to-noise ratio (SNR) governs image quality, approximated by SNR=S+(rn)2+(dc⋅t)S, where rn is read noise and dc is dark current rate; long exposures enhance SNR for faint objects by increasing S faster than noise sources like Poisson photon statistics and thermal dark current.[49]Resolution in light capture is constrained by the diffraction limit, defined by the Airy disk with radius r≈1.22λ/D, where λ is the wavelength and D the aperturediameter, setting the theoretical minimum spot size for point sources like stars.[50] In practice, atmospheric seeing—turbulence-induced image motion—further degrades resolution to 1–2 arcseconds under typical conditions, often dominating over diffraction for apertures smaller than 20 cm and emphasizing the need for stable photon collection over fine detail.[51]
Optical and Atmospheric Considerations
In astrophotography, optical aberrations arise from imperfections in telescope designs, degrading image sharpness and introducing distortions that must be minimized for high-quality captures. Chromatic dispersion, or chromatic aberration, occurs when different wavelengths of light focus at varying points along the optical axis due to the refractive index varying with wavelength in lens materials, resulting in color fringing around bright objects like stars. This is commonly corrected using achromatic doublets, which combine a convex crown glass lens with a concave flint glass lens to bring two wavelengths (typically red and blue) to the same focal point, significantly reducing longitudinal chromatic aberration while also mitigating some spherical aberration.[52][53]Reflector telescopes, which avoid chromatic issues by using mirrors, are prone to coma, an off-axis aberration that stretches star images into comet-like shapes, particularly in Newtonian designs with parabolic primaries. This effect worsens with wider fields of view, limiting suitability for astrophotography. Ritchey-Chrétien telescopes address this by employing hyperbolic primary and secondary mirrors, which eliminate both spherical aberration and coma across a broader field, providing a flatter focal plane ideal for imaging extended celestial objects.[54][55]Earth's atmosphere introduces additional challenges through turbulence, known as atmospheric seeing, which causes random refractive index variations that blur stellar images by distorting incoming wavefronts. This turbulence, driven by wind shear and temperature gradients, spreads point sources into seeing disks typically 1-2 arcseconds in diameter under average conditions. The severity is quantified by the Fried parameterr0, the coherence length of the atmosphere, where r0 values of 10-20 cm at 500 nm wavelength indicate good sites with seeing around 1 arcsecond full width at half maximum (FWHM). At exceptional locations, r0 can exceed 30 cm, yielding sub-arcsecond resolution. To counteract seeing in real-time, adaptive optics systems employ wavefront sensors to measure distortions and deformable mirrors—thin, flexible surfaces with hundreds of actuators—that adjust shape at kilohertz rates to restore a flat wavefront, enabling diffraction-limited imaging even under moderate turbulence.[56][57]Light pollution from artificial sources elevates sky background brightness, reducing contrast for faint deep-sky objects and necessitating longer exposures or specialized techniques. The Bortle scale, a nine-level classification from 1 (pristine dark skies) to 9 (inner-city glow), assesses this by visual cues like Milky Way visibility and zodiacal light detectability; for instance, Bortle class 1 sites exhibit zenith surface brightness around 22 magnitudes per square arcsecond in V-band, while class 9 is around 18 or lower, overwhelming subtle nebulae.[58] In urban zones (Bortle 8-9), sky backgrounds can be 100-1000 times brighter than rural areas, often requiring narrowband imaging to isolate emission lines and suppress continuum glow.[59]For long-exposure astrophotography on equatorial mounts, precise polar alignment is essential to track the sky's apparent motion; misalignment introduces periodic errors and field rotation, where the image plane rotates around the optical axis, causing trailed stars and elongated features. Accurate alignment within 1-2 arcminutes minimizes this to under 1° over several hours, preserving sharp details.Optimal site selection mitigates these atmospheric and optical challenges by prioritizing locations with minimal turbulence and pollution. Higher altitudes reduce the air column overhead, decreasing integrated turbulence and improving seeing, while low humidity limits water vapor-induced scintillation. Jet stream winds at 10-12 km altitude can inject turbulent air layers, worsening seeing by 0.5-1 arcsecond; sites below these flows, like mountain summits, benefit from laminar conditions. Mauna Kea, at 4,200 m elevation on Hawaii's Big Island, exemplifies this with median seeing of 0.4 arcseconds under optimal conditions, owing to its isolation above trade winds, dry air (median relative humidity ~25%), and position shielding from jet stream effects.[60][61][62]
Techniques and Methods
Deep-Sky Object Imaging
Deep-sky object imaging focuses on capturing the subtle light from distant galaxies, nebulae, and star clusters, which are often too faint for short exposures. These techniques rely on extended integration times to gather photons from low-surface-brightness targets, often spanning multiple nights to overcome sky glow and atmospheric interference. Success depends on precise tracking and data collection strategies to reveal structural details like spiral arms or gaseous filaments.In deep-sky imaging, the choice of telescope aperture and focal length imposes practical limitations. Small-aperture instruments, for example a 4-inch (102 mm) telescope with a long focal length, collect fewer photons, rendering faint galaxies and nebulae dimmer and appearing smaller within the narrow field of view, thus requiring significantly longer total exposures to achieve adequate signal-to-noise ratios.[63] Furthermore, alt-azimuth mounts introduce field rotation during tracking, which causes stars to trail in arcs over time; this necessitates limiting individual sub-exposures to around 30 seconds or employing live stacking methods to correct for rotation during acquisition.[64]Target selection for deep-sky imaging draws from established catalogs such as the Messier catalog, which lists 110 prominent objects, and the New General Catalogue (NGC), containing over 7,000 entries of galaxies, nebulae, and clusters suitable for imaging.[65][66] For particularly faint subjects like the Horsehead Nebula (Barnard 33), total exposure times of 5-20 hours are typical to extract meaningful signal from the dark silhouette against its emission background.[67][68]Autoguiding systems are crucial for maintaining alignment during these prolonged sessions, employing off-axis guiders integrated into the imaging train or separate guide telescopes to monitor a guide star and correct for sidereal motion. These setups achieve tracking precision by issuing periodic adjustments to the mount, reducing periodic error and drift to under 1 arcsecond per hour, ensuring sharp stars across the field.[69]Narrowband imaging enhances contrast for emission nebulae by targeting specific spectral lines, such as H-alpha at 656 nm for hydrogen emissions and OIII at 500 nm for doubly ionized oxygen, using interference filters with bandwidths of 10-20 nm to block broadband light pollution while passing the desired wavelengths.[70]Dithering patterns introduce small, random offsets—typically a few pixels—between successive exposures, distributing fixed-pattern noise from sensor imperfections and averaging out flat-field inconsistencies, while also facilitating the rejection of cosmic ray artifacts during post-processing stacking.[71]A representative example is the Andromeda Galaxy (M31), where total exposures exceeding 10 hours are often necessary to delineate its extended spiral arms and resolve faint dust lanes beyond the bright core.[72] Stacking these frames briefly improves the signal-to-noise ratio, emphasizing subtle features over random noise.[73]
Planetary and Lunar Photography
Planetary and lunar photography focuses on capturing high-resolution details of bright, compact solar system targets using short-exposure techniques to minimize distortions from Earth's atmosphere. These methods prioritize rapid image acquisition to resolve fine features like craters, atmospheric bands, and surface textures, contrasting with the long integrations used for faint deep-sky objects. Atmospheric seeing, caused by turbulent air layers, blurs images but can be mitigated through high frame-rate capture and frame selection.[51]A key technique in this field is lucky imaging, which involves recording video sequences at frame rates of 50-100 frames per second and selecting the sharpest frames—typically 10% of the total—for stacking into a final image. This approach counters seeing effects by exploiting brief moments of atmospheric stability, achieving Strehl ratios greater than 0.3, which enables diffraction-limited resolution and reveals planetary details otherwise lost to blur. The method, pioneered in the early 2000s, relies on fast-readout cameras to freeze momentary clear air paths.[74][75]For extended observations of rotating bodies like the Moon or planets, derotation techniques compensate for field rotation and target motion during capture sessions. Software such as AutoStakkert! aligns and stacks frames while accounting for these shifts, allowing integration of sequences spanning several minutes without smearing. Complementary tools like WinJUPOS perform precise derotation by modeling planetary rotation rates, enabling the creation of composite images that preserve orientation and detail across the observation period.[76]Solar imaging requires specialized safety measures, including neutral density filters with an optical density of 5 (ND5) to reduce sunlight intensity by a factor of 100,000, preventing eye damage and sensor overload during white-light observations of sunspots and surface features. For chromospheric details like prominences and filaments, hydrogen-alpha (H-alpha) telescopes equipped with narrowband filters centered at 656.3 nm isolate the emission line of hydrogen, revealing dynamic plasma structures extending from the solar limb. These setups demand precise tuning to maintain filter bandwidths of 0.5-0.7 Å for high-contrast imaging.[77][78]Typical exposures for planetary targets balance signal capture with motion control; for Jupiter, integrations of 100-500 milliseconds per frame suffice to delineate atmospheric bands and transient features such as the Great Red Spot, a persistent anticyclonic storm spanning about 16,000 km in width. Higher frame rates ensure sufficient data volume for post-processing, with total video lengths often reaching 60-120 seconds to build signal-to-noise without rotation-induced blur. Lunar imaging follows similar short-exposure protocols but benefits from the Moon's slower apparent motion relative to planets.[79]Early digital advancements in this domain emerged in the 1990s with the adaptation of consumer webcams, which offered 60-90 frames per second and low-cost video capture for stacking planetary images, marking a shift from film-based methods to accessible electronic imaging. By the late 1990s, these devices produced the first high-resolution webcam mosaics of Jupiter and Saturn, democratizing detailed planetary observation.[36]
Wide-Field and Landscape Astrophotography
Wide-field astrophotography captures expansive views of the night sky, often incorporating terrestrial landscapes to create immersive scenes that highlight the grandeur of celestial phenomena against earthly backdrops. This approach differs from targeted deep-sky imaging by emphasizing broad vistas, such as the Milky Way arching over mountains or deserts, using wide-angle optics to encompass fields of view up to 180 degrees. Landscape integration requires careful planning to balance the faint glow of stars with brighter foreground elements, typically achieved through multi-exposure techniques.Fisheye and ultra-wide lenses with focal lengths of 14-24mm are essential for achieving these panoramic perspectives, enabling photographers to frame the entire celestial dome in a single shot. These lenses produce characteristic barrel distortion at the edges, which can be corrected in post-processing, but their fast apertures (often f/2.8 or wider) gather sufficient light for low-light conditions. Without tracking, exposures are limited to under 15 seconds to prevent star trailing, as Earth's rotation causes stars to streak across the frame at rates of about 15 arcseconds per second.To extend exposure times and reduce noise, portable star trackers like the Sky-Watcher Star Adventurer are widely used, compensating for Earth's rotation to allow sub-exposures of 5-10 minutes on f/2.8 lenses. These compact, battery-powered devices mount between the camera and tripod, enabling sharper images of faint structures like nebulae or star fields without the bulk of full equatorial mounts. Stacking multiple such subs further enhances detail, making wide-field setups accessible for mobile astrophotographers in remote locations.Aurora photography within this genre relies on forecasting tools that monitor the Kp index—a global measure of geomagnetic activity ranging from 0 to 9—to predict visibility, with apps like Aurora Forecast providing real-time alerts based on satellite data. Optimal settings include ISO values of 3200-6400 to capture the aurora's dynamic range while preserving detail in the rapidly changing lights, often paired with shutter speeds of 5-15 seconds to freeze motion without overexposure.Compositing foreground elements involves HDR merging of separate exposures: one for the dim sky (e.g., 30 seconds at ISO 3200) and another for the brighter landscape (e.g., 10 seconds at ISO 100), blended using software like Lightroom or Photoshop to achieve tonal balance without haloing artifacts. This technique ensures the Milky Way's subtle colors pop against silhouetted horizons, a staple in landscape astrophotography.Iconic examples include images of the Milky Way core rising over dark-sky sites classified as Bortle 1-3 on the light pollution scale, where zenithal surface brightness exceeds 21.6 magnitudes per square arcsecond, allowing visibility of the galactic plane's intricate dust lanes. Meteor shower composites, such as those of the Perseids peaking in August with up to 100 meteors per hour, stack dozens of 30-second exposures to trace radiant streaks across wide fields, often over foregrounds like Joshua Tree National Park. Light pollution avoidance is crucial, with urban areas (Bortle 8-9) rendering such scenes nearly impossible due to skyglow.
Equipment and Hardware
Telescopes and Optics
Telescopes serve as the primary optical instruments in astrophotography, gathering and focusing faint celestial light to form images on sensors. Refracting telescopes, or refractors, use lenses to achieve this, offering advantages in contrast and color fidelity, while reflecting telescopes, or reflectors, employ mirrors for larger apertures at lower costs. The choice between refractors and reflectors depends on the target's brightness, field of view, and the photographer's need for portability versus light-gathering power. Smaller apertures, such as 4 inches, particularly when paired with long focal lengths exceeding 1000 mm, limit the effectiveness for deep-sky imaging by making faint galaxies and nebulae appear dim and tiny due to reduced photon collection and a narrow field of view.[80]Apochromatic refractors, featuring extra-low dispersion (ED) glass elements, provide superior color correction by minimizing chromatic aberration, where different wavelengths focus at slightly different points, resulting in sharper, truer-color images of stars and nebulae. In contrast, reflectors like Newtonian designs avoid chromatic issues entirely since mirrors reflect all wavelengths equally, making them ideal for broadband deep-sky imaging. Dobsonians, a subtype of Newtonian reflectors, pair large apertures—often 8 to 20 inches—for enhanced light collection with simple alt-azimuth mounts, enabling affordable access to dim objects despite the mount's limitations for long exposures.[81][82]Focal length determines the magnification and field of view, while the f-ratio (focal length divided by aperture diameter) balances image scale, exposure speed, and resolution; an f/5 ratio is often favored for its compromise between fast light gathering for shorter exposures and sufficient resolution for detail. The plate scale, which quantifies angular size on the image plane, is calculated as p=f206 arcseconds per millimeter, where f is the focal length in millimeters, helping photographers match optics to sensor pixel sizes for optimal sampling. Long focal lengths, such as those exceeding 1000 mm, demand stable atmospheric conditions to avoid blurring from seeing effects.[83][84]For Newtonian reflectors, regular collimation is essential to align the optical axis, particularly adjusting the secondary mirror's tilt using laser collimators, which project a beam to center it on the primary mirror's reflection; this process involves loosening and tightening adjustment screws while observing the beam's return path through a focuser eyepiece. Binocular setups, typically with 7x to 10x magnification and objective diameters of 50mm or larger, excel in wide-field astrophotography by capturing expansive sky scenes like the Milky Way without the complexity of single-aperture alignment. Catadioptric designs, such as Maksutov-Cassegrains, combine lenses and mirrors in compact tubes for high-magnification planetary work, delivering sharp, high-contrast images of Jupiter's bands or Saturn's rings in a portable package.[85][86][87]Budget plays a key role in selection, with entry-level 80mm refractors available for around $300, suitable for beginners targeting brighter objects, while professional-grade 16-inch Ritchey-Chrétien telescopes, prized for their coma-free fields in advanced imaging, start at approximately $8,000.[88][89]
Cameras, Sensors, and Mounts
In astrophotography, the choice of sensors significantly impacts image quality, particularly in low-light conditions where noise and sensitivity are critical. Complementary metal-oxide-semiconductor (CMOS) sensors, such as those based on Sony's IMX series (e.g., IMX571), have become dominant due to their low read noise levels, often below 2 electrons (e⁻), which minimizes electronic noise during readout and enables shorter exposures without sacrificing signal-to-noise ratio.[90][91] Full-frame CMOS sensors offer high dynamic range and flexible gain settings, allowing astrophotographers to adjust sensitivity on the fly for various targets. In contrast, charge-coupled device (CCD) sensors, when cooled, excel in reducing dark current to levels below 0.01 e⁻ per pixel per second, preventing thermal noise accumulation in long exposures essential for faint deep-sky objects.[92] Cooled CCDs remain relevant for applications requiring uniform charge transfer, though their slower readout speeds limit use in high-frame-rate scenarios like planetary imaging.Back-illuminated (BSI) sensors enhance light capture by relocating wiring behind the photodiode layer, achieving quantum efficiencies (QE) exceeding 90% at 500 nm, which boosts photon collection in the visible spectrum.[90] Modern cameras like the ZWO ASI series incorporate BSI CMOS sensors, such as the IMX571 in the ASI2600, delivering peak QE around 91% and zero amp-glow for cleaner images. The 2025 upgraded models feature lower readout noise (1.0e) and higher frame rates.[90][93] These advancements make BSI sensors ideal for color imaging, where high QE across red, green, and blue channels preserves natural hues without excessive post-processing.For stable tracking, equatorial mounts are preferred over alt-azimuth designs in astrophotography, especially for deep-sky imaging requiring long exposures. German equatorial mounts align one axis parallel to Earth's rotational axis, enabling sidereal tracking with minimal corrections; high-end models feature periodic error correction to reduce worm gear inaccuracies to under 5 arcseconds peak-to-peak (PE).[94] GoTo systems integrated into these mounts use GPS for initial alignment, automatically calculating coordinates based on location, time, and date to slew to targets precisely.[95] Alt-az mounts offer simpler setup and portability but introduce field rotation during long exposures, distorting star trails at the frame edges and limiting deep-sky work to short sub-exposures or live stacking methods; this can be mitigated via software derotators in post-acquisition processing.[96]Entry-level setups often begin with modified digital single-lens reflex (DSLR) cameras, where the internal infrared (IR) blocking filter is removed to extend sensitivity into the hydrogen-alpha emission line at 656 nm, costing around $500 including a used body and modification service.[97] Dedicated astrophotography cameras, however, provide optimized performance; for instance, the ZWO ASI2600 series, with its cooled BSI sensor and low-noise electronics—as of 2025, the ASI2600MC Pro (color) starts at $1,499 and the ASI2600MM Pro (monochrome) at $1,999—supports professional-grade deep-sky imaging.[90][93] These systems ensure compatibility with optical setups by matching sensor formats to focal lengths, balancing resolution and field of view.Raspberry Pi single-board computers enable affordable, compact astrophotography setups suitable for automation, guiding, and all-sky imaging. Essential components include a Raspberry Pi 4 or 5 board with 8 GB RAM for efficient processing of image stacks, paired with the Raspberry Pi High Quality Camera featuring the Sony IMX477 12.3 MP sensor for enhanced low-light sensitivity. This camera uses CS-mount lenses—telephoto variants for planetary targets or wide-angle/fisheye for all-sky coverage—and supports 1.25-inch telescope eyepiece adapters for prime focus imaging or fisheye domes for wide-field applications. Tracking requires a sturdy tripod for short exposures or an equatorial mount such as the Sky-Watcher Star Adventurer for longer sessions to counteract Earth's rotation. Portable battery packs power field operations, while accessories like weatherproof enclosures, cooling fans, heatsinks, and optional USB DSLR connections improve reliability and expand capabilities.[98][99]
Accessories and Filters
For safe solar astrophotography, a DSLR or mirrorless camera with live view is recommended, paired with a long telephoto lens of minimum 300-400 mm focal length (ideal 600 mm or more, or extended with a teleconverter), mounted on a sturdy tripod. A solar filter must fit the lens front to attenuate harmful light, and a remote shutter or timer avoids vibrations during capture.[100]In astrophotography, accessories and filters play a crucial role in optimizing image quality by mitigating environmental challenges, enhancing light selectivity, and improving tracking precision. These tools are particularly valuable for observers in light-polluted areas or under varying atmospheric conditions, allowing for clearer captures of celestial objects without altering the core optical setup.[101]Light pollution filters are essential for urban astrophotographers, as they suppress artificial light interference while preserving emissions from nebulae and stars. Broadband filters like the City Light Suppression (CLS) type block common urban pollutants such as sodium and mercury vapor emissions in the orange-to-green spectrum, enabling better contrast for wide-field imaging. In contrast, Ultra High Contrast (UHC) or dual-band filters are more selective, targeting specific nebular lines like hydrogen-alpha and doubly ionized oxygen, which makes them ideal for deep-sky objects in severely polluted skies by further reducing background glow.[101][102]Infrared (IR) and ultraviolet (UV) cut filters address spectral issues inherent to digital sensors, preventing unwanted haze and color fringing that can degrade image sharpness. These filters block IR light above 700 nm and UV below 390 nm, ensuring that only visible wavelengths reach the sensor, which is vital for accurate color reproduction in broadband imaging with one-shot color cameras. Without them, IR rays can cause focus shifts and star bloating, compromising detail in planetary or lunar shots.[103][104]Focal reducers serve as optical accessories that expand the field of view and accelerate imaging workflows by shortening the effective focal length of the telescope. A typical 0.75x reducer, for instance, reduces the focal length proportionally while lowering the f-ratio, resulting in brighter images and the ability to capture larger sky areas with shorter exposure times due to increased light-gathering efficiency. This is particularly beneficial for framing extended objects like galaxies or clusters, as it widens the observable patch without sacrificing resolution.[105][106]Dew heaters and controllers prevent condensation on optics during humid nights, a common issue that can obscure views and ruin exposures. These systems use flexible resistive bands wrapped around lenses or correctors, powered by low-voltage DC, to maintain surface temperatures slightly above the ambient dew point, typically avoiding fogging without overheating the setup. Advanced controllers monitor environmental humidity and temperature to regulate power output, ensuring efficient energy use for extended sessions.[107][108]Guide scopes facilitate precise autoguiding by providing a dedicated optical path for tracking stars, compensating for mount imperfections during long exposures. A compact 50 mm f/4 model, with its short 200 mm focal length, offers a wide field of view—around 5.7 degrees—for easy star acquisition and is often paired with main telescopes up to 1:10 focal ratio difference to ensure stable corrections without introducing flexure. This setup is standard for deep-sky astrophotography, where sub-arcsecond guiding accuracy is needed to minimize trailing.[109][110]
Image Processing and Analysis
Data Acquisition and Calibration
Data acquisition in astrophotography involves capturing raw light frames of celestial objects under controlled conditions to minimize noise and artifacts, often using specialized cameras attached to telescopes or mounts. Basic exposure settings, such as duration and ISO/gain, are adjusted to balance signal-to-noise ratio while avoiding saturation from bright stars or the sky background.[111]To ensure accurate raw data, calibrationframes are essential for correcting systematic errors in the imaging system. Biasframes capture the read noise inherent in the camera's electronics by taking very short exposures (typically the minimum possible, around 0.001 seconds) with the shutter closed and no light reaching the sensor; they are used to subtract this fixed pattern noise from other frames.[112] Dark frames account for thermal electrons generated in the sensor during exposure, matching the light frames' duration, temperature, gain, and binning settings, with the shutter closed to exclude light; these correct for dark current, which increases exponentially with temperature.[112]Flat frames correct for vignetting, dust motes, and optical imperfections by imaging a uniformly illuminated source, such as a twilight sky, electroluminescent panel, or dome flat; they should be taken immediately after lightframes to match the optical train's configuration.[113]The calibration process applies these frames pixel-wise to produce corrected science images, following the formula:Calibrated=(flat−bias)(light−bias)−(dark−bias)This subtracts bias and the bias-subtracted dark from the light frame, then divides by the bias-subtracted flat to equalize sensitivity across the field.[114]Gain settings on the camera influence the trade-off between dynamic range and sensitivity. Unity gain, where approximately 1 electron per ADU (analog-to-digital unit) is recorded, preserves high dynamic range for capturing both faint nebulae and bright stars without clipping.[115] In contrast, high gain settings (e.g., 0.1–0.5 e-/ADU) amplify low-light signals for photon-counting regimes, reducing read noise impact but potentially compressing the well depth for brighter sources.[115]Metadata logging is crucial for traceability and processing; in the FITS (Flexible Image Transport System) format, standard for astronomical images, headers record EXIF-like details including sensor temperature, gain value, exposure timestamps, and filter used.[111] These keywords, such as GAIN, TEMPERAT, and DATE-OBS, enable precise calibration and analysis.[116]Best practices include acquiring 20–50 flat frames per imaging session to average out noise and ensure robust correction, taken at the same gain and focus as lights.[117] Temperature-stabilized cooling to around -10°C minimizes dark current to levels below 0.1 e-/pixel/second, reducing thermal noise in long exposures; gradual cooling prevents sensor stress.[111]
Stacking and Noise Reduction
Stacking in astrophotography involves combining multiple short exposures, known as subframes, of the same celestial target to enhance the signal-to-noise ratio (SNR) and mitigate various noise sources. By aligning and averaging these subframes, the signal from the astronomical object accumulates linearly while random noise decreases proportionally to the square root of the number of frames, N, yielding an SNR improvement of N. This technique is essential for capturing faint deep-sky objects, where individual exposures are limited by factors such as atmospheric conditions or detector saturation. Calibration frames, such as darks and flats, are typically applied prior to stacking to correct for instrumental artifacts in each subframe.[118]Key noise sources in astrophotographic images include Poisson-distributed shot noise from the target signal itself, which scales as signal; Gaussian read noise inherent to the detector readout process; and Poisson dark noise arising from thermal electrons generated at a rate proportional to the dark current and exposure time. The total noise variance for a pixel can be expressed as variance=signal+(DC×t)+RN2, where DC is the dark current rate, t is the exposure time, and RN is the read noise standard deviation. These noise components are uncorrelated and add in quadrature, making stacking particularly effective for suppressing the random elements while preserving the coherent signal.[119][120]To handle outliers like cosmic ray hits, which appear as high-intensity spikes in individual subframes, sigma-clipping or median-based stacking methods are employed. In sigma-clipping, pixels deviating more than a threshold (typically 2–3σ) from the median value are iteratively rejected before averaging the remaining data, effectively removing cosmic rays and other transient artifacts. Median stacking computes the median pixel value across all aligned subframes, inherently rejecting extreme outliers without requiring iterative clipping, though it is less efficient for very large N. These rejection techniques maintain the SNR gain of N for the primary signal while improving overall image quality.[121]Weighted stacking further refines the process by assigning weights to each subframe based on its quality, prioritizing those with lower noise variance. A common weighting scheme uses w=1/(variance+background), where variance accounts for noise in the subframe and background adjusts for sky glow variations, ensuring that higher-quality exposures contribute more to the final stack. This approach is particularly useful in datasets with varying seeing conditions or exposure lengths, optimizing the combined SNR beyond simple averaging. In PixInsight software, advanced photometry-based weighting algorithms, such as PSF flux estimation, dynamically compute these weights during integration.[122]Popular software tools for stacking include DeepSkyStacker (DSS), which performs alignment using plate-solving and supports kappa-sigma clipping for outlier rejection, and PixInsight (PI), which offers the WeightedBatchPreprocessing script for automated calibration, registration, and weighted integration, along with Dynamic Background Extraction to model and subtract large-scale gradients post-stacking. For instance, stacking 50 subframes of 5 minutes each can achieve an SNR exceeding 100 for faint galaxies like NGC 7331, revealing structural details unattainable in a single 4-hour exposure due to saturation and accumulated noise limitations.[121][122]
Color Rendering and Enhancement
In astrophotography, color rendering and enhancement refine stacked images to faithfully depict astronomical colors while amplifying visual details for scientific and aesthetic purposes. These post-processing steps operate on calibrated, combined data from multiple exposures, adjusting tones to counteract the limitations of sensors and atmospheric interference.False-color mapping is essential for narrowband imaging, where monochrome filters capture specific emission lines from ionized gases. A common approach assigns red to hydrogen-alpha (Hα at 656.3 nm), green to doubly ionized oxygen (OIII at 500.7 nm), and blue to singly ionized sulfur (SII at 672.0 nm), forming the Hubble palette that highlights nebular structures like filaments and shells in emission nebulae. This technique, inspired by Hubble Space Telescope observations, translates invisible wavelengths into perceptible colors without altering relative intensities.[123]Histogram stretching enhances contrast by remapping pixel values to utilize the full display range. Linear stretching applies a uniform adjustment to brighten faint features, but it risks clipping highlights in high-dynamic-range scenes typical of deep-sky objects. Non-linear methods, such as the arcsinh function, provide a more gradual expansion—compressing bright areas while boosting shadows—thus preserving 16-bit depth and avoiding saturation artifacts during subsequent edits.[124]Deconvolution restores sharpness to images blurred by the telescope's point spread function (PSF), which convolves fine details during capture. The Richardson-Lucy algorithm, a maximum-likelihood iterative method, estimates the deconvolved image by alternately convolving a guess with the PSF and adjusting based on observed data, typically requiring 10-20 iterations to recover sub-arcsecond structures like planetary rings or galactic arms without introducing ringing. Regularization via wavelets prevents noise amplification in low-signal regions.[125][126]Noise masking targets residual variations in low signal-to-noise ratio (SNR) areas post-stacking, using wavelet decomposition to isolate scales where noise dominates. Selective smoothing applies to these scales via luminance masks, reducing graininess in faint nebulae or backgrounds while protecting high-SNR features; this avoids halo artifacts around stars by excluding bright pixels from aggressive filtering.[127]A practical example is LRGB imaging, where separate luminance (broadband grayscale) and RGB (color) exposures are balanced before combination. The luminance channel, often with longer total exposure for detail, is added to the RGB image after color calibration, enhancing monotonicity and reducing chrominance noise for natural-looking results in galaxies or star clusters.[128]
Applications and Communities
Amateur Astrophotography Practices
Amateur astrophotographers often begin with minimal investment using smartphone cameras and dedicated apps, such as NightCap Camera, which enables long-exposure night sky imaging without additional hardware.[129] For iPhone Pro models, enabling Apple ProRAW in Settings > Camera > Formats provides greater flexibility for editing low-light images.[130] To optimize captures, preserve Night mode settings via Settings > Camera > Preserve Settings; lock focus and exposure by tapping and holding the screen until AE/AF Lock appears, particularly for lunar shots; and for the Moon, employ shorter 3-10 second exposures or the telephoto lens to prevent overexposure.[131][132] Third-party apps like Halide offer manual control over ISO and shutter speed. This entry-level approach requires preparation such as selecting locations with low light pollution and stabilizing the device on a tripod or stable surface, with no upfront cost beyond a basic smartphone and tripod, allowing beginners to capture wide-field views of the Milky Way or constellations even in moderately lit urban settings.[133] As skills develop, hobbyists typically progress to dedicated setups for deep-sky objects like nebulae and galaxies, with budget rigs costing around $1,000 that include a DSLR or mirrorless camera, a star tracker mount, and wide-angle lens.[134] Single-board computers such as the Raspberry Pi, running specialized distributions like Astroberry, enable amateurs to automate equipment control, facilitate remote access via web interfaces or VNC, support image capture through software like KStars and Ekos, and integrate basic processing workflows, thereby enhancing accessibility in amateur deep-sky imaging automation.[135]Online resources play a central role in fostering amateur engagement, with established forums like Cloudy Nights providing in-depth discussions on equipment selection, troubleshooting, and technique refinement for thousands of users worldwide.[136] Similarly, communities such as Reddit's r/astrophotography offer platforms for sharing images and seeking advice, while tutorial series from creators like AstroBackyard deliver structured guides on everything from basic setups to advanced imaging, including periodic processing challenges that encourage skill-building through community participation.[137] These resources lower the barrier to entry by offering free, peer-reviewed knowledge that helps newcomers avoid common pitfalls.Ethical practices are emphasized within the amateur community to preserve shared resources and maintain trust. At dark-sky sites, light discipline is crucial, involving the minimization of artificial lighting—such as avoiding flash or unshielded headlamps—to prevent disruption to wildlife, other observers, and the natural night environment.[138] When creating composite images that blend multiple exposures or elements, amateurs are encouraged to credit original sources and disclose editing methods transparently to ensure authenticity and avoid misleading representations of the cosmos.[138]Skill development in amateur astrophotography follows a structured progression, starting with untracked wide-field imaging using camera lenses to capture expansive scenes like star trails or the galactic core, which requires mastering basic exposure settings and minimal post-processing.[139] As confidence grows, practitioners advance to guided imaging with equatorial mounts and autoguiders for sharper deep-sky captures, involving polar alignment and precise tracking to counter Earth's rotation. This transition often spans a 1-2 year learning curve, during which hobbyists iteratively refine techniques through trial and error, supported by online tutorials and community feedback.[140]In 2025, amateur astrophotography increasingly intersects with citizen science, particularly through platforms like Zooniverse's Galaxy Zoo project, where volunteers classify galaxy morphologies from telescope data to contribute to research on cosmic evolution.[141] Relaunched in April 2025, it incorporates approximately 300,000 galaxy images from the James Webb Space Telescope's COSMOS-Web survey, alongside earlier datasets, to enhance collaborative discoveries.[141] Another example is the Rubin Comet Catchers project, launched in June 2025 on Zooniverse, where participants classify images from the Vera C. Rubin Observatory to identify comets and asteroids, contributing over 1.75 million classifications by September 2025.[142] Participants upload or analyze their own images alongside professional datasets, aiding in the identification of galaxy types and structures.
Professional and Scientific Uses
Astrophotography plays a pivotal role in large-scale astronomical surveys, enabling the systematic imaging of vast sky regions to map cosmic structures and probe fundamental questions in cosmology. The Sloan Digital Sky Survey (SDSS), initiated in 2000, exemplifies this application by imaging over 230 million celestial objects across 8,400 square degrees of the sky using a 2.5-meter telescope equipped with a 120-megapixel camera.[143][144] These multi-band photometric observations have facilitated detailed studies of galaxy distributions, dark matter, and the universe's large-scale structure, contributing to constraints on cosmological parameters such as the matter density and dark energy equation of state.[144] Similarly, the Vera C. Rubin Observatory's Legacy Survey of Space and Time (LSST), starting in late 2025, surveys the southern sky repeatedly with a 3.2-gigapixel camera on an 8.4-meter telescope every few nights over 10 years, producing approximately 20 terabytes of data nightly to detect millions of transients and map time-domain phenomena.[145]In exoplanet research, astrophotography underpins transit photometry, where precise measurements of stellar flux variations detect planetary transits. The Kepler mission (2009–2018) achieved photometric precisions better than 100 parts per million for bright stars, enabling the detection of thousands of exoplanets, including Earth-sized ones in habitable zones, through repeated observations of over 150,000 stars.[146] Similarly, the Transiting Exoplanet Survey Satellite (TESS), launched in 2018, surveys the entire sky with precisions ranging from 60 parts per million to 3% depending on stellar magnitude, identifying transiting exoplanets around nearby bright stars to facilitate follow-up atmospheric characterization. These missions rely on high-cadence imaging to achieve flux precision below 0.1% for robust transit signals, transforming our understanding of planetary systems.[147]Space-based astrophotography extends these capabilities beyond Earth's atmosphere, capturing phenomena across the electromagnetic spectrum. The Chandra X-ray Observatory has produced detailed images of black hole accretion disks and jets, revealing the dynamics of supermassive black holes in quasars and active galactic nuclei through high-resolution X-ray photometry.[148] For instance, Chandra's observations have quantified black hole growth rates and spin properties by analyzing X-ray emissions from surrounding hot gas.[149] Complementing this, the James Webb Space Telescope's (JWST) Mid-Infrared Instrument (MIRI) operates in the mid-infrared range (5–28 microns) to study the early universe, imaging distant galaxies and protostars with cryogenic cooling to approximately 7 K to minimize thermalnoise.[150] MIRI's capabilities have enabled detections of redshifted light from galaxies formed within the first 500 million years after the Big Bang, shedding light on cosmic reionization. The Euclid space telescope, launched in 2023 by the European Space Agency, released its first data release in March 2025, covering about 2,000 square degrees (14% of its planned 15,000 square degree survey area) to investigate dark energy and matter through weak gravitational lensing and spectroscopic galaxy surveys using near-infrared imaging.[151]Scientific image processing in astrophotography ensures accurate astrometric and photometric measurements essential for research. Astrometry.net provides blind plate-solving, automatically determining celestial coordinates and orientations from images by matching stellar patterns to catalogs, which is widely used in professional pipelines for survey data reduction.[152] Photometric calibration often employs Landolt standards, a set of UBVRI-band stars with precisely measured magnitudes, to convert instrumental counts to absolute flux values and correct for atmospheric extinction.[153] These tools enable precise alignment and standardization across datasets from ground- and space-based telescopes.Astrophotography has made enduring contributions to key astrophysical fields through targeted imaging campaigns. The Hubble Deep Fields, deep exposures capturing faint galaxies, have yielded gravitational lensing maps that reveal mass distributions in galaxy clusters, amplifying the visibility of background sources and constraining dark matter profiles.[154] Additionally, time-series astrophotography of supernova light curves, particularly Type Ia events, serves as a cornerstone for cosmological distance measurements; by standardizing peak luminosities via light curve shapes, astronomers have mapped the accelerating expansion of the universe and refined the Hubble constant.[155][156]

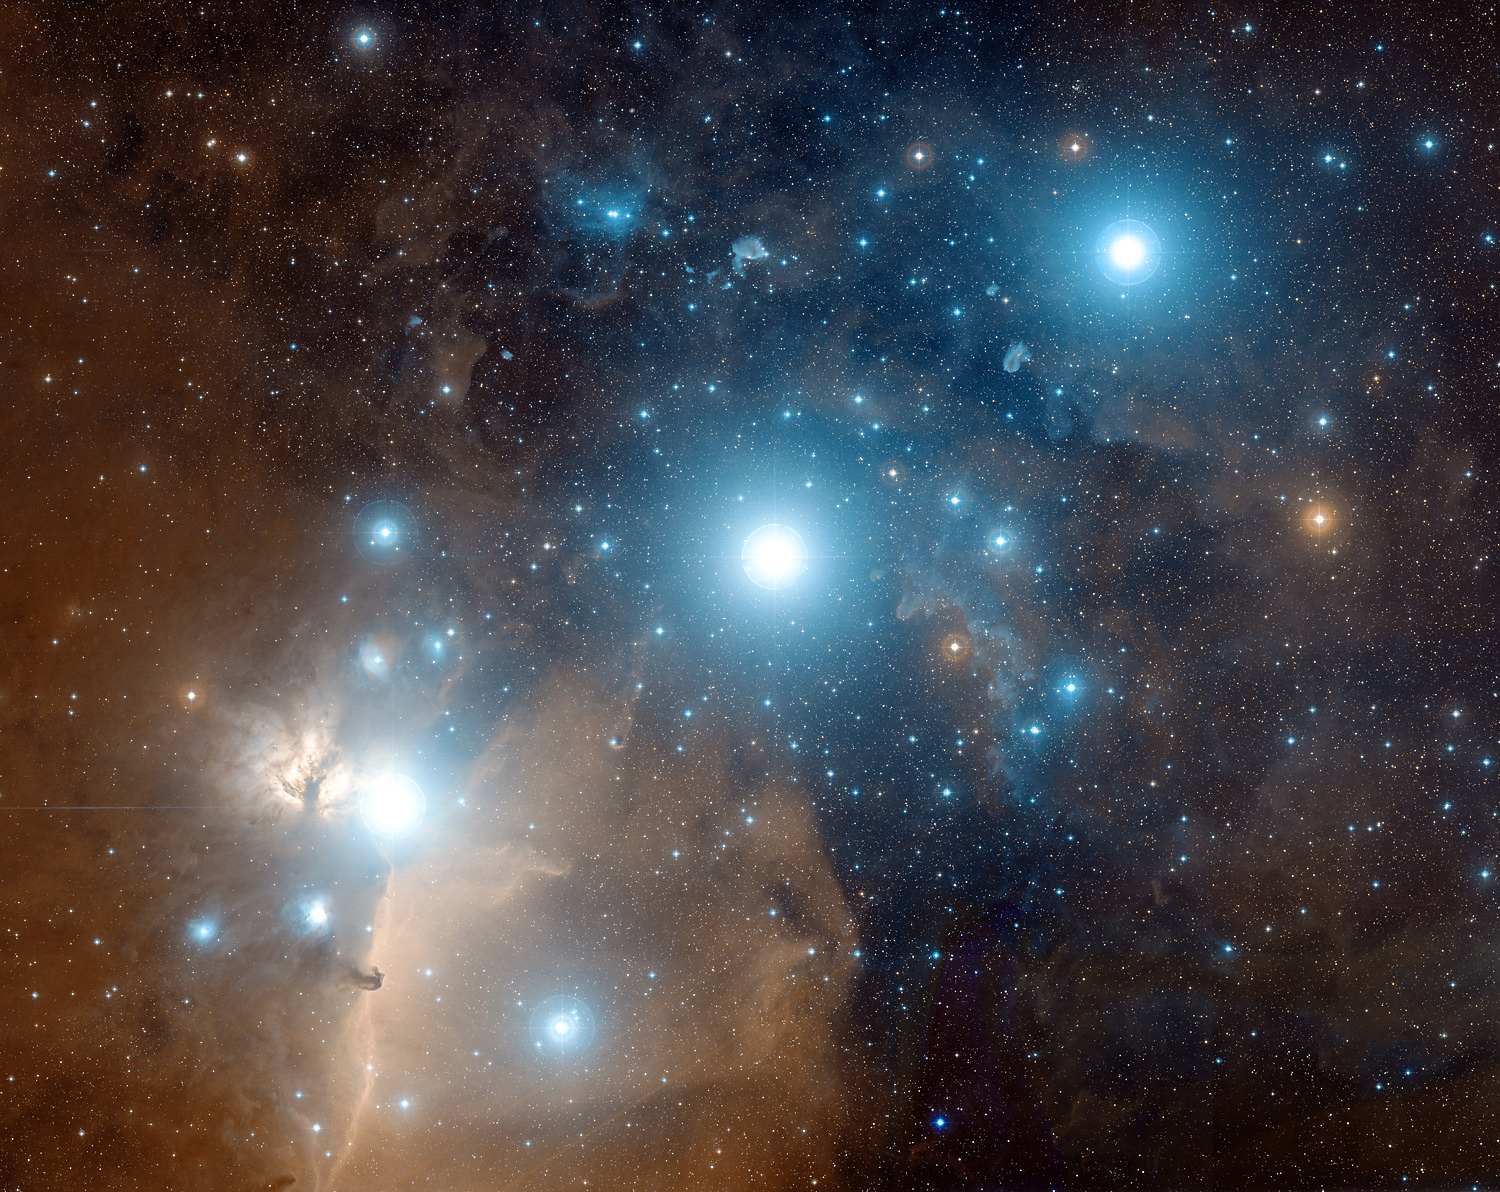


 20sec exposure photograph taken with a tripod mounted DSLR camera with 18-55mm lens
 Fixed tripod mounted camera capturing "star trails"
 Star trails photographed in earth orbit from the International Space Station
 Fixed tripod image of a solar eclipse using a digital-SLR camera with a 500 mm lens
 Milky Way, 1 minute exposure using ISO 800 film, wide angle lens, piggybacked on an equatorial telescope
 Comet Hale-Bopp, camera with a 300mm lens piggybacked
 Film image of the Andromeda Galaxy shot at the prime focus of an 8" f/4 Schmidt–Newton telescope
 Image of the moon taken with a Nikon Coolpix P5000 digital camera via Afocal projection through an 8-inch Schmidt–Cassegrain telescope
 The Moon photographed using the Afocal technique, using 10 seconds of video stacked to create a final image.
 A composite of several Digital-SLR photos compiled in Photoshop taken via eyepiece projection from an 8-inch Schmidt Cassegrain telescope.
 Saturn image using negative projection (Barlow lens) with a webcam attached to a 250mm Newtonian telescope. It is a Composite image made from 10% of the best exposures out of 1200 images.


_(1).jpg)


.jpg)

.JPG)


 Definitions from Wiktionary
 Media from Commons
 News from Wikinews
 Quotations from Wikiquote
 Texts from Wikisource
 Textbooks from Wikibooks
 Resources from Wikiversity