Hubbry Logo
Battle of ImphalBattle of ImphalMain
Open search
Battle of Imphal
Community hub
Battle of Imphal
logo
8 pages, 0 posts
0 subscribers
Be the first to start a discussion here.
Battle of Imphal
Battle of Imphal
from Wikipedia

Battle of Imphal
(Meitei: Japan Laan)[1][2]
Part of Operation U-Go during the Burma campaign in the South-East Asian theatre of World War II

Gurkhas advancing with Grant tanks to clear the Japanese from Imphal-Kohima road in North Eastern British India
Date8 March – 3 July 1944
Location24°49′00″N 93°57′00″E / 24.8167°N 93.9500°E / 24.8167; 93.9500
Result British victory
Belligerents
Commanders and leaders
Units involved
Strength
120,000 troops [3] 85,000 troops[3]
66 tanks[4]
Casualties and losses
12,603 killed and wounded[5] 54,879 killed and wounded
Map

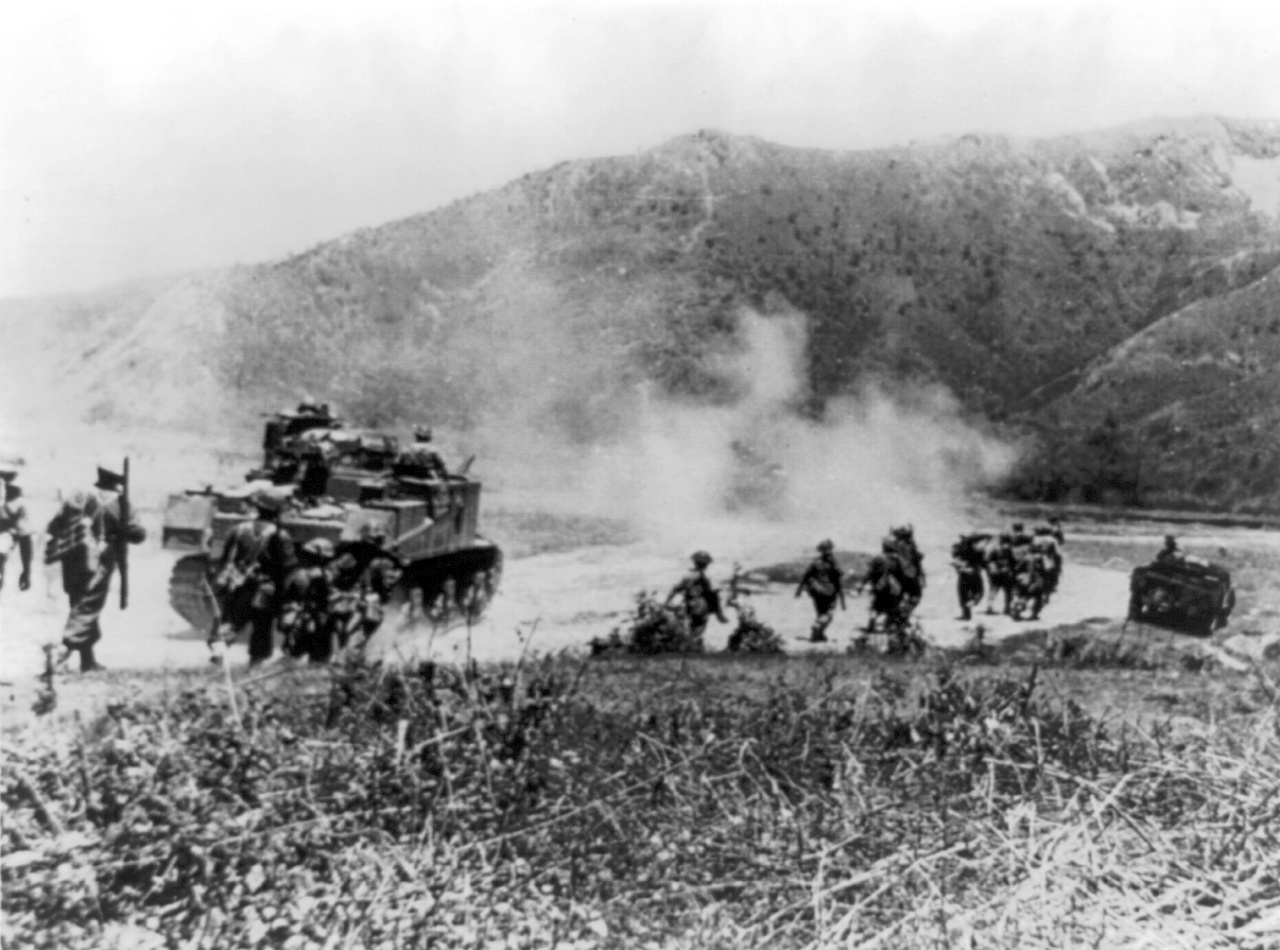
The Battle of Imphal (Meitei: Japan Laan[1][2], lit.'Japanese invasion') took place in the region around the city of Imphal, the capital of the state of Manipur in Northeast India from March until July 1944. Japanese armies attempted to destroy the Allied forces at Imphal and invade India, but were driven back into Burma with heavy losses. Together with the simultaneous Battle of Kohima on the road by which the encircled Allied forces at Imphal were relieved, the battle was the turning point of the Burma campaign, part of the South-East Asian theatre of World War II.[6] The Japanese defeat at Kohima and Imphal was the largest up until that time,[7] with many of the Japanese deaths resulting from starvation, disease and exhaustion suffered during their retreat.[5][6] According to voting in a contest run by the British National Army Museum, the battles of Imphal and Kohima were jointly bestowed as Britain's Greatest Battle in 2013.[8][9]

Situation

[edit]

Background

[edit]
Lt. Gen. Renya Mutaguchi, commanding Fifteenth Army

In March 1943, the Japanese command in Burma had been reorganised. A new headquarters, Burma Area Army, was created under Lieutenant-General Masakazu Kawabe. One of its subordinate formations, responsible for the central part of the front facing Imphal and Assam, was the Fifteenth Army. Lieutenant-General Renya Mutaguchi was appointed to command this army in March 1943. From the moment he took command, Mutaguchi forcefully advocated an invasion of India. His motives for doing so are uncertain. He had played a major part in several Japanese victories, ever since the Marco Polo Bridge incident in 1937, and believed it was his destiny to win the decisive battle of the war for Japan. He may also have been goaded by the first Chindit expedition, a raid behind Japanese lines launched by the British under Orde Wingate early in 1943. The Allies had widely publicised the successful aspects of Wingate's expedition while concealing their losses to disease and exhaustion, possibly leading Mutaguchi and some of his staff to underestimate the difficulties they would later face.

At the start of 1944, the war was going against the Japanese on several fronts. They were being driven back in the central and southwest Pacific, and their merchant ships were under attack by Allied submarines and aircraft. In Southeast Asia, they had held their lines over the preceding year, but the Allies were preparing several offensives from India and the Chinese province of Yunnan into Burma. In particular, the town of Imphal in Manipur on the frontier with Burma was built up to be a substantial Allied logistic base, with airfields, encampments and supply dumps. Imphal was linked to an even larger base at Dimapur in the Brahmaputra River valley by a road which wound for 100 miles (160 km) through the steep and forested Naga Hills.

Japanese offensive planning

[edit]
Imphal and Kohima campaign

Mutaguchi intended to exploit his planned capture of Imphal by advancing to the Brahmaputra Valley. This would cut the Allied lines of communication to the front in northern Burma, where the American-led Northern Combat Area Command was attempting to construct the Ledo Road to link India and China by land, and to the airfields supplying the Nationalist Chinese under Chiang Kai-shek via an airlift over "The Hump" (the Himalaya Mountains). Although the staffs at Burma Area Army and at Southern Expeditionary Army Group (the supreme command for the Japanese forces in southeast Asia and the southern Pacific) had reservations over the scale of Mutaguchi's proposed operation, they were eventually won over by his persistent advocacy. Finally, Prime Minister Hideki Tojo and Imperial General Headquarters gave their approval to the plan.[10]

Mutaguchi intended to block the supply lines to the Allied units in their forward positions, to isolate and destroy them, drawing the Allied reserves into the battle and then capture Imphal. His plan was named U-Go, or Operation C. In detail:

  • The 33rd Infantry Division under Lieutenant-General Motoso Yanagida would surround and destroy the 17th Indian Division at Tiddim, then attack Imphal from the south.
  • Yamamoto Force, formed from units detached from the Japanese 33rd and 15th Divisions under Major-General Tsunoru Yamamoto [ja] (commander of 33rd Division's Infantry Group),[nb 1] would destroy the 20th Indian Division at Tamu, then attack Imphal from the east. The force was supported by the 14th Tank Regiment, equipped with 66 assorted tanks, under Lieutenant Colonel Nobuo Ueda[4] and the 3rd Heavy Artillery Regiment under Lieutenant Colonel Kazuo Mitsui.[4]
  • The 15th Infantry Division under Lieutenant-General Masafumi Yamauchi [ja] would envelop Imphal from the north. This division was still arriving from road-building duties in Thailand and was understrength at the start of the operation.
  • In a separate subsidiary operation, the 31st Infantry Division under Lieutenant-General Kotoku Sato would isolate Imphal by capturing Kohima on the Imphal-Dimapur road, and then advance to Dimapur.

At the insistence of Subhas Chandra Bose, leader of the Azad Hind (a movement which sought to overthrow British rule in India by force, with Japanese assistance), the Indian National Army made a substantial contribution. Originally, the Japanese intended using them only for reconnaissance and propaganda.[11]

  • Units of the First Division (initially the Subhas Brigade or 1st Guerrilla Regiment, less a battalion sent to the Arakan) covered the left flank of 33rd Division's advance.
  • The 2nd Guerrilla Regiment was attached later in the battle to Yamamoto Force.[4][12]
  • The Special Services Group, redesignated the Bahadur Group, acted as scouts and pathfinders with the advanced Japanese units in the opening stages of the offensive. They were tasked to infiltrate through British lines and encourage units of the British Indian Army to defect.

All of Mutaguchi's divisional commanders disagreed with the plan to some extent. Sato distrusted Mutaguchi's motives, and Yanagida openly derided his abrasive superior as a "blockhead." Yamauchi was already very ill and fatalistic.[13] Their main reservations concerned supply. Mutaguchi had assumed that success would be achieved within three weeks, but adequate supplies after that period could be obtained only if the Japanese captured Allied supply dumps, as the monsoon rains, which usually descended from about the middle of May, would make the supply routes from the Chindwin almost impossible to traverse. Gambles such as Mutaguchi was making had worked in the past, but could no longer be relied upon, given nearly total Allied air superiority in the area and the improvement in morale and training of British and Indian troops. Mutaguchi proposed to use "Genghis Khan" rations, driving herds of buffalo and cattle rounded up throughout northern Burma across the Chindwin as meat rations on the hoof.[14] However, most of these beasts died from lack of forage and their meat rotted many miles from the troops they were intended to supply.

There were other weaknesses in the plan, which were revealed as the campaign progressed. The Japanese assumed that the British would be unable to use tanks on the steep jungle-covered hills around Imphal. For ease of movement and supply, the Japanese left behind most of their field artillery, their chief anti-tank weapon. As a result, their troops would have little protection against tanks.

Based on his experiences in the campaigns in Malaya and Singapore and in the Japanese conquest of Burma in early 1942, Mutaguchi dismissed British and Indian troops as inherently inferior. The troops he had met on those occasions had generally been inadequately trained and led. The Allies, under general William Slim, had by now largely overcome the administrative and organisational problems which had crippled their early efforts in Burma, and their troops were far better trained and motivated.

Allied defensive arrangements

[edit]
Lieutenant General William Slim, commanding Fourteenth Army
Lieutenant General Geoffry Scoones, commanding IV Corps

Imphal was held by the IV Corps (Lieutenant General Geoffry Scoones) part of the Fourteenth Army (Lieutenant-General William Slim). Because the Allies were planning to take the offensive, the corps was thrown forward almost to the Chindwin River and widely separated, vulnerable to being isolated and surrounded.[15]

The Indian divisions were composed of British and Indian personnel. In each brigade, there was generally one British, one Gurkha and one Indian battalion, although two brigades (the 37th Brigade in the 23rd Division and 63rd Brigade in the 17th Division) were Gurkha units. Each division was supported by two field artillery regiments (usually British) and one Indian mountain artillery regiment.

Prelude to the operation

[edit]

In late February, a local Japanese counterattack was launched against Indian XV Corps in Arakan, using much the same tactics as Mutaguchi proposed to use. The engagement became known to the Allies as the Battle of the Admin Box, the "box" being the supply area for the brigades of the 7th Division. The attack failed as Allied aircraft were able to parachute supplies to the cut-off troops, allowing them to stand firm, while the Japanese who had infiltrated behind them ran out of supplies. From this point onwards, the Allies were to rely increasingly on their transport aircraft. Also, the Japanese unexpectedly encountered tanks, to which the lightly equipped infiltrators had little counter.[17] The planning of U-Go, however, was too far advanced to take account of these developments.

Even as the Japanese prepared to launch their attack, the Allies launched the airborne phase (Operation Thursday) of the second Chindit expedition on 5 March 1944. Japanese officers such as Major-General Noburo Tazoe, commanding the Japanese Army Air Force units in Burma, urged Mutaguchi to divert troops from his offensive to secure the Japanese rear areas against the Chindits. Mutaguchi dismissed these concerns, claiming that in a few weeks he would occupy the air bases from which the Chindits were supplied.[18]

Opening phases of the battle

[edit]
On Imphal front, Sikh signaller operates wireless for British officers, listening to patrols reporting Japanese positions.

When they received intelligence that a major Japanese offensive was impending, Slim and Scoones planned to withdraw their forward divisions into the Imphal plain and force the Japanese to fight at the end of impossibly long and difficult lines of communication. However, they misjudged the date on which the Japanese were to attack, and the strength they would use against some objectives. The Japanese troops began to cross the Chindwin River on 8 March. Scoones gave his forward divisions orders to withdraw to Imphal only on 13 March.

Tamu–Shenam

[edit]

The 20th Indian Division held Tamu near the Chindwin, and Moreh a short distance to the north, where a large supply dump had been established.[19] On 20 March, there was a clash between six Lee medium tanks of the 3rd Carabiniers and six Type 95 Ha-Go tanks leading Yamamoto's advance from the south. The lighter Japanese tanks were destroyed.[20] Acting major-general Douglas Gracey was opposed to making any retreat, but on 25 March he was ordered to detach some of his division to provide a reserve for IV Corps. As this left the division too weak to hold Tamu and Moreh, they withdrew to the Shenam Saddle, a complex of hills through which the Imphal-Tamu road ran. The supply dump at Moreh was set ablaze, and 200 cattle there were slaughtered.[21] The division fell back without difficulty, mainly because two of Yamamoto Force's battalions from the Japanese 15th Division (II/51 Regiment and III/60 Regiment) were delayed at Indaw in northern Burma by the Chindits and were unable to intervene.

Tiddim–Bishenpur

[edit]

Further south, the 17th Indian Division was cut off by the Japanese 33rd Division. Patrols from the division and from V Force (an irregular force of locally raised levies and guerrillas) warned Cowan of a Japanese force advancing against the rear of the division as early as 8 March, allowing Cowan to regroup the division to protect its rear. On 13 March, the Japanese 215th Regiment attacked a supply dump at milestone 109, twenty miles behind Cowan's leading outposts, while the Japanese 214th Regiment seized Tongzang and a ridge named Tuitum Saddle across the road a few miles behind the 17th Indian Division's main position.

The Indian division began to withdraw on 14 March. At Tuitum Saddle, the Japanese 214th Regiment were unable to dig in properly before they were attacked by the 48th Indian Infantry Brigade on 15 March. The Japanese suffered heavy casualties and were forced away from the road. Further north, the Japanese captured the depot at Milestone 109 on 18 March, but Indian troops recovered it on 25 March. Cowan had taken steps to secure the most vulnerable point in the rear of his division, the bridge over the Manipur River. The division's rearguard crossed safely on 26 March, demolishing the bridge behind them. The division removed most of the vehicles, food and ammunition from the depot at Milestone 109 before resuming their retreat.[22]

Both the Japanese and the Indian division had suffered heavy casualties. Yanagida, the Japanese 33rd Division's commander, was already pessimistic, and was apparently unnerved by a garbled radio message which suggested that one of his regiments had been destroyed at Tongzang.[23] He therefore did not press the pursuit against the 17th Division, and advanced cautiously in spite of reprimands from Mutaguchi.

Scoones had nevertheless been forced to send the bulk of his only reserve, the 23rd Indian Infantry Division, to the aid of the 17th Division. The two divisions, supplied by parachute drops from Allied aircraft, made their way back to the Imphal plain, which they reached on 4 April.

Sangshak–Litan

[edit]

Meanwhile, Imphal had been left vulnerable to the Japanese 15th Division. The only force left covering the northern approaches to the base, the Indian 50th Parachute Brigade, was roughly handled in the Battle of Sangshak by a regiment from the Japanese 31st Division on its way to Kohima. The Japanese 60th Regiment cut the main road a few miles north of Imphal on 28 March, while the 51st Regiment advanced on Imphal from the north-east, down the valley of the Iril River and a track from Litan, 23 miles (37 km) north-east of Imphal.

However, the earlier diversionary attack launched by Japanese 55th Division in Arakan had already failed. Admiral Louis Mountbatten, the commander in chief of the Allied South East Asia Command, had taken steps to secure aircraft normally assigned to the "Hump". Slim was able to use these to move the battle-hardened 5th Indian Infantry Division, including all its artillery and first-line transport (jeeps and mules), by air from Arakan to the Central Front. The move was completed in only eleven days. One brigade and a mountain artillery regiment went to Dimapur in the Brahmaputra valley, but the other two brigades, the field artillery and the divisional HQ went to Imphal. The leading troops of the division were in action north and east of Imphal on 3 April.

Chin Hills

[edit]

On the Japanese left flank, the INA's Subhas Brigade, led by Shah Nawaz Khan, reached the edge of the Chin Hills below Tiddim and Fort White at the end of March. From this position, the 2nd Battalion sent companies to relieve Japanese forces at Falam and to Hakha, from where in turn Khan's forces sent out patrols and laid ambushes for the Chin guerrillas under the command of a British officer, Lieutenant-Colonel Oates,[24][full citation needed] taking a number of prisoners. In the middle of May, a force under Khan's Adjutant, Mahboob "Boobie" Ahmed, attacked and captured the hilltop fortress of Klang Klang.[25] The 3rd Battalion meanwhile moved to Fort White-Tongzang area in premature anticipation of the destruction of Major General Frank Messervy's 7th Indian Infantry Division in the Arakan, which would allow it to receive volunteers.

During the early part of the offensive, the Bahadur Group of the INA apparently achieved some success in inducing British Indian soldiers to desert.[26]

Stalemate

[edit]

From the beginning of April, the Japanese attacked the Imphal Plain from several directions:

Bishenpur

[edit]

The Japanese 33rd Division attacked from the south at Bishenpur, where they cut a secondary track from Silchar into the plain. A commando raid destroyed a suspension bridge, making the Silchar track unusable.[27] The 17th and 23rd Indian Divisions were regrouping after their retreat, and Bishenpur was only held by the 32nd Indian Infantry Brigade (detached from 20th Division). The Japanese advanced through the hills to the west of Bishenpur, almost isolating the British in the village, but suffered severely from British artillery fire. Their leading troops were halted by lack of supply only 10 miles (16 km) from Imphal. Other Japanese advancing directly up the Tiddim-Imphal road were halted in Potsangbam 2 miles (3.2 km) south of Bishenpur, as troops of 17th Indian Division rejoined the battle.[28]

Yanagida, the Japanese division's commander, had already infuriated Mutaguchi by his caution. He was finally relieved of command at the end of the month.

Shenam–Palel

[edit]
Scraggy Hill (known to the Japanese as Ito Hill) on the Shenam Pass, captured by the 4/10th Gurkhas.
Troops inspect captured Japanese ordnance, 1944.

Yamamoto Force attacked the Shenam Saddle, defended by the main body of the Indian 20th Division, on the main road from Tamu into Imphal. This was the only metalled road the Japanese could use, and it was vital for them to break through to allow Yamamoto's tanks and heavy artillery to attack the main defences around Imphal itself. Only a few miles north of the saddle was Palel airfield, one of the only two all-weather airfields in the plain, and vital to the defenders.

A Japanese attack up the road on 4 April was disjointed; the infantry were not ready to take part and twelve Japanese tanks were caught exposed on the road by British anti-tank guns.[29] From 8 to 22 April, there was heavy fighting for five peaks which commanded the road east of the Saddle. The Japanese captured a number of them, but Indian and British counter-attacks regained some of those initially lost. Casualties were heavy on both sides.

Having failed to break through using the road, Yamamoto sent some troops through the rough terrain to the north of the Saddle to raid Palel airfield. The INA's Gandhi Brigade or 2nd Guerrilla Regiment, of two battalions led by Inayat Kiyani, took part in this attack. On 28 April, they attacked Palel. They tried to induce some Indian defenders to surrender, but the defenders rallied after initial hesitation.[30] Another INA detachment carried out demolitions around Palel, but withdrew after they failed to rendezvous with Japanese units. The Gandhi Brigade was short of rations, having brought forward only one day's supplies, and also suffered 250 casualties to shellfire after they pulled back from Palel.

Kanglatongbi–Nungshigum

[edit]

The Japanese 15th Division encircled Imphal from the north. Its 60th Regiment captured a British supply dump at Kanglatongbi on the main Imphal-Dimapur road a few miles north of Imphal, but the depot had been emptied of food and ammunition. A battalion of the Japanese 51st Regiment (which was commanded by Colonel Kimio Omoto) seized the vital Nungshigum Ridge, which overlooked the main airstrip at Imphal. This was a major threat to IV Corps and on 13 April the 5th Indian Division counter-attacked, supported by air strikes, massed artillery and the M3 Lee tanks of B Squadron of the 3rd Carabiniers. The Japanese had expected that the slopes were too steep for tanks to climb, and indeed Lee tanks had never been tried before on such gradients in action.[31] The Japanese regiment had very few effective anti-tank weapons, and their troops were driven from the ridge with heavy casualties. The attackers also lost heavily; every officer of the Carabiniers and the attacking infantry (1st Battalion, 17th Dogra Regiment) was killed or wounded.

Allied counter-attacks

[edit]

North

[edit]
Troops of Indian 5th Division and British 2nd Division meet at Milestone 109, to raise the siege of Imphal

By 1 May, all Japanese attacks had come to a halt. Slim and Scoones began a counter-offensive against the Japanese 15th Division. This division was the weakest of the Japanese formations, and if it was defeated, the siege would be broken (once Kohima was recaptured). The progress of the counter-attack was slow. The monsoon had broken, making movement very difficult. Also, IV Corps was suffering some shortages. Although rations and reinforcements were delivered to Imphal by air, artillery ammunition had to be conserved.

The 5th Indian Division (joined by the 89th Indian Infantry Brigade which was flown in to replace the brigade sent to Kohima) and 23rd Indian Division (later replaced by the 20th Division) tried capturing the steep ridges, such as the Mapao Spur, held by the Japanese, but found these to be almost impregnable. Allied artillery was usually unable to hit Japanese positions on the reverse slopes, and the troops often stormed the summits of the ridges, only to be driven off by mortar fire and grenades from the reverse slope positions.[31] IV Corps regrouped. The 23rd Indian Division took over the defence of the Shenam Saddle, while from the end of May, 5th Division concentrated on driving north from Sengmai up the main road through Kanglatongi, while the 20th Indian Division advanced along the tracks and the Iril River toward Litan and Ukhrul, threatening the Japanese 15th Division's lines of communication.

By this time, the Japanese were at the end of their endurance. Neither the 31st Division which was fighting at Kohima nor the 15th Division had received adequate supplies since the offensive began, and their troops were starving. Lieutenant General Sato, the commander of the Japanese 31st Division, ordered a retreat at the end of May, so that his division could find food.[32] This allowed Indian XXXIII Corps to drive the Japanese from Kohima, and advance south.

The troops of Japanese 15th Division were forced to abandon their defensive positions to scavenge for supplies in local villages or on the Japanese lines of communication. Mutaguchi dismissed the mortally ill Yamauchi (replacing him with Lieutenant General Uichi Shibata [ja]) but this did not change matters. After driving rearguards from the Miyazaki Group (an independent detachment from the 31st Division) and the Japanese 60th Regiment from their delaying positions on the Dimapur-Imphal road, the leading troops of IV Corps and XXXIII Corps met at Milestone 109, 10 miles (16 km) north of Imphal, on 22 June, and the siege of Imphal was raised.

South

[edit]

South of Imphal, 17th Indian Division had moved back into the line, facing the Japanese 33rd Division. During the first half of May, there were several Japanese air attacks on Bishenpur, and heavy fighting for the village of Potsangbam 2 miles (3.2 km) to the south, in which the British lost 12 tanks.[33] The surviving crews of the 3rd Carabiniers were later flown out of Imphal to be reconstituted in India.

Major General Cowan planned to break the deadlock on this front by sending the 48th Indian Infantry Brigade on a wide left hook into the Japanese division's rear while 63rd Indian Infantry Brigade attacked them in front. The Japanese division's temporary commander (its chief of staff, Major General Tetsujiro Tanaka) planned at the same time to infiltrate through Indian 17th Division's front to seize vital objectives in the middle of the Indian positions. Both moves were launched almost simultaneously.

The Gurkhas of 48th Indian Brigade cut the road behind the Japanese on 18 May, but 63rd Indian Brigade were unable to break through to them, and 48th Brigade was forced to fight its way through the Japanese positions to rejoin the division, with heavy losses. Meanwhile, some of Tanaka's troops (the 214th Regiment) captured hills close to 17th Division's headquarters on 20 May. Because of the incursion into their own rear, the Japanese were unable to reinforce their forward troops, and over the following week the isolated Japanese were driven from their positions in the middle of the Indian division, many parties being wiped out.

A new forceful commander, Lieutenant General Nobuo Tanaka, took command of the 33rd Division on 22 May, and ordered repeated attacks which reduced many of his division's battalions to mere handfuls of men.[34] In June, he received reinforcements (a regiment from the Japanese 53rd Division, and a detachment from the 14th Tank Regiment) and used them to launch another attack. After initial success, the fresh regiment suffered heavy casualties from shellfire. By the end of June, the 33rd Division had suffered so many casualties that they could make no further effort.

Yamamoto Force had also suffered heavy casualties, but before withdrawing, they launched two modest raids on Palel Airfield in the first week of July, destroying several parked aircraft.

INA operations

[edit]

Towards the end of May, the INA's 1st and 2nd Guerrilla Regiments (the latter commanded by Malik Munawar Khan Awan) had been redirected to Kohima. They moved north across the Japanese rear but by the time they reached Ukhrul, the Japanese had already begun to withdraw. They decided to attack Imphal instead. At Imphal, both units suffered some desertions, but not on the scale that the Commonwealth forces expected.[35]

End of the battle

[edit]
General Montagu Stopford (right) confers with other British officers after the opening of the Imphal-Kohima road.

The Japanese had realised that the operation ought to be broken off as early as May. Lieutenant General Hikosaburo Hata, the Vice-Chief of the General Staff, had made a tour of inspection of Southern Army's headquarters in late April. When he returned to Tokyo, he reported pessimistically on the outcome of the operation at a large staff meeting to Prime Minister Hideki Tojo but Tojo dismissed his concerns as their source was a junior staff officer (Major Masaru Ushiro, at Burma Area Army HQ). Messages were sent from Imperial Headquarters, urging that the operation was to be fought to the end.[36]

Lieutenant General Kawabe travelled north from Rangoon to see the situation for himself on 25 May. Several officers whom he interviewed expressed confidence in success if reinforcements could be provided, but actually concealed their losses and the seriousness of the situation. At a meeting between Mutaguchi and Kawabe on 6 June, both used haragei, an unspoken form of communication using gesture, expression and tone of voice, to convey their conviction that success was impossible,[37] but neither of them wished to bear the responsibility of ordering a retreat. Kawabe subsequently became ill with dysentery and perhaps physically unfit for duty. He nevertheless ordered repeated attacks, stating later that Bose was the key to Japan's and India's future.[38]

Mutaguchi ordered the Japanese 31st Division, which had retreated from Kohima when threatened with starvation, to join the 15th Division in a renewed attack on Imphal from the north. Neither division obeyed the order, being in no condition to comply. When he realised that none of his formations were obeying his orders to attack, Mutaguchi finally ordered the offensive to be broken off on 3 July. The Japanese, reduced in many cases to a rabble, fell back to the Chindwin, abandoning their artillery, transport, and many soldiers too badly wounded or sick to walk. The Allies recovered Tamu at the end of July. It was found to contain 550 unburied Japanese corpses, with over 100 more severely-wounded Japanese soldiers slowly dying amongst them.[39]

Casualties

[edit]

The Japanese defeat at Kohima and Imphal was the largest up until that time.[40] They had suffered 54,879 casualties, including 13,376 dead (plus 920 casualties in the preliminary battles in Assam).[5] Most of these losses were the result of starvation, disease and exhaustion.

The Allies suffered 12,603 casualties.[5]

Aftermath

[edit]

The Japanese had also lost almost every one of the 12,000 pack horses and mules in their transport units and the 30,000 cattle used either as beasts of burden or as rations,[14] and many trucks and other vehicles. The loss of pack animals was to cripple several of their divisions during the following year. Mutaguchi had sacked all of his divisions' commanders during the battle. Both he and Kawabe were themselves subsequently relieved of command.

In December, Slim and three of his corps commanders (Scoones, Christison and Stopford) were knighted by the viceroy Lord Wavell, at a ceremony at Imphal in front of Scottish, Gurkha and Punjab regiments. Slim was created KCB, the others were made KBEs.

Air operations at Imphal

[edit]
A Hawker Hurricane Mark IV attacks a Japanese position on the Tiddim Road.

By mid-1944, the Allied air forces enjoyed undisputed air supremacy over Burma. The last major effort by the Japanese Army Air Force had been over the Arakan in February and March, when they had suffered severe losses. During the Imphal and Kohima battles, they were able to make barely half a dozen significant raids.

IV Corps enjoyed close air support from fighter-bombers and dive bombers of 221 Group of the RAF. Allied fighter bombers and medium bombers shot up and bombed enemy concentrations, supply dumps, transport, roads and bridges all the way to the Chindwin river. The monsoon, which occurred every year from May to September, in no way diminished their activity. The RAF Third Tactical Air Force flew 24,000 sorties during the worst four months of the monsoon, nearly six times the previous year's record.

The most important contribution to the Allied victory was made by British and American transport aircraft. The Allies could fly men, equipment and supplies into the airstrips at Imphal (and Pallel also, until the onset of the monsoon rains), so, although cut off by land, the town had a lifeline. By the end of the battle, the Allied air forces had flown 19,000 tons of supplies and 12,000 men into Kohima and Imphal, and flown out 13,000 casualties and 43,000 non-combatants. They delivered over a million gallons of fuel, over a thousand bags of mail and 40 million cigarettes.[41][42] Several thousand mules were used to supply outlying outposts, for example, 17th Indian Division on the Bishenpur trail, so animal fodder was also flown in during the siege. Allied aircraft parachuted ammunition, rations and drinking water to surrounded units.

At the start of the battle, South East Asia Command had 76 transport aircraft (mainly C-47 Skytrain) available, but many others were dedicated to supplying the Nationalist Chinese under Chiang Kai-Shek, or to establishing USAAF bomber bases in China, via "the Hump". Not even Admiral Louis Mountbatten, the Commander-in-Chief, had the authority to commandeer any of these aircraft, but at the crisis of the battle in the middle of March he nevertheless did so, acquiring 20 C-46 Commando aircraft (equivalent to another 30 C-47s). He was supported by American officers at SEAC and the American China-Burma-India Theater headquarters.[43]

War cemetery

[edit]

After the war, the Commonwealth War Graves Commission set up Imphal War Cemetery and Kohima War Cemetery to commemorate the British and the Indian soldiers who died during the Second World War.[44]

See also

[edit]

Notes

[edit]

Bibliography

[edit]

Further reading

[edit]
[edit]
Revisions and contributorsEdit on WikipediaRead on Wikipedia
from Grokipedia
The Battle of Imphal was a decisive engagement in the of the Second World War, fought from March to July 1944 around , the capital of in , between Allied forces of the British Fourteenth Army and the invading Imperial Japanese Fifteenth Army. The Japanese launched on 8 March 1944, crossing the from Burma with approximately 85,000 troops under Lieutenant General , aiming to seize the Imphal plain, disrupt Allied supply lines to , and potentially force British withdrawal from . Opposing them was Lieutenant General William Slim's Fourteenth Army, comprising diverse British, Indian, , and African units within IV Corps under Lieutenant General Geoffrey Scoones, which mounted a tenacious defense bolstered by airlifted reinforcements and supplies despite encirclement. Allied air superiority enabled critical resupply operations, sustaining the garrison amid monsoon rains and terrain challenges that exacerbated Japanese logistical failures, including inadequate provisions leading to widespread starvation among attackers. The battle culminated in a comprehensive Allied victory by early July, with Japanese forces suffering approximately 54,879 casualties (killed and wounded), compared to around 12,603 Allied killed and wounded at Imphal alone, shattering Japanese offensive capabilities in the theater. This outcome marked the easternmost extent of Japanese expansion in , enabling subsequent Allied counteroffensives into Burma and underscoring the primacy of logistics and aerial support in .

Strategic Context

Geopolitical and Theater Background

The geopolitical context of the Battle of Imphal arose from Japan's expansionist ambitions in Asia following its entry into via the on December 7, 1941, which enabled rapid conquests across . By May 1942, Japanese forces had overrun , expelling British-led Allied troops and severing the primary overland supply route—the —to Nationalist , thereby isolating Chinese forces fighting Japan since 1937 and complicating Allied aid efforts. This positioned the along India's northeastern frontier, where Japanese strategists viewed invasion as a means to preempt anticipated British reconquests of , disrupt air supply lines over "" from India to (which delivered approximately 650 tons of daily by 1944 at high cost), and exploit Indian nationalist unrest to undermine British rule. Japanese leaders, including those in the , calculated that capturing territory in or could facilitate the establishment of a puppet regime, drawing on alliances with Subhas Chandra Bose's (INA)—comprising approximately 40,000 ex-Indian prisoners of war and expatriates—and his provisional government, proclaimed in on October 21, 1943, to rally anti-British sentiment. However, these aims reflected overconfidence amid Japan's broader strategic reversals, such as defeats at Midway (June 1942) and (1943), which strained resources and prompted a shift toward peripheral offensives to secure defensive perimeters rather than outright continental dominance. In the China-Burma-India (CBI) theater—formally designated by U.S. forces on March 4, 1942, to coordinate support for and defend emerged as a critical forward base due to its airfields and position in province, approximately 100 miles from the Burmese border, facilitating for the British Fourteenth Army's preparations to retake . The theater's strategic imperatives included maintaining 's as a staging ground for counteroffensives, sustaining Chinese supply via the precarious (begun December 1942, extending 478 miles through jungle and mountains), and countering Japanese threats to Assam's tea plantations and oil refineries at , which produced vital . British defenses, reorganized after the 1942 retreat, emphasized fortified boxes with air resupply capabilities, reflecting lessons from earlier defeats where Japanese infiltration tactics had exploited mobility in 's terrain of dense jungles, rivers, and hills. By late 1943, under Lieutenant-General William Slim, the Fourteenth Army—comprising British, Indian, African, and units totaling over 300,000 men—had bolstered eastern 's garrisons, including IV Corps at under Lieutenant-General Geoffrey Scoones, anticipating Japanese moves amid reconnaissance reports of enemy buildups in . This setup underscored the theater's role as a secondary but essential front, often under-resourced compared to or the Pacific, yet pivotal for tying down Japanese divisions—about 300,000 in by —and preventing their redeployment elsewhere.

Japanese Offensive Planning

Lieutenant General , commander of the Japanese 15th Army, initiated planning for an offensive into in late April 1943 by proposing the idea to Lieutenant General Masakazu Kawabe, commander of Burma Area Army. Mutaguchi advocated the invasion to counter Allied air threats from bases in northeastern and to secure a buffer zone against further British incursions into Burma. Despite initial rejections, the plan gained traction through conferences, including one from 22 to 26 December 1943, leading to formal approval by on 7 January 1944 via Army Directive No. 1776, with Prime Minister Hideki Tojo's authorization on 9 January 1944. The primary objectives of were to destroy British forces at , capture the and areas before the mid-May 1944 rainy season, and establish defensive positions to safeguard . The offensive divided the 15th Army's forces into three prongs: the 33rd Division under Motoso Yanagida would advance from the south along the Tiddim-Bishnupur- and Tamu-Palel- roads; the 31st Division under Kotoku Sato would target via routes including to block reinforcements from ; and the 15th Division under Masafumi Yamauchi would approach from the northwest through to sever the - road. Logistical preparations included stockpiling three weeks of rations and 20 days of munitions by , utilizing approximately 3,000 horses and 5,000 oxen with limited forage, and repairing roads such as Kalewa to Yazagyo for vehicle access. However, planning overlooked severe terrain challenges and supply line vulnerabilities, with the 33rd Division commander issuing warnings about inadequate provisions that were dismissed by Mutaguchi. Internal opposition persisted, including suggestions from the 5th Air Division and 15th Army staff to delay the operation due to British airborne operations like Wingate's on 5 , but Mutaguchi proceeded, interpreting them as diversions. The operation commenced around 15 , though preliminary movements began earlier.

Allied Defensive Posture

The Allied defensive posture at Imphal was anchored by IV Corps of the British Fourteenth Army, commanded by Lieutenant-General Geoffrey Scoones, which bore the primary responsibility for defending the Imphal plain against Japanese invasion from Burma. Scoones' strategy emphasized concentrating forces in the Imphal plain for a decisive battle, leveraging the area's open terrain for artillery, tank maneuvers, and air support, rather than holding dispersed forward positions indefinitely. This approach involved forward divisions conducting delaying actions before withdrawing to fortified positions around Imphal, anticipating Japanese logistical vulnerabilities in the challenging terrain. IV Corps initially comprised the 17th Indian Division, the 20th Indian Division, and the 23rd Indian Division, with the latter serving as a reserve force stationed directly in the area alongside the 254th Indian Tank Brigade. The 17th Indian Division, approximately 16,000 strong with supporting vehicles and pack animals, was deployed near Tiddim in the Chin Hills to cover southern approaches, while the 20th Indian Division held positions east of near Tamu along the line. These dispositions aimed to screen the plain's approaches from multiple axes, including the Tiddim Road to the south and routes toward Shenam Pass and to the east and northeast. Logistical preparations centered on Imphal's airfields, which facilitated rapid resupply and reinforcement, including the airlifting of the 5th Indian Division from starting 19 1944 to bolster northern defenses. Under overall Fourteenth Army command of Lieutenant-General William Slim, IV Corps benefited from post-1942 reforms, including enhanced jungle training, improved administration, and integration of diverse units such as Indian, , and British troops, enabling a resilient defense despite initial forward dispersal. Intelligence from Ultra decrypts had alerted Allies to Japanese intentions, though the exact timing of the offensive on 8 1944 prompted Scoones to order withdrawals to by 13 .

Prelude and Opening Moves

Initial Japanese Advances

The Japanese 15th Army, commanded by Lieutenant General Renya Mutaguchi, initiated on the night of 7–8 March 1944, with forces crossing the from into , . The army comprised the 15th Division under Major General Masao Yamauchi, the 31st Division under Lieutenant General Kotoku Sato, and the 33rd Division under Lieutenant General Michio Yanagida, totaling approximately 85,000 troops supported by elements of the . These units advanced over rugged jungle-covered hills and valleys, exploiting the element of surprise due to Allied underestimation of Japanese intentions and poor intelligence. The 33rd Division moved northward toward , capturing the town of by mid-March and positioning elements to threaten the Imphal-Kohima road from the north. Simultaneously, the 15th Division advanced southward along the Tiddim Road, reaching positions near the by 20 March after traversing 150 miles of difficult terrain in two weeks, forcing British withdrawals from forward positions like Sinzweya. The central 31st Division pushed through the toward Imphal's eastern approaches, achieving rapid progress with minimal opposition initially as Allied forces, including IV Corps under Geoffrey Scoones, were dispersed and preparing for defensive concentrations. These advances covered up to 20 miles per day in some sectors, leveraging Japanese infantry's mobility and endurance despite inadequate supplies and no armored support, as the troops carried only two weeks' rations expecting quick victory and local . By late March, Japanese forces had penetrated deep into , encircling parts of the Allied defenses and setting the stage for convergence on Plain, though logistical strains from overextended lines began to emerge. The initial momentum stemmed from Mutaguchi's aggressive planning, which prioritized speed over consolidation, allowing the Japanese to bypass strongpoints and aim for the destruction of British IV Corps.

Key Preliminary Engagements

The Japanese Fifteenth Army initiated on 8 March 1944, with its three divisions advancing across the into India, encountering initial resistance from forward Allied elements of IV Corps. In the southern sector, the Japanese 33rd Division, supported by the 14th Tank Regiment, pushed northward along the Tiddim Road from positions near Fort White, clashing with rearguard units of the British 17th Indian Division under Major-General Geoffrey Scoones' orders to delay while withdrawing toward . These skirmishes, beginning around mid-March, involved infantry probes and ambushes in the Hills, forcing the 17th Division to conduct fighting retreats that inflicted early casualties on the Japanese while preserving Allied mobility. In the northern sector, the most significant preliminary engagement occurred at Sangshak, where elements of the Japanese 31st Division encountered the 50th Indian Parachute Brigade on 20 March 1944. The parachute brigade, numbering approximately 1,500 men including the 152nd () Parachute Battalion and 153rd () Parachute Battalion, held fortified hill positions against assaults by around 2,200 Japanese troops equipped with mountain guns, enduring six days of intense close-quarters combat until withdrawing on 26 March. Japanese attacks, led by the 58th and 124th Regiments, captured key features like Hill 7378 but at high cost, with estimates of over 600 Japanese killed compared to around 200 Allied fatalities and 400 wounded. The Sangshak action critically disrupted Japanese timelines, delaying the 31st Division's thrust toward and by several days and allowing IV Corps to redirect reserves, including airlifted reinforcements to . Meanwhile, the central advance by the Japanese 15th Division proceeded with fewer major clashes, bypassing denser Allied patrols through jungle infiltration toward the Plain, setting conditions for encirclement attempts by late . These engagements highlighted Japanese logistical vulnerabilities in rugged terrain and Allied advantages in and defensive depth, foreshadowing the attrition that would define the broader campaign.

Core Phases of the Battle

Battles in the Shenam and Tiddim Sectors

The Shenam sector covered the eastern approaches to along the Tamu-Palel Road and Shenam Pass, where Force, detached from the Japanese 33rd Division under Major General , sought to breach Allied lines held by the 20th Indian Division commanded by Major General . Fighting intensified from mid-March 1944, with Japanese forces employing infantry assaults supported by medium artillery, tanks, and mechanized transport, aided by two battalions from the 15th Division and elements of the Indian National Army's Gandhi and Brigades. Key engagements occurred around the Shenam Saddle and a series of hills including Nippon Hill, Hill, East and West, Scraggy Hill (known to the Japanese as Ito Hill), , and , where positions changed hands repeatedly amid intense bunker-to-bunker combat that denuded the jungle through sustained shelling. Allied defenses, bolstered by the 80th and 100th Brigades initially, with the 23rd Indian Division under Ouvry Roberts relieving positions by mid-May 1944, repelled Japanese advances through coordinated infantry, artillery, and . A notable action saw the 4/10th Rifles capture Scraggy Hill, while on 9 June 1944, the Japanese 213th Regiment's final major assault on the peak was defeated by British infantry-tank teams. The sector remained contested until the exacerbated conditions, but Allied forces maintained control of the high ground, preventing a breakthrough to and clearing the area by late July 1944, at the cost of hundreds of casualties on both sides. In the Tiddim sector to the south, the 17th Indian Division under Major General David Cowan conducted a fighting withdrawal northward along the Tiddim Road from positions near Tiddim against the Japanese 33rd Division led initially by Lieutenant General Yanagida and later Tanaka Nobuo. Japanese forces cut the road by 16 March 1944 at Milestone 132 using the 214th and 215th Regiments, isolating elements of the 48th and 63rd Brigades, but Cowan's division fought through multiple ambushes and roadblocks to reach Imphal by late March. Subsequent clashes south of Imphal, including at Potsangbam, Ningthoukhong, and Torbung, saw the Japanese 33rd Division push to within striking distance, with its headquarters advancing near Bishenpur by 14 April 1944. The most critical engagement unfolded at Red Hill (Maibam Lokpaching) from 20 to 29 May 1944, where combined forces of the 17th Indian Division and 32nd Brigade from the 20th Indian Division halted the Japanese closest approach from the south, despite counterattacks hampered by coordination issues in and Japanese anti-tank defenses. By late April, the 33rd Division had suffered attrition reducing it to one-third strength, prompting its headquarters withdrawal by month's end after failing to sever Allied supply lines or capture key positions, leaving thousands dead amid interdiction of their lines of communication. Allied interdictions, such as destroying a Japanese supply column via a roadblock on 16 May, further exacerbated enemy logistical failures in the sector.

Central Imphal Defenses

The central defenses of focused on securing the Imphal Plain, a relatively flat area encompassing the town and its vital all-weather airfield northwest of the city center, which functioned as the logistical lifeline for Geoffrey Scoones' IV Corps amid by Japanese forces starting in early March 1944. The 23rd Indian Division, understrength at approximately 12,000 men after prior operations, formed the primary static defense in the plain, augmented by the 254th Indian Tank Brigade equipped with around 50 and Stuart tanks for mobile counterattacks, and ad hoc formations including and local levies. Defensive positions emphasized key ridges and river crossings, such as those along the , where engineers improved roads and bridges to facilitate rapid reinforcement; by 17 March, IV Corps forces held the critical Manipur River bridge against advances by the Japanese 33rd Division along the Tiddim Road. Japanese efforts to penetrate the central perimeter targeted high ground overlooking the airfield, notably the Nungshigum Ridge southeast of , where from 4 to 13 April 1944, elements of the Japanese 214th launched repeated assaults to disrupt air operations and supply drops. Defenders from the 1st Battalion, 9th , supported by artillery and tanks of the 7th Indian Cavalry, repelled these attacks in a series of close-quarters fights, including a notable armored engagement on 13 April involving six British tanks that destroyed Japanese anti-tank guns and infantry positions, preventing the ridge's loss and maintaining airfield functionality. Air superiority enabled continuous resupply via Operation Stamina, with RAF and USAAF transports delivering over 18,824 tons of supplies and flying in reinforcements like the 5th Indian Division's elements by late March, sustaining the defenders despite ground lines severed. The 50th Indian Parachute Brigade, air-dropped into the plain in mid-March, reinforced central positions against probing attacks, while the airfield's dual runways supported Hurricane fighters for , striking Japanese concentrations and . No major Japanese thrust succeeded in overrunning the town or airfield core, as peripheral battles in sectors like Shenam diverted enemy resources; by mid-May, rains and attrition had stalled further central probes, with IV Corps maintaining cohesion through disciplined fire control and limited counteroffensives. This resilience, underpinned by superior and adaptability, ensured Imphal's airfield remained operational throughout the siege, contributing to the overall repulsion of the Japanese offensive by July 1944.

Peripheral Actions in Chin Hills and Sangshak

In the Chin Hills, Japanese forces advanced through the difficult terrain in early to outflank Allied positions, targeting Falam and establishing blocks such as at milestone 105 on the Tiddim- road to sever supply lines to . The Chin Hills Battalion of the Burma Frontier Force, comprising Chins, Gurkhas, and other troops under IV Corps, along with locally raised Chin levies armed initially with muskets and later rifles, conducted extensive patrols north of Kennedy Peak and between the and to contest these moves. These actions delayed Japanese progress amid the rugged landscape, contributing to the attrition of their southern flanking efforts, though the battalion ultimately withdrew with the 17th Indian Division toward before refitting in . To the north, the Battle of Sangshak unfolded from 19 to 26 March 1944, where the 50th Indian Parachute Brigade, numbering around 2,000 men under Hope Thomson, blocked the Japanese 31st Division's Left Raiding Column advancing toward . The brigade included the 152nd Indian Parachute , elements of the 153rd Gurkha Parachute , the 4/5th Mahratta , machine-gun and mortar , and artillery support like the 15th Mountain Battery. Opposing them were approximately 2,200 Japanese troops from the 58th Regiment and other elements of the 15th and 31st Divisions, commanded by Shigesaburo Miyazaki, who encircled the position after initial clashes on 19 March that destroyed 'C' of the 152nd at Point 7378. Intense fighting ensued, with the defenders repelling repeated assaults through 21–25 March, including hand-to-hand combat by the 153rd Gurkha Battalion to recapture positions like the church area on 26 March. Allied casualties totaled 652 to 850 killed, wounded, or captured, with the 152nd Battalion suffering roughly 80% losses and the 153rd around 35%. Japanese losses reached at least 580, nearly half fatalities, with estimates up to 1,000. The brigade broke out in small groups on the night of 26 March under covering fire, abandoning the position to the Japanese. This stand delayed the Japanese thrust by six days, enabling Allied forces to reinforce and secure the northern lifeline to , marking a pivotal peripheral contribution to the campaign's defense.

Stalemate and Attrition

Logistical Breakdowns

The Japanese Fifteenth Army's logistical strategy for , initiated on 8 March 1944 under Lieutenant General , assumed a swift conquest of within three weeks, enabling the capture of Allied supply depots to sustain forces thereafter. This plan neglected contingencies for extended combat, overextending supply lines across over 300 miles of jungle, mountains, and rivers from rear bases like , with initial provisions limited to 14-20 days of rice per division and munitions at only 50% of requirements. Transport relied heavily on pack animals—horses, mules, oxen, and limited elephants—along with manual porterage, as motorized units were scarce (18 companies assigned versus requests for 150) and heavy often abandoned due to impassable trails. By early April 1944, as advances stalled, rations depleted rapidly, forcing troops to scavenge villages, consume pack animals (with significant losses, including nearly 400 of 700 oxen to exhaustion or drowning), and forage roots, grasses, and wild plants, yielding minimal sustenance amid sparse local resources and hostile populations. Supply promises from rear echelons, such as 10 tons daily post-initial phase, went unfulfilled, with rearward logistics crippled by Allied air interdiction reducing rail deliveries to 150 tons monthly and severed communications isolating forward units. The absence of effective aerial resupply, compounded by lost air superiority, contrasted sharply with Allied capabilities and accelerated the collapse. The monsoon onset in late May 1944 transformed trails into quagmires, flooded rivers like the Chindwin, and destroyed improvised bridges, halting all transport and rendering field hospitals resource-starved. These breakdowns precipitated widespread and , , and exhaustion—inflicting non-combat casualties that decimated units; for instance, the 33rd Division suffered 5,000 sick alongside 7,000 combat losses, totaling 70% of its strength, while overall Fifteenth Army attrition reached 53,000 of 84,000 engaged, predominantly from deprivation rather than battle. This logistical implosion eroded combat effectiveness, compelling withdrawal by July 1944 and marking a pivotal failure in Japanese overland offensives.

Monsoon Effects and Supply Crises

The onset of the season in late May 1944 intensified the already precarious logistical situation for Japanese forces encircled around , turning mountain tracks and river crossings into deep mudslides that halted all but minimal porterage. Pack animals perished en masse in the quagmires, while human carriers—often impressed locals or underfed troops—abandoned efforts or succumbed to exhaustion, severing supply lines from Burma that were already stretched over 200 miles of hostile terrain. By early June, Japanese divisions, including the 15th Army's 31st and 33rd, faced critical shortages, with frontline units operating on quarter rations or less, forcing soldiers to for , insects, and even pack animals to stave off . dwindled to the point where fire ceased in many sectors, and medical supplies vanished, leaving wounded untended amid rampant and outbreaks fueled by incessant rains and contaminated water sources. Lieutenant General Renya Mutaguchi's had anticipated a swift capture of before the rains, but the prolonged stalemate exposed the fallacy of living off the land in Manipur's sparse hills, where villages yielded little and Allied scorched-earth tactics denied further sustenance. Commanders like Lieutenant General Kotoku Sato of the 31st Division reported troops "starving and wracked with diseases," with morale collapsing as non-combat attrition outpaced battle losses. Allied defenders, though hampered by mists obscuring drop zones, sustained operations via over 4,000 air sorties delivering 6,000 tons of supplies monthly to Imphal's plain, leveraging radar-directed flights and forward airstrips to mitigate the weather's impact. This asymmetry in sustainment—Japanese ground-bound versus dominance—accelerated the 15th Army's breakdown, culminating in orders for withdrawal by mid-June as floods isolated remnants and claimed thousands more. Overall, supply crises and effects accounted for the bulk of Japanese casualties, exceeding 50,000 from starvation, exhaustion, and illness by July 1944.

Allied Counteroffensives

Northern Flank Operations


The Allied counteroffensive on the northern flank commenced with the relief of Kohima, where elements of the British 2nd Division and the 161st Indian Brigade advanced from Dimapur to break the Japanese siege that had begun on 4 April 1944. Facing the Japanese 31st Division under Lieutenant General Kōtoku Satō, which comprised approximately 12,000 to 15,000 troops securing the northern approach, the relief force overcame a critical roadblock at Zubza in mid-April. On 18 April, the 1/1st Punjab Regiment pierced Japanese lines, enabling the evacuation of wounded and marking the effective end of the siege phase, though fighting persisted.
Under John Grover's command, the 2nd Division, supported by tanks and air resupply from the RAF delivering over 19,000 tons of supplies, cleared key positions on Ridge, including Garrison Hill and the Deputy Commissioner's bungalow area, by 14 May 1944. Japanese resistance involved repeated counterattacks, but supply shortages and terrain hampered their efforts, leading to over 7,000 casualties in the sector alone. The XXXIII Corps, led by Montagu , then coordinated the southward advance along the Imphal- road, employing envelopment tactics to dislodge Japanese rearguards from fortified hills. Allied forces, including units advancing with Lee-Grant tanks, systematically reduced these strongpoints amid conditions. By late June, the northern push linked with southern relief columns from the 5th Indian Division at Milestone 109 (or 110), on 22 June 1944, fully lifting the threat to and forcing the Japanese 31st Division into retreat. This operation resulted in approximately 4,000 Allied casualties in the area, contrasting with severe Japanese losses that left only about 6,000 fit troops from Satō's division. The northern flank success, bolstered by superior logistics and air support, turned the tide, enabling the broader reconquest of Burma.

Southern Flank Pursuits

Following the relief of on 22 June 1944, when elements of XXXIII Corps linked up with IV Corps forces, Lieutenant-General Montagu Stopford's XXXIII Corps focused northward while IV Corps under Lieutenant-General Ronald Christison turned to offensive pursuits on the southern flank to exploit the Japanese collapse. The primary effort targeted the battered remnants of Lieutenant-General Yanagida Masao's 15th Division, which had advanced up the Tiddim Road earlier in the campaign but was now in full retreat amid starvation, disease, and ammunition shortages, having suffered over 50% casualties by mid-1944. The 5th Indian Division, commanded by Major-General Geoffrey Evans and recently airlifted to from , spearheaded the advance down the 150-mile Tiddim Road toward the , relieving the exhausted 17th Indian Division which had borne the brunt of earlier defensive fighting. Supported by elements of the 254th Indian Tank Brigade and close from RAF and USAAF squadrons targeting Japanese columns, the division encountered sporadic actions amid monsoon-swollen terrain and demolished bridges, inflicting further attrition on the Japanese who abandoned heavy equipment and resorted to in desperation. By late July 1944, as the official end of the battle, IV Corps had pushed forward approximately 50 miles south of , disrupting Japanese cohesion and preventing organized regrouping. The pursuit culminated in the capture of Tiddim town on 20 October 1944 by 5th Indian Division troops, after which advances continued sporadically into proper, though slowed by logistical constraints and the onset of the preparations for broader offensives. Japanese losses in this phase exceeded 5,000 from combat, exposure, and supply failure, with the 15th Division effectively annihilated as a fighting force, contributing to the 33rd Army's overall disintegration. Allied casualties remained comparatively low, around 1,000 for the division in the pursuit, underscoring superior mobility and sustainment via .

Indian National Army Engagements

The (INA), operating under the provisional government led by , committed elements of its 1st Division to support the Japanese 15th Army's U-Go offensive during the Battle of Imphal, with the aim of penetrating British defenses in and inciting local uprisings. Approximately 7,000 troops from this division, commanded by Colonel Mohammad Zaman Kiani with headquarters at Chamol, participated in auxiliary roles including skirmishes, reconnaissance, and propaganda efforts alongside Japanese forces. Key INA units involved included the Gandhi Brigade under Lieutenant Colonel Inayat Jan Kiani, the Subhas Brigade under Lieutenant Colonel Shah Nawaz Khan, and the Azad Brigade under Lieutenant Colonel Gulzara Singh. INA Special Groups, comprising trained intelligence and sabotage personnel, crossed into with Japanese troops in mid-March 1944, conducting initial probes and disruptions behind Allied lines. A notable symbolic action occurred on April 14, 1944, when Colonel Shaukat Ali Malik of the Bahadur Group raised the INA tricolour flag in , establishing the first provisional headquarters on Indian soil and declaring the area "liberated" as part of territory. This event, intended to rally Manipuri support, involved minimal combat but highlighted INA's political objectives amid the ongoing . The Gandhi Brigade positioned on the left flank of Yamamoto Force, establishing headquarters at Khanjol by late April 1944 and attempting an unsuccessful assault on Palel airfield to disrupt Allied air operations. By mid-May, the 2nd and 3rd Battalions of the Subhas Brigade advanced to Ukhrul, engaging in defensive actions against British counterattacks in the northern sector. The Azad Brigade, deployed on Yamamoto Force's right flank, set up headquarters at Narum in June 1944, supporting Japanese efforts in the Tiddim road area but facing severe attrition from monsoon rains and supply failures. INA engagements remained largely supportive of Japanese maneuvers, with limited independent operations due to inadequate equipment, training gaps relative to regular armies, and shared logistical breakdowns that halted advances by June. All brigades commenced withdrawal on July 18, 1944, retreating toward alongside Japanese remnants, contributing to the offensive's collapse without achieving territorial gains or widespread defections from Allied Indian troops.

Japanese Withdrawal and Battle's End

Retreat Dynamics

The Japanese 15th Army's retreat from the Imphal area commenced unevenly, with the 31st Division initiating an unauthorized withdrawal from on 31 May 1944 due to acute and exhaustion, defying orders from to persist in attacks. Formal suspension of the Imphal operation was approved on 4 , followed by explicit withdrawal directives on 5 July, as supply lines had collapsed and combat strength had eroded under sustained Allied pressure. This phased disengagement involved the 15th, 31st, and 33rd Divisions, alongside detachments like Yamamoto Force, shifting from offensive postures to survival-oriented movements aimed at reestablishing defenses west of the . Division-specific routes traced arduous paths through mountainous terrain and river valleys back toward Burma: the 15th Division via Ukhrul-Humine-Tamu-Sittaung; the 31st via Humine-Thaungdut-Sittaung; Yamamoto Detachment through Moreh-Mawlaik; and the 33rd via Chikha-Tonzang-Tiddim. These trajectories, largely unmotorable tracks exacerbated by the onset of monsoon rains in late May, forced troops to abandon 70 percent of vehicles, all draft animals, and heavy equipment, compelling infantry to haul limited rations and wounded on foot amid swollen streams and mud-choked paths. Logistical implosion—marked by failed foraging and aerial resupply attempts—induced widespread malnutrition, with units devolving into skeletal formations prone to dysentery and malaria, amplifying non-combat attrition beyond battlefield losses. Allied IV Corps elements, including the 5th, 11th East African, 19th, and 20th Indian Divisions, mounted aggressive pursuits, reopening the Imphal-Kohima road by 20 June and harrying Japanese rearguards with and air strikes, though dense and rearguard actions by depleted units slowed decisive encirclements. The retreat's dynamics reflected cascading failures: initial cohesion frayed into disorganized straggling by mid-July, as deluges halved mobility and culled ranks, with the 15th Army incurring approximately 30,500 casualties by late September 1944 from combat, starvation, and illness during the pullback phase alone. Overall, of the 85,000-strong force committed, around 53,000 perished or went missing, the majority succumbing post-offensive to environmental and supply privations rather than direct engagements, transforming tactical reversal into operational catastrophe.

Final Casualties Assessment

The final assessment of casualties in the Battle of Imphal reveals a stark disparity between Allied and Japanese losses, reflecting the campaign's attritional nature and the Japanese Fifteenth Army's logistical collapse. Allied forces, comprising British, Indian, and troops under XIV Army, sustained approximately 16,000 casualties in total across the Imphal and Kohima fronts from March to July 1944, including killed, wounded, and missing personnel. These figures encompass around 12,500 casualties specifically at , with the remainder at , primarily from combat engagements amid defensive operations. Japanese casualties were far higher, totaling over 53,000 out of an initial force of about 85,000, including dead, missing, wounded, and those incapacitated by disease. Of these, combat deaths numbered around 13,000 to 30,000, but the majority—exceeding 50% and likely up to 80% in some estimates—resulted from , exhaustion, and tropical diseases during the prolonged and subsequent retreat, rather than direct battlefield action. Only about 600 Japanese were captured, underscoring their policy of fighting to the death or succumbing to attrition.
SideTotal CasualtiesKilled/MissingPrimary Causes
Allies~16,000~4,000-6,000Combat wounds, , air strikes
Japanese~53,000+~30,000+ (incl. non-combat), , exhaustion (majority); combat (minority)
These assessments, drawn from British military records and Commonwealth graves data, highlight the Japanese defeat's decisiveness, as non-combat losses amplified the operational failure of Operation U-Go, rendering the Fifteenth Army combat-ineffective by July 1944. Variations in exact figures arise from incomplete Japanese records and the challenges of verifying deaths during retreat, but the overall scale remains consistent across official Allied evaluations.

Decisive Factors Analysis

Japanese Strategic Flaws

The Japanese 15th Army's , launched on March 7, 1944, under Lieutenant General , sought to seize and to sever Allied supply lines and forestall offensives into . The strategy divided the army's three divisions—the 15th, 31st, and 33rd—into separate northern, central, and southern columns advancing over approximately 150 miles of rugged, jungle-covered mountains from the . This dispersal aimed for rapid convergence on within three weeks but exposed the forces to isolation, delays from terrain, and vulnerability without secured flanks or alternative routes. Logistical planning constituted a core strategic deficiency, as troops carried only 15 days' rations with expectations of subsisting on captured Allied stocks or in hostile . Mutaguchi dismissed warnings from subordinates like Kotoku Sato regarding supply inadequacies, presuming Japanese resilience and enemy collapse would suffice. No provisions accounted for the impending , which began in May 1944, transforming paths into quagmires and halting pack animal transport; the absence of robust supply chains or air resupply—ceded to Allied dominance—led to acute shortages, with divisions like the 15th suffering 80% attrition from and by campaign's end. Tactically, the offensive underestimated Allied aerial and capabilities, failing to integrate Japanese air support or anticipate the airlifting of over 1,000 tons of supplies daily to besieged defenders after ground routes closed. Mutaguchi's inflexibility exacerbated these flaws; he rejected retreat proposals amid mounting casualties—exceeding 50,000 by July 1944—and internal command friction, such as Sato's unauthorized pullback from , undermined cohesion. Overconfidence rooted in prior conquests blinded planners to the evolved Allied defenses, comprising battle-hardened Indian and British units, rendering the invasion a protracted attrition battle rather than a swift victory.

Allied Logistical and Tactical Superiority

The Allied forces demonstrated marked logistical superiority during the Battle of Imphal, primarily through mastery of aerial resupply operations that sustained the garrison amid severed ground communications. From April to June 1944, when Japanese advances encircled Imphal and cut road links to the north, Royal Air Force and United States Army Air Forces transport squadrons delivered critical ammunition, fuel, and rations via the plain's multiple airstrips, peaking at over 500 tons per day in May. This air bridge, supported by unchallenged air supremacy, aggregated approximately 19,000 tons of supplies by the campaign's conclusion in July 1944, enabling defensive persistence without starvation or materiel shortages. In contrast, Japanese logistics faltered due to reliance on foot porterage over 100 miles of mountainous terrain, yielding daily rations as low as 1-2 pounds per man and forcing consumption of draft animals by mid-May. Tactically, General William Slim's Fourteenth Army exploited the Imphal plain's topography for defensive depth, integrating barrages, armored counterthrusts, and holds in fortified boxes that inflicted disproportionate casualties on attackers. Allied formations fielded superior —over 100 guns concentrated around key positions—and limited tank squadrons, such as those at Nunshigum Ridge on 13 April 1944, where overwhelmed Japanese assaults lacking equivalent . Slim's emphasis on rigorous jungle training and rapid reinforcement from , facilitated by intact rail and road networks to the north, allowed fluid repositioning of divisions like the 5th and 7th Indian, turning initial into attritional denial. This doctrinal shift from static defense to aggressive local counterattacks, honed after 1942-43 retreats, neutralized Japanese and banzai charges through coordinated firepower, with Allies expending tenfold more shells in sustained bombardments. Overall, these advantages stemmed from pre-war industrial capacity and adaptive command, contrasting Japanese overextension and doctrinal rigidity in maneuver without logistic backing.

Role of Air Operations

Allied air operations proved decisive in the Battle of Imphal, providing logistical sustainment, close support, and air superiority against Japanese forces from March to July 1944. The Royal Air Force (RAF), supplemented by U.S. Army Air Forces (USAAF) elements, maintained dominance over the theater, as Japanese aviation capabilities were minimal following earlier losses in . This control enabled uninterrupted operations, including of enemy supply lines and direct strikes on troop concentrations. During the siege of , when ground supply routes were severed by Japanese advances in mid-March , air transport became the primary lifeline for the besieged IV Corps. RAF squadrons, utilizing Dakota transports and other aircraft, delivered approximately 19,000 tons of supplies and flew in over 12,000 reinforcements by the battle's conclusion, while evacuating around 13,000 casualties. Operations intensified after the closure of the Imphal-Kohima road in April , with daily flights from bases in sustaining the garrison despite monsoon conditions and enemy anti-aircraft fire. Close air support complemented these efforts, with RAF 221 Group's Hurricanes, Vengeances, and Spitfires conducting thousands of sorties to bomb and strafe Japanese positions, , and bridges. These attacks disrupted enemy and morale, particularly during critical phases like the defense of in April-May 1944, where rapid response times from Imphal's airstrips allowed fighters to engage within minutes of ground requests. USAAF contributions included additional transport and bombing missions, enhancing the overall volume of air-delivered munitions. The absence of effective Japanese air opposition stemmed from their strategic prioritization of ground offensives and prior attrition; by 1944, Allied fighters had neutralized most units in the . This asymmetry not only prevented enemy interference with Allied airlifts but also forced Japanese reliance on vulnerable overland supplies, exacerbating their logistical collapse amid the campaign's demands. Air power thus shifted the balance, enabling Allied forces to endure and despite initial .

Aftermath and Strategic Ramifications

Immediate Theater Impacts

The Allied victory at Imphal in July 1944 secured the Plain and northeastern against Japanese invasion, restoring British-Indian control over key supply routes and airfields essential for sustaining operations in the Burma theater. The defeat compelled the Japanese 15th Army to abandon its positions and retreat southward across the , with elements of XXXIII Corps linking up with the 5th Indian Division on 22 June to lift the siege and initiate pursuit. Japanese forces, which had advanced with roughly 84,000 troops under , incurred approximately 53,000 casualties—primarily from , starvation, and —effectively dismantling their offensive capacity in the region and leaving surviving units understrength and demoralized. Allied casualties totaled about 16,500, a figure that permitted William Slim's Fourteenth Army to reorganize swiftly without compromising its defensive posture. This outcome transferred strategic initiative to the Allies, transforming Imphal into a fortified staging area for counteroffensives and enabling air resupply networks to support advances into Burma proper, while Japanese logistical collapse in the theater precluded any immediate reinforcement or regrouping. The 15th Army's attrition not only halted threats to Assam but also exposed Burmese flanks to exploitation, marking the first major reversal of Japanese land dominance in Southeast Asia since 1942.

Broader War Consequences

The Battle of Imphal resulted in irrecoverable losses for the , with over 50,000 troops killed, wounded, or captured out of the 85,000 committed to , primarily due to starvation, disease, and combat attrition during the retreat into Burma. This catastrophe represented one of the worst defeats in Japanese , decimating the 15th Army and the Burma Area Army's offensive capacity, as the survivors were left malnourished and without adequate supplies or reinforcements. The command failure led to the dismissal of Lieutenant General Renya Mutaguchi on July 2, 1944, and subsequent purges, eroding Japanese high command effectiveness in . These losses shifted the strategic initiative to the Allies in the China-Burma-India theater, enabling Slim's Fourteenth to transition from defense to pursuit operations in late 1944. By exploiting Japanese disarray, Allied forces advanced into , recapturing key positions and culminating in the complete reconquest of the territory by May 1945, which severed Japanese supply lines to and isolated their garrisons. Air superiority demonstrated at , including the delivery of 19,000 tons of supplies, further amplified this momentum, allowing sustained offensives that Japanese forces could no longer counter. On a wider scale, Imphal's outcome overextended Japanese resources across the Pacific, as the diversion of troops and to the failed prevented reinforcements elsewhere, contributing to vulnerabilities exploited in subsequent Allied island-hopping campaigns and the atomic bombings. The defeat underscored the limits of Japanese against logistically resilient opponents, accelerating the collapse of their empire in by mid-1945 and facilitating post-war dynamics in British and Burma.

Legacy in Military Historiography

The Battles of and (March–July 1944) are regarded in military as the decisive turning point of the , representing the Imperial Japanese Army's greatest land defeat of , with approximately 53,000 Japanese casualties out of 84,000 committed forces compared to 17,000 Allied losses. This outcome reversed earlier Allied setbacks in , enabling the subsequent reconquest of Burma by Lieutenant General William Slim's Fourteenth Army, primarily composed of Indian and British Commonwealth troops. Historians emphasize Slim's strategic decision to defend in place at Imphal while counterattacking at Kohima, exploiting Japanese overextension across 500 miles of difficult terrain without adequate supply lines. A 2013 British poll identified the battles as the nation's greatest, underscoring their recognition for heroism and tactical innovation amid initial resource shortages. Slim's memoir Defeat into Victory (1956) shaped early postwar narratives, detailing the Fourteenth Army's transformation from a demoralized force—derided by as inefficient—into a cohesive unit through rigorous training, emphasis on junior leadership, and adaptation to jungle conditions. Later works, such as Raymond Callahan's analysis, highlight institutional reforms in the , including better integration of and African units, which countered Japanese infiltration tactics and human-wave assaults. Admiral Lord Mountbatten, Supreme Allied Commander Southeast Asia, praised the engagement as rivaling in heroism and strategic import, a view echoed in official histories that credit dominance for delivering over 600 tons of supplies daily to besieged troops. Japanese accounts, conversely, attribute failure to underestimation of Allied resilience and logistical vulnerabilities exposed by monsoons and terrain, without acknowledging broader doctrinal rigidities. In contemporary , the battles exemplify causal factors in modern : sustained air enabling defense against numerically superior but supply-starved attackers, and the perils of offensive operations in contested environments without secure bases. Analysts draw parallels to scenarios, where U.S. and allied forces might face similar isolation, stressing the need for prepositioned stocks and rapid air mobility over reliance on ground lines of communication. The campaign's initial marginalization in Western narratives—due to Europe's priority—has yielded to renewed focus on non-European theaters, affirming the battles' role in validating multi-domain operations and adaptive command against attrition-based foes.

Controversies and Alternative Viewpoints

Debates on Japanese Intentions

Lieutenant General Renya Mutaguchi, commander of the Japanese 15th Army, conceived Operation U-Go as an ambitious offensive to capture Imphal by April 29, 1944, the Emperor's birthday, using it as a base to advance toward Dimapur and Kohima, thereby severing the Assam-Bengal railway and Ledo Road to disrupt Allied supplies over "The Hump" to China. Mutaguchi anticipated this would annihilate British IV Corps, isolate China from Allied aid, and trigger widespread Indian revolt in coordination with the Indian National Army under Subhas Chandra Bose, achieving a decisive strategic victory in the Greater East Asia War. His planning emphasized rapid "Hiyodorigoe" maneuvers and reliance on seizing British stockpiles at Imphal for sustenance, underestimating the 1,000-kilometer supply line from Burma. Higher echelons, including Burma Area Army commander General Masakazu Kawabe, endorsed more restrained aims focused on defensive consolidation, advancing Japanese lines to the Chindwin River to preempt Allied incursions into Burma while disrupting enemy logistics through limited thrusts at Imphal and Kohima. Kawabe overruled Mutaguchi's directive to prioritize Dimapur on April 6, 1944, deeming it beyond the 15th Army's scope, and advocated suspension by early June amid monsoon rains and supply shortages, shifting to "endurance operations" west of the Chindwin by July 3. The Southern Expeditionary Army Group under General Masami Inada criticized the plan's naivety during pre-operation wargames, favoring political symbolism like hoisting the Azad Hind flag over full-scale invasion. Historians debate whether U-Go represented offensive conquest driven by Mutaguchi's or a pragmatic defensive-diversionary effort constrained by Japan's deteriorating position in , with internal dissent from division commanders like Kotoku Sato—who prioritized survival over annihilation—exposing flaws in unified intent. Mutaguchi's memoirs expressed regret for persisting despite evident failure, highlighting logistical overoptimism as a causal factor in the 15th Army's near-destruction, with approximately 30,000 killed and 25,000 incapacitated by disease. While some analyses emphasize the operation's role in drawing Allied attention from Pacific theaters, others underscore its misalignment with Japan's resource limits, rendering conquest unattainable absent captured supplies that proved insufficient.

INA's Motivations and Effectiveness

The Indian National Army (INA), revived under Subhas Chandra Bose's leadership in 1943, participated in the Imphal campaign primarily to advance Indian independence by exploiting Japanese military advances to expel British forces from northeastern India. Bose viewed the alliance with Japan as a pragmatic necessity, given Axis powers' opposition to British imperialism, and aimed to inspire mass uprisings in India upon crossing the border, framing the INA as liberators rather than mere auxiliaries. This motivation drew from captured Indian POWs' disillusionment with British defeats in Malaya and Singapore, where around 40,000 had surrendered, many joining the INA after rejecting repatriation offers due to perceived racial hierarchies in the British Indian Army. Approximately 7,000 INA troops, organized into the 1st INA Division under Shah Nawaz Khan, supported the Japanese 15th Army's thrust, with units like the 2nd Guerrilla Regiment assigned to and roles ahead of the main advance. Their most notable action occurred on April 14, 1944, when Colonel Shaukat Malik's force captured in , hoisting the Indian tricolour—the first instance of being seized from British control during the campaign—before withdrawing due to supply shortages and Japanese retreats. However, the INA's was severely hampered by inadequate training, reliance on captured British equipment, and logistical failures mirroring those of their Japanese allies, resulting in high estimated at over 1,500 killed or wounded amid the broader Japanese losses of 53,000. Historians assess the INA's military contributions as marginal, with no decisive influence on the campaign's outcome, which ended in Japanese defeat by due to superiority and reinforcements; the INA's propaganda broadcasts and presence aimed to demoralize British Indian troops but failed to trigger widespread defections or revolts. Post-war INA trials in 1945-1946 amplified their symbolic impact, sparking mutinies and accelerating British withdrawal from India in 1947, though this political legacy overshadowed their limited battlefield performance.

Critiques of Allied Command Decisions

Lieutenant General Geoffrey Scoones, commander of IV Corps responsible for the Imphal sector, faced criticism for misinterpreting Japanese intentions in early 1944, attributing the initial incursions to a limited operation rather than a full-scale invasion aimed at capturing . This assessment stemmed from Allied intelligence underestimating the scale of Japanese preparations, including the movement of over 85,000 troops across the starting in early March 1944, due in part to differences in strategic cultures that led British analysts to dismiss the feasibility of a deep Japanese thrust into India without adequate supply lines. As a result, IV Corps' forward positions, such as those held by the 17th Indian Division near Tiddim, were not reinforced promptly, allowing the Japanese 33rd Division to advance rapidly along the Tiddim Road. On 13 March 1944, Scoones ordered the 17th Indian Division to withdraw northward from Tiddim toward , a decision later critiqued as premature and contributing to the loss of key terrain like the Shenam Pass, which facilitated Japanese encirclement efforts around by late March. Although General William Slim, commanding the 14th , publicly assumed responsibility for the order to shield Scoones, the latter acknowledged it as his own in post-war reflections, expressing resentment over the episode amid the corps' subsequent isolation and reliance on . Critics argue this maneuver ceded initiative to the Japanese 15th under Lieutenant General , exacerbating supply strains for IV Corps' approximately 75,000 troops now defending against encirclement. Broader command critiques highlight the vulnerability introduced by positioning IV Corps divisions—17th, 20th, and 23rd Indian—in dispersed forward locations without sufficient reserves, a configuration approved by Slim but reflecting pre-offensive complacency in higher echelons like under Lord Mountbatten. The failure to anticipate Japanese logistics limitations, despite indicating buildup, delayed counter-mobilization, forcing ad hoc airlifts of over 600 tons of supplies daily by April 1944 to sustain the beleaguered forces. These lapses nearly resulted in disaster before tactical adaptations, such as the defense at from 4 April, stabilized the front.

References

Add your contribution
Related Hubs
User Avatar
No comments yet.